Weider 7000 Crosstrainer English Manual
Weider 7000 Crosstrainer Manual
 |
View all Weider 7000 Crosstrainer manuals
Add to My Manuals
Save this manual to your list of manuals |
Weider 7000 Crosstrainer manual content summary:
- Weider 7000 Crosstrainer | English Manual - Page 1
calling our toll free number 1-800.225-0653, Mon. - Fri., 8 am - 5 pm CST. IMPORTANT: Read all safety precautions and instructions in this manual carefully before using this equipment. Save this manual for future reference. WEIDER SPORTING GOODS INC. 21100 ErwIn Strad, Woodland HID., CA. 01967 USA - Weider 7000 Crosstrainer | English Manual - Page 2
of Contents Important Safety Precautions Introduction Assembly Steps Maintenance Tips Conditioning Guide Parts List Ordering Parts 1 1 2 7-25 2 26-27 age of 35 or persons with pre-existing health problems. Read all instructions before using. Weider assumes mv responsibility for personal injury - Weider 7000 Crosstrainer | English Manual - Page 3
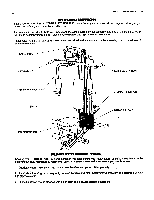
simple assembly, adjustments, and use of the Home Gym. In addition to assembly instructions it also contains maintenance tips and parts information. Please take the time to read all the information contained in this manual and after assembly is completed keep it for future reference. TOP MAST LAT - Weider 7000 Crosstrainer | English Manual - Page 4
PULLEY PLATE STEPPER BRACE TOP FRAME ARM PRESS BRACKET SEAT BRACE SEAT MOUNTING PLATE WEIGHT PLATE 12.5 LB. WEIGHT SELECTOR TUBE GUIDE ROD SEAT BACKREST LEG EXTENSION TUBE PAD BAR 3/4" X 121/2' PAD BAR 3/4" X 1312' FOAM ROLLER 3" X 53/4' FOAM ROLLER 21/4' X 6" ARM PRESS ASSEMBLY - Weider 7000 Crosstrainer | English Manual - Page 5
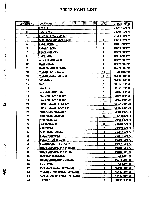
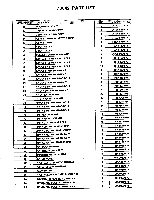
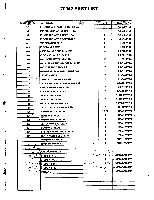
70042 PART LIST DIAGRAM NO 41 42 43 44 45 50 51 52 60 61 62 63 64 65 66 67 68 70 71 72 73 74 78 79 80 81 82 83 84 85 86 87 88 89 90 91 .92 ' 93 94 95 96 PART NAME ., FOAM GRIP 1' X 5" CABLE TRAP BRACKET BENT PULLEY BRACKET AB FLEX ARM CONNECTOR TUBE AB FLEX ARM 41/2' PULLEY 31/2' PULLEY - Weider 7000 Crosstrainer | English Manual - Page 6
5" 116 AB FLEX BACKREST 117 AB FLEX ARM PAD 118 BACK SUPPORT BRACKET 119 1/4" X11/4" MACHINE SCREW 120 WEIGHT PLATE DECAL 121 2 DECAL 125 STEPPERRESISTANCE DECAL 125 VERTICAL AB FLEX DECAL ASSEMBLY MANUAL - -' _ ' TRAINING MANUAL .. .. . _ . .e i.,.*.. hARDWARE SAGS.. -S-TEPS1 - Weider 7000 Crosstrainer | English Manual - Page 7
and that this product reaches the customer in the best possible condition. In the event that you find any problem in workmanship or missing parts please call our toll free product service number: 1-800-225-0653. Weider provides replacement parts at no charge to the customer for one year if it - Weider 7000 Crosstrainer | English Manual - Page 8
PAGE 7 WEIDER SPORTING GOODS STEP I BASE FRAME ASSEMBLY .. . 60 5/16' X 21/4' HEX HEAD BOLT 4 71 5/16" NYLON LOCK NUT 4 95 2" SQUARE PLASTIC COVER CAP 3 X X ti X • 5 w 0 Begin by capping each tubing end of the REAR BASE (2) with 2" SQUARE PLASTIC COVER CAPS (95). Cap the end of the - Weider 7000 Crosstrainer | English Manual - Page 9
PAGE • WEIDER SPORTING GOODS STEP 2 ARM PRESS & SEAT.FRAMR.ASSEMBLY- PART NAME , 60 6/16" X 2 1/4" HEX HEAD BOLT 61 St16" X 21/2' HEX HEAD BOLT 62 5/16X23/4' HEX HEAD BOLT 70 5/16' FLAT WASHER 71 5/16" NYLON LOCK NUT 93 11/2' SQUARE PLASTIC INSERT CAP 97 11/4' SQUARE PLASTIC INSERT CAP Ci - Weider 7000 Crosstrainer | English Manual - Page 10
(70) onto two 5/16' X 2 3/4" HEX HEAD BOLTS (62) and attach the BACK SUPPORT BRACKET (118) and the TOP FRAME (8) to the top of the STEPPER UPRIGHT (3) by bolting down through the Back Support Bracket and then through the Top Frame and finalty through the - Weider 7000 Crosstrainer | English Manual - Page 11
PAGE 10 WEIDER SPORTING GOODS ID Assemble 5/16" FLAT WASHERS (70) onto two 5/16" X 2 3/4" HEX HEAD BOLTS (62) and attach the TOP FRAME (8) to the ARM PRESS FRAME UPRIGHT(4) byboltingdoon.through the top:ofthe Top Frame andthenihroUgh the brackets of the Upright. Fasten with 5/16" NYLON LOCK NUTS ( - Weider 7000 Crosstrainer | English Manual - Page 12
Plate. NOTE: The Weight Selector Tube should Insert completely through the stack of Weight Plates If they are in proper alignment with the welded Guide Rod Bracket on the Base Frame. Ifit does not Insert completely, adjust the Weight Stack positioning untilit does. When the WEIGHT SELECTOR TUBE - Weider 7000 Crosstrainer | English Manual - Page 13
(14) to the top, insert the Rods Into the two remaining holes in the top of the Weight Stack (SEE DETAIL A.) Bolt the GUIDE RODS (14) to the front side of the welded brackets on the TOP FRAME (8) using 5/16" X 1 1/2' HEX HEAD BOLTS (65) through the Rod, then the - Weider 7000 Crosstrainer | English Manual - Page 14
PAGE 13 WEIDER SPORTING GOODS STEP 8 SEAT & BACKREST ASSEMBLY 44:4Viik ii i i: r:: . .n,.." E ire, 81 1/4' X 3/4' MACHINE SCREW 4 82 1/4' X 21/2' MACHINE SCREW 2 86 1/4' FLAT WASHER 2 82 u Attach the SEAT (15) to 86 the SEAT MOUNTING PLATES (11) on the SEAT FRAME (5) using 1/4" X - Weider 7000 Crosstrainer | English Manual - Page 15
STEP 10 ARM PRESS ASSEMBLY PAGE 14 wEIDER SPORTING GOODS PART NAmE ... -"' tily 81 1/4' X 3/4' MACHINE SCREW 4 87 1/4' NYLON LOCK NUT 4 88 #8 SHEET METAL SCREW 2 Lift the Arm Press unit over the end of the TOP FRAME (8) and align on , the flat weldedbracket. 11 Press the two - Weider 7000 Crosstrainer | English Manual - Page 16
PAGE 15 WBDER SPORTING GOODS STEP 11 ARM PRESS HANDLE ASSEMBLY PART NAME € 66 5/16" X 2" HEX HEAD BOLT 70 5/16" FLAT WASHER 71 5/16" NYLON LOCK NUT 93 1112" SQUARE PLASTIC INSERT CAP 99 1" ROUND PLASTIC INSERT CAP 106 9/32" LONG METAL SPACER QTY 2 u Press 1 1/2" SQUARE PLASTIC INSERT CAPS (93) - Weider 7000 Crosstrainer | English Manual - Page 17
STEP 12 PEC-IDECK ARM ASSEMBLY PA OM. 83 1/4" X 11t2" HEX HEAD BOLT 2 87 1/4' NYLON LOCK NUT 2 90 1 1/8" X 21/2" PLASTIC BUSHING 2 112 1 3/16" X 2" WASHER 115 PEC-DECK LOCK PIN 5/16" X 5" 2 2 115 u Slide a 1 1/8" X 2 1/2" 83 PLASTIC BUSHING (90) onto each leg of the ARM PRESS - Weider 7000 Crosstrainer | English Manual - Page 18
PAGE 17 WELDER SPORTING GOODS STEP 13 BRACKET ASSEMBLIES PARTNAME ,• 60 5/16X21/4" HEX HEAD BOLT 63 5/16" X 3" HEX HEAD BOLT 66 6116" X 2" HEX HEAD BOLT 67 5116X31/4" HEX HEAD BOLT 70 5116" FLAT WASHER :::QTY.: , 2 1 2 1 3 Attach the U-BRACKETS (26) to the back of the PEC-DECK ARMS (25) by - Weider 7000 Crosstrainer | English Manual - Page 19
FLAIR END BUSHING 2 108 5/8' I.O. PLASTIC SPACER 2 111 TENSION KNOB 2 124 Press 1 1/4" SQUARE END BUSHINGS (104) Into each STEPPER PEDAL (31) and (32). 108 SUPPORT TUBE Double check to be certain the correct Pedals are on the proper sides of the frame (resistance holes should be to the - Weider 7000 Crosstrainer | English Manual - Page 20
Tube and the Ring Retainer is seated firmly against the Resistance Cylinder. u Cap the ends of the Support Tube with 5/8" ROUND PLASTIC COVER CAPS (94). u Place CYLINDER MOUNTING BRACKET (34) Into one of the resistance setting holes and secure with a 5/16" FLAT WASHER ( - Weider 7000 Crosstrainer | English Manual - Page 21
the welded bracket Secure with a 3/8" X 1 3/4" HEX HEAD BOLT (73) and a 3/8' NYLON LO. .CK NUT (79). • 78 0 Leave some of the Cable draped down between the Guide Rods. This area of . the Cable will be assembled later. The amount of the Cable left draped Is not. critical as • you will be pulling - Weider 7000 Crosstrainer | English Manual - Page 22
PAGE 14 WEIDERSPORTING GOODS Move to the left-hand side of the unit. u Bring the P EC-DEC K CABLE (37) up and set into a 31/2' PULLEY (51). 73 Trap the Cable into the groove of the Pulley using 79 a CABLE TRAP BRACKET (42) (THE 0 CABLE TRAP BRACKET WILL BE POSITIONED AT APPROXIMATELY A - Weider 7000 Crosstrainer | English Manual - Page 23
with a 5/16" X11/2" HEX HEAD BOLT (65) and5/16" NYLON LOCK NUT (71). u Bring the Cable up andmake the dualpulleyassembly that hangs between the Guide Rods. (SEE DETAIL A) El Using two 4 1/2" PULLEYS (50), trap the Weight Selector Cable and the Pec-Deck Cable. Insert two 3/8" X 1 3/4" HEX HEAD BOLTS - Weider 7000 Crosstrainer | English Manual - Page 24
PAGE 23 WEIDER SPORTING GOODS 28 50 52 52 7.9 -e 73 5 71 13 17 71 70 70 8 0 79 79 78 78 66 51 51 74 65 79 DETAIL A 38 42 73 51 o. 88 34 73 43 Cb DETAIL C DETAIL B LEG EXTENSION CABLE When assembling the 'Leg-Extension Cable,. Make sure the end of the cable that Is bolted to - Weider 7000 Crosstrainer | English Manual - Page 25
PAGE 24 WEIDER SPORTING GOODS STEP 17.. LAT BAR.ASSEMBLY •• PART NAME u 99 1' ROUND PLASTIC INSERT CAP Col ii::::::: QTY 2 40 41 99 41 99 El To the LAT BAR (40) press 1" ROUND PLASTIC INSERT CAPS (99) Into each end of the Bar and assemble 1' X 5" FOAM GRIPS (41) to the Bar with the - Weider 7000 Crosstrainer | English Manual - Page 26
. Place a 5/16' FLAT WASHER (70) onto the Bolt and secure with a 5/16" NYLON LOCK NUT (71). Attach the AB FLEX BACKREST (116) to the BACK SUPPORT BRACKET (118) using 1/4' X 3/4" MACHINE SCREWS (81) to bolt through the back of the Bracket and then into the Backrest. 81 Attach the ARM PADS (117 - Weider 7000 Crosstrainer | English Manual - Page 27
exceed mild-demands while falling short of causing breathlessness and fatigue. The proper level of exertion can be determined using the heart rate as a guide. For effective aerobic exercise, the heart rate must be maintained at a level between 70% and 85% of your maximum heart rate. This is your - Weider 7000 Crosstrainer | English Manual - Page 28
EXERCISE FREQUENCY To maintain or improve your condition, you must workout 2-3 times per week following the pattern described above. A day of rest between workouts is recommended. After several months of exercise, the number of workouts can be increased to 4-5 times per week. The key to a successful
-
 1
1 -
 2
2 -
 3
3 -
 4
4 -
 5
5 -
 6
6 -
 7
7 -
8
-
9
-
10
-
11
-
12
-
13
-
14
-
15
-
16
-
17
-
18
-
19
-
20
-
21
-
22
-
23
-
24
-
25
-
26
-
27
-
28
 |
 |
5119:5
17
1
1 E
IIICITOSS
TRAINER
MODEL
70042
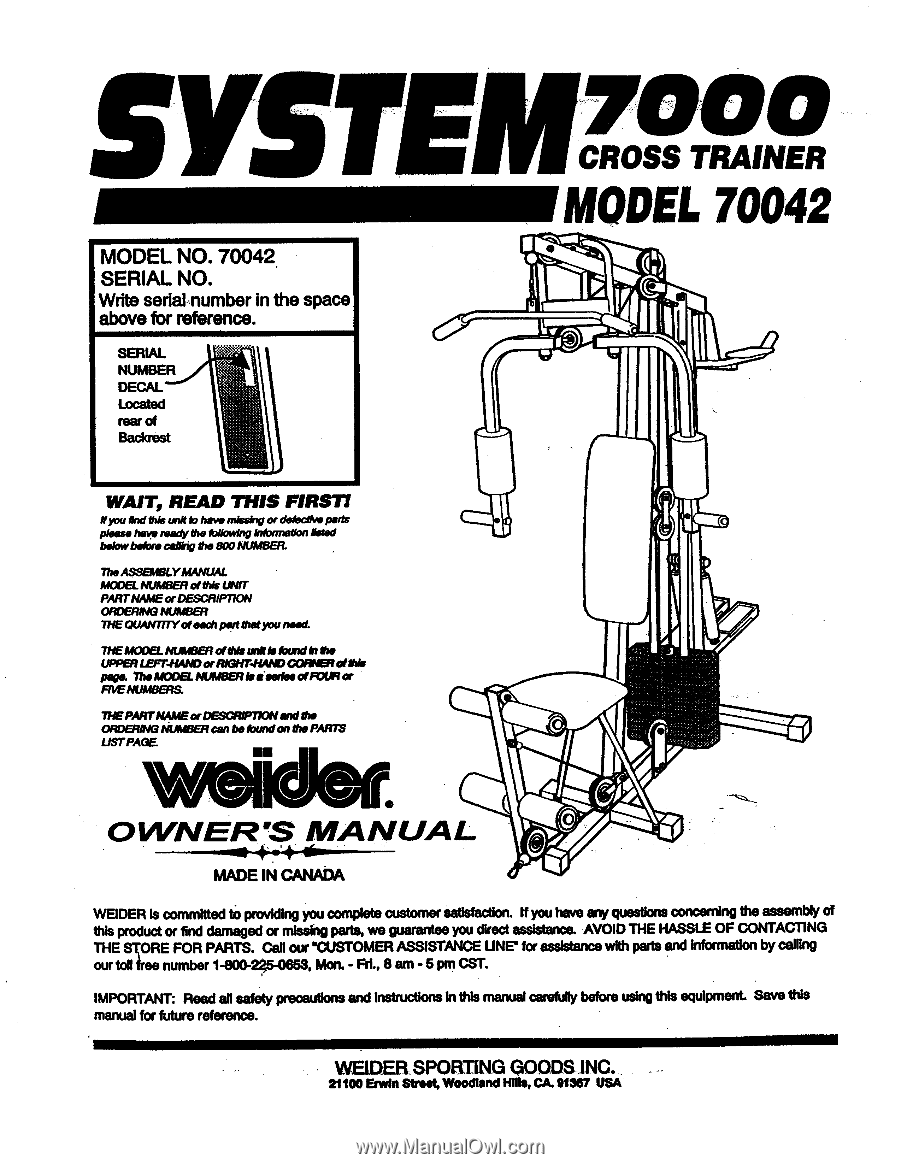
MODEL
NO.
70042
SERIAL
NO.
Write
serial
number
in
the
space
above
for
reference.
SERIAL
NUMBER
DECAL
Located
rear
of
Bacicrest
WAIT,
READ
THIS
FIRST!
you
and
this
unit
b
hams
missing
or
detective
pens
please
hey.
reedy
the
following
Intommtion
listed
below
before
calling
the
trop
NUMBER.
The
ASSEMBLY
MANUAL
MODEL
NUMBER
of
this
UNIT
PART
NAME
or
DESCRIPTION
ORDERING
NUMMI
THE
QUANTITY
of
each
pert
that
you
need.
THE
MODEL
NUMBER
of
Ws
unit
le
th
mdtotIe
UPPER
LEFT
-NAND
or
RIGHPHAPID
CORNER
otitis
peg*.
The
MODEL
NUMBER
le
limbo
of
FOUR
or
FIVE
NUMBIgla
THE
PART
NAME
or
DESCRIPTION
and
the
ORDERING
NUMBER
con
b
is
found
on
the
PARTS
LIST
PAGE
•
OWNER
^
S
MANUAL
MADE
IN
CANADA
I
,•
0
WEIDER
is
committed
to
providing
you
complete
customer
satisfaction.
If
you
have
any
questions
concerning
the
assembly
of
this
product
or
Ind
damaged
or
missing
parts,
we
guarantee
you
direct
assistance.
AVOID
THE
HASSLE
OF
CONTACTING
THE
STORE
FOR
PARTS.
Call
our
'CUSTOMER
ASSISTANCE
UNE'
for
assistance
with
parts
and
information
by
calling
our
toll
free
number
1-800.225-0653,
Mon.
-
Fri.,
8
am
-
5
pm
CST.
IMPORTANT:
Read
all
safety
precautions
and
instructions
in
this
manual
carefully
before
using
this
equipment.
Save
this
manual
for
future
reference.
WEIDER
SPORTING
GOODS
INC.
21100
ErwIn
Strad,
Woodland
HID.,
CA.
01967
USA