Weider Pro 220 Bench English Manual - Page 7
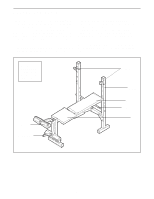
Attach the Front Leg 4 to the Bench Frame 3
 |
View all Weider Pro 220 Bench manuals
Add to My Manuals
Save this manual to your list of manuals |
Page 7 highlights
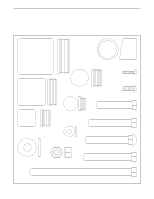
2. Attach the Crossbar (2) to an Upright (1) with two 2 M10 x 68mm Bolts (27), two Joint Plates (11), and two M10 Nylon Locknuts (31). Do not tight- en the Locknuts yet. Repeat this step with the other Upright (1). 1 1 31 11 27 2 3. Press three 50mm Square Inner Caps (16) into 3 the Front Leg (4) and the Stabilizer (5). Attach the Front Leg (4) to the Stabilizer (5) with two M10 x 60mm Carriage Bolts (26) and two M10 Nylon Locknuts (31). Do not tighten the Locknuts yet. 16 31 16 26 4. Attach the Front Leg (4) to the Bench Frame (3) 4 with two M10 x 50mm Bolts (28), two M10 Washers (30), and two M10 Nylon Locknuts (31). Do not tighten the Locknuts yet. Make sure the bolt heads fit inside the hexagon holes in 31 30 the Bench Frame. 30 4 31 5 16 3 28 4 Hexagon Holes 7
-
 1
1 -
 2
2 -
 3
3 -
 4
4 -
 5
5 -
 6
6 -
 7
7 -
 8
8 -
 9
9 -
 10
10 -
 11
11 -
 12
12 -
13
-
14
-
15
-
16
 |
 |
