Weider Pro 318 English Manual
Weider Pro 318 Manual
 |
View all Weider Pro 318 manuals
Add to My Manuals
Save this manual to your list of manuals |
Weider Pro 318 manual content summary:
- Weider Pro 318 | English Manual - Page 1
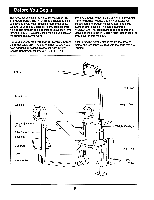
EIDERP Model No. WEBE21580 Serial No. Write the serial number in the space above for reference. o 0 0 318 USER'S MANUAL 0 Serial Number Decal (under seat) kkk QUESTIONS? As a manufacturer, we are committed to providing complete customer satisfaction. If you have questions, or find that there - Weider Pro 318 | English Manual - Page 2
Assembly Adjusting the Weight Bench Exercise Guidelines Ordering is attached to the center of this manual. Remove the Part List/Exploded Drawing before and material, under normal use and service conditions, for a period of ninety WEIDER is a registered trademark of ICON Health & Fitness, Inc. 2 - Weider Pro 318 | English Manual - Page 3
Important Read all instructions in this manUal befOre using the weight bench, Use the weight bench only as described in this manual. It is the responsibility of the owner to ensure that all users of the weight bench are adequately informed of all precautions. The weight bench is intended for - Weider Pro 318 | English Manual - Page 4
has been placed on the weight bench. If the decal is missing, or If It Is not legible, please call our Customer Service Department toll-free at may result in serious injury. • Read user's manual and follow all warnings C and operating instructions prior to use. • Do not allow children on - Weider Pro 318 | English Manual - Page 5
can be found on a decal attached to the PRO 318 Weight Bench (see the front cover of this manual). For your benefit, read this manual carefully before using the WEIDER• PRO 318 Weight Bench. If you have additional questions, please call our Customer Service Department toll-free at 1-800-999-3756 - Weider Pro 318 | English Manual - Page 6
Part Identification Chart - Model No. WEBE21580 R0798A (O) 3/8" Nylon Locknut (28) 3/8" Washer (51) Cod O 1/4" Nylon Locknut (63) 1/4" Washer (54) 5/16" Washer (53) 5/16" Nylon Locknut (40) (O) 5/16" Nylon Jamnut (44) \\\\\\ 6 3/8" x 3 1/2" Bolt (50) 3/8" x 3/4" Bolt (39) t\\\\1] 1/4" x - Weider Pro 318 | English Manual - Page 7
instructed to do otherwise. • For help identifying the small parts, use the PART IDENTIFICATION CHART on page 6 of the manual. • As you assemble the weight bench into the 49 Bench Frame (5). Attach the Bench Frame (5) to the Front Leg (4) with two 5/16" x 2 3/4" Bolts (42), the Support Plate (20) - Weider Pro 318 | English Manual - Page 8
onto each Carriage Bolt. Do not tighten the Nylon Locknuts yet. .o • Insert two 5/16" x 2 3/4" Bolts (42) through the mounting bracket (A) on the Bench Frame (5) and the Left and Right Base (6, 7). Partially tighten a 5/16" Nylon Locknut (40) onto each Bolt. Tighten the 5/16" Nylon Locknuts (40 - Weider Pro 318 | English Manual - Page 9
as shown. Note the holes on one end of the Backrest Supports. Hole 45 9. Lubricate a 5/16" x 5" Bolt (43). Attach the Backrest Supports (13) to the Bench Frame (5) with the Bolt and a 5/16" Nylon Locknut (40). Make sure the Backrest Supports (13) are oriented as shown. Do not overtighten the Nylon - Weider Pro 318 | English Manual - Page 10
and a 1/4" Nylon Locknut (63). Attach the narrow end of the Seat (22) to the Bench Frame (5) with the 1/4" x 2 1/2" Screw (46) and a 1/4" Washer (54). 22 the weight tube (D). Press a 1" Round Inner Cap (30) into the other end of the weight tube (D). Slide the Weight Stop (21) onto the weight tube - Weider Pro 318 | English Manual - Page 11
a 2 1/4" Square Bushing (32) into the top and bottom of the Weight Carriage (2). Press a 1" Round Inner Cap (30) into the end of each weight support tube (F) on the Weight Carriage (2). Slide a Weight Stop (21) onto each support tube (F). Press a 2 1/4" Square Bushing (32) into the top (note the - Weider Pro 318 | English Manual - Page 12
16. Insert a 1 3/4" Square Inner Cap (19) into the top end of the Lat Tower (1). Wrap the free end of the Cable (36) around a Pulley (35). Attach the Pulley to the top end of the Lat Tower (1) with a 3/8" x 3 1/2" Bolt (50), a 3/8" Washer (51) and a 3/8" Nylon Locknut (28). Make sure the Cable is - Weider Pro 318 | English Manual - Page 13
of the 19 6' Barbell (55). Slide the Plastic Sleeve (58) onto the Barbell (55). Make sure all parts are properly tightened before you use the weight bench. The use of all remaining parts will be explained in Adjusting the Weight Bench beginning on the next page. 58 55 30 13 - Weider Pro 318 | English Manual - Page 14
exercise poster to see the correct form for each exercise. Inspect and tighten all parts each time you use the weight bench. Replace any worn parts immediately. The weight bench can be cleaned with a damp cloth and a mild, non-abrasive detergent. Do not use solvents. ADJUSTING THE BACKREST The - Weider Pro 318 | English Manual - Page 15
LAT TOWER For some exercises, the Curl Post (10) must be attached to the weight bench. Insert the Curl Post (10) into the indicated hole in the Front Leg (4). For other exercises, the Lat Tower (1) must be attached to the weight bench. 10 Insert the Lat Tower (1) into the indicated hole in the - Weider Pro 318 | English Manual - Page 16
Clip (16). 36 16 14 ADJUSTING THE BENCH FOR SQUAT EXERCISES To perform squat or toe raise Bench Frame (5) to hold the Backrest in place. Raise the Weight Rests (11) to the highest position and turn them around (see ADJUSTING THE WEIGHT RESTS earlier in this section). The high side of the Weight - Weider Pro 318 | English Manual - Page 17
schedule that is right for you, stick with it. Weight Loss To lose weight, use a low amount of weight and increase the number of repetitions in each set. leave you feeling exhausted. On the exercise poster accompanying this manual, you will find photographs showing the correct form for several - Weider Pro 318 | English Manual - Page 18
record of each workout. The chart on page 18 of this manual can be photocopied and used to schedule and record your workouts. List the date, the exercises performed, the weight plus the numbers of sets and repetitions completed. Record your weight and key body measurements at the end of every month - Weider Pro 318 | English Manual - Page 19
MONDAY Date: / / EXERCISE WEIGHT SETS REPS _ TUESDAY Date: / / WEDNESDAY Date: / / AEROBIC EXERCISE EXERCISE WEIGHT SETS REPS THURSDAY Date: / / FRIDAY Date: / / AEROBIC EXERCISE EXERCISE WEIGHT SETS REPS Make photocopies of this page for scheduling and recording your workouts. 19 - Weider Pro 318 | English Manual - Page 20
Parts To order replacement parts, simply call our Customer Service Department toll-free at 1-800-999-3756, Monday through 2. The NAME of the product (WEIDER* PRO 318 Weight Bench). 3. The SERIAL NUMBER of the product (see the front cover of this manual). 4. The KEY NUMBER and DESCRIPTION of - Weider Pro 318 | English Manual - Page 21
REMOVE THIS PART LIST/EXPLODED DRAWING FROM THE MANUAL SAVE THIS PART LIST/EXPLODED DRAWING FOR FUTURE REFERENCE - Weider Pro 318 | English Manual - Page 22
Exploded Drawing - Model No. WEBE21580 R0798A 35 50 36 50 52 35 51 28 51 28 57 19 21 2 36 32 30 32 42 39 • 30 • 0 21 32 37 1--' 23 15 16 14 15 13 • 18 0 5 17 CD 26 22 31 19 56 49 64- 6 5 2 41 0 38 20 4 18 45 18 0 30 21 17 19 1 45 40 OD 54 46 63 o 58 55 18 - Weider Pro 318 | English Manual - Page 23
26 1 27 1 28 3 29 3 30 7 31 4 32 3 33 2 Description Lat Tower Weight Carriage Leg Lever Front Leg Bench Frame Left Base Right Base Left Upright Right Upright Curl Post Weight Rest Adjustment Tube Backrest Support Lat Bar Handgrip Cable Clip Pad Tube Foam Pad 1 3/4" Square Inner Cap
-
 1
1 -
 2
2 -
 3
3 -
 4
4 -
 5
5 -
 6
6 -
 7
7 -
8
-
9
-
10
-
11
-
12
-
13
-
14
-
15
-
16
-
17
-
18
-
19
-
20
-
21
-
22
-
23
 |
 |

EIDER
P
Model
No.
WEBE21580
Serial
No.
Write
the
serial
number
in
the
space
above
for
reference.
o
0
0
0
Serial
Number
Decal
(under
seat)
QUESTIONS?
As
a
manufacturer,
we
are
com-
mitted
to
providing
complete
customer
satisfaction.
If
you
have
questions,
or
find
that
there
are
missing
or
damaged
parts,
we
will
guarantee
you
complete
sat-
isfaction
through
direct
assis-
tance
from
our
factory.
TO
AVOID
UNNECESSARY
DELAYS,
PLEASE
CALL
DIRECT
TO
OUR
TOLL
-FREE
CUSTOMER
HOT
LINE.
The
trained
techni-
cians
on
our
customer
hot
line
will
provide
immediate
assis-
tance,
free
of
charge
to
you.
CUSTOMER
HOT
LINE:
1-800-999-3756
Mon.
—Fri.,
6
a.m.-6
p.m.
MST
•
ix
*i*
318
;iftpi
S•K
USER'S
MANUAL
IMar
iVMMN
kkk