Weider Pro 318 English Manual - Page 11
<J
 |
View all Weider Pro 318 manuals
Add to My Manuals
Save this manual to your list of manuals |
Page 11 highlights
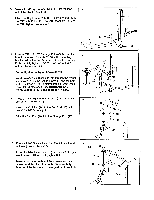
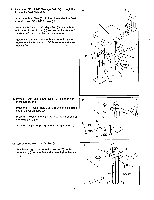
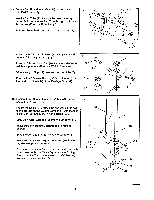
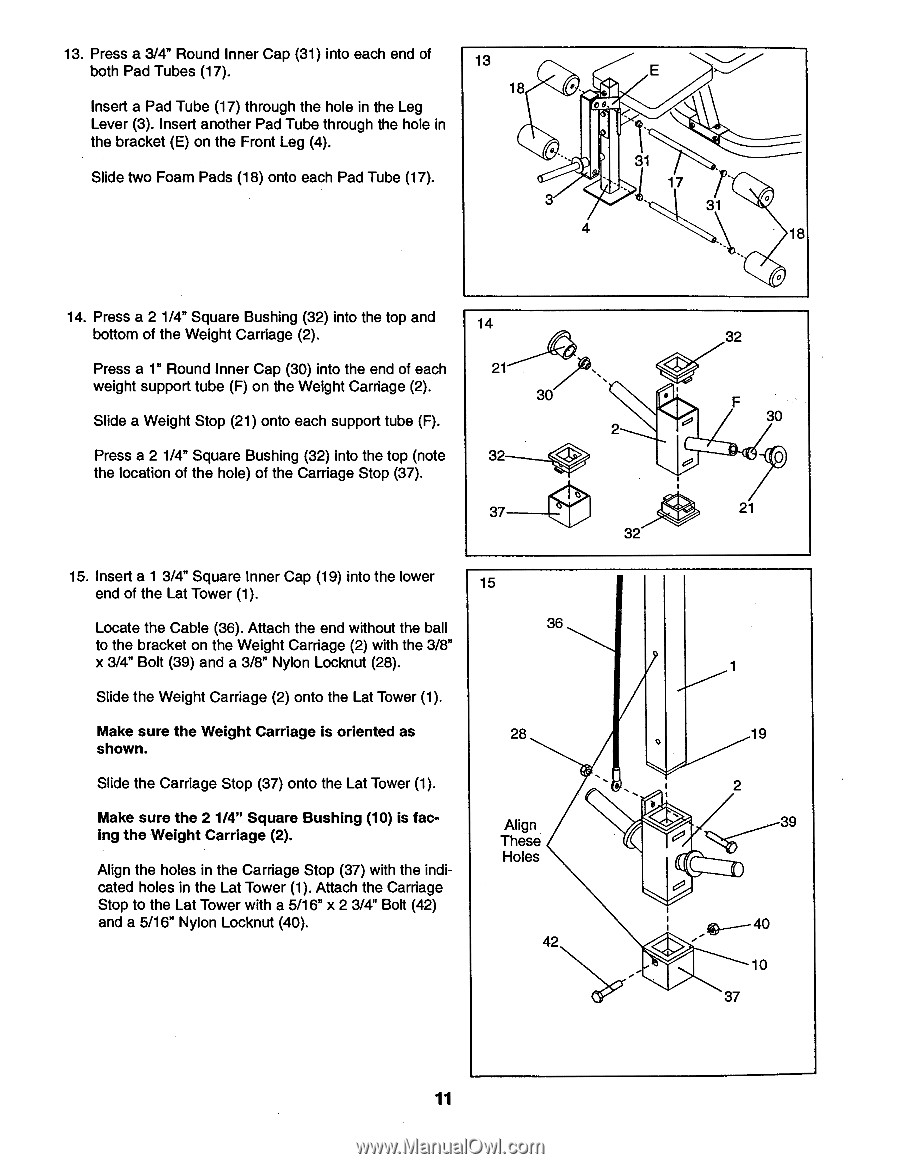
13. Press a 3/4" Round Inner Cap (31) into each end of both Pad Tubes (17). Insert a Pad Tube (17) through the hole in the Leg Lever (3). Insert another Pad Tube through the hole in the bracket (E) on the Front Leg (4). Slide two Foam Pads (18) onto each Pad Tube (17). 13 18 a 3 4 31 17 31 0 18 14. Press a 2 1/4" Square Bushing (32) into the top and bottom of the Weight Carriage (2). Press a 1" Round Inner Cap (30) into the end of each weight support tube (F) on the Weight Carriage (2). Slide a Weight Stop (21) onto each support tube (F). Press a 2 1/4" Square Bushing (32) into the top (note the location of the hole) of the Carriage Stop (37). 14 21 32 30
-
 1
1 -
2
-
3
-
4
-
5
-
 6
6 -
 7
7 -
 8
8 -
 9
9 -
 10
10 -
 11
11 -
 12
12 -
 13
13 -
 14
14 -
 15
15 -
 16
16 -
17
-
18
-
19
-
20
-
21
-
22
-
23
 |
 |
13.
Press
a
3/4"
Round
Inner
Cap
(31)
into
each
end
of
both
Pad
Tubes
(17).
13
Insert
a
Pad
Tube
(17)
through
the
hole
in
the
Leg
Lever
(3).
Insert
another
Pad
Tube
through
the
hole
in
the
bracket
(E)
on
the
Front
Leg
(4).
Slide
two
Foam
Pads
(18)
onto
each
Pad
Tube
(17).
14.
Press
a
2
1/4"
Square
Bushing
(32)
into
the
top
and
bottom
of
the
Weight
Carriage
(2).
Press
a
1"
Round
Inner
Cap
(30)
into
the
end
of
each
weight
support
tube
(F)
on
the
Weight
Carriage
(2).
Slide
a
Weight
Stop
(21)
onto
each
support
tube
(F).
Press
a
2
1/4"
Square
Bushing
(32)
into
the
top
(note
the
location
of
the
hole)
of
the
Carriage
Stop
(37).
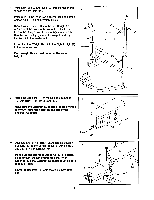
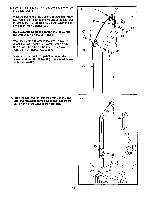
15.
Insert
a
1
3/4"
Square
Inner
Cap
(19)
into
the
lower
end
of
the
Lat
Tower
(1).
Locate
the
Cable
(36).
Attach
the
end
without
the
ball
to
the
bracket
on
the
Weight
Carriage
(2)
with
the
3/8"
x
3/4"
Bolt
(39)
and
a
3/8"
Nylon
Locknut
(28).
Slide
the
Weight
Carriage
(2)
onto
the
Lat
Tower
(1).
Make
sure
the
Weight
Carriage
is
oriented
as
shown.
Slide
the
Carriage
Stop
(37)
onto
the
Lat
Tower
(1).
Make
sure
the
2
1/4"
Square
Bushing
(10)
is
fac-
ing
the
Weight
Carriage
(2).
Align
the
holes
in
the
Carriage
Stop
(37)
with
the
indi-
cated
holes
in
the
Lat
Tower
(1).
Attach
the
Carriage
Stop
to
the
Lat
Tower
with
a
5/16"
x
2
3/4"
Bolt
(42)
and
a
5/16"
Nylon
Locknut
(40).
18
3
a
4
31
17
31
0
0
18
14
21
32
37
30
<J;
2
32
O
32
21
30
15
28
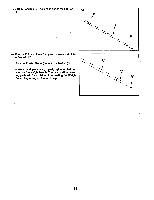
Align
These
Holes
36
42
O
O
1
19
2
40
10
37
39
11