Weider Pro 395 B Bench English Manual
Weider Pro 395 B Bench Manual
 |
View all Weider Pro 395 B Bench manuals
Add to My Manuals
Save this manual to your list of manuals |
Weider Pro 395 B Bench manual content summary:
- Weider Pro 395 B Bench | English Manual - Page 1
space above for reference. WEIGHT BENCH EXERCISER User's Manual Serial Number Decal (under frame) • Assembly • Operation • Maintenance • Part List and Drawing Sears, Roebuck and Co. Hoffman Estates, IL 60179 CAUTION Read all precautions and instructions in this manual before using this equipment - Weider Pro 395 B Bench | English Manual - Page 2
TABLE OF CONTENTS WARNING DECAL PLACEMENT 2 IMPORTANT PRECAUTIONS 3 BEFORE YOU BEGIN 4 PART IDENTIFICATION CHART 5 ASSEMBLY 6 ADJUSTMENT 13 EXERCISE GUIDELINES 16 PART LIST 18 EXPLODED DRAWING 19 ORDERING REPLACEMENT PARTS Back Cover 90-DAY FULL WARRANTY Back Cover WARNING DECAL PLACEMENT - Weider Pro 395 B Bench | English Manual - Page 3
instructions in this manual and all warnings on the weight bench before using the weight bench with pre-existing health problems. 3. The weight bench is not intended for use from the weight bench at all times. 14. Before you use the weight bench, make sure that the backrest support is properly - Weider Pro 395 B Bench | English Manual - Page 4
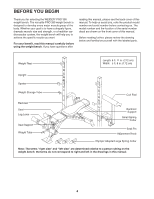
BEFORE YOU BEGIN Thank you for selecting the WEIDER® PRO 395 weight bench. The versatile PRO 395 weight bench is designed to develop every major muscle group of the body. Whether your goal is to have a shapely figure, dramatic muscle size and strength, or a - Weider Pro 395 B Bench | English Manual - Page 5
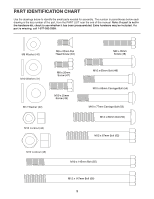
for assembly. The number in parentheses below each drawing is the key number of the part, from the PART LIST near the end of this manual. Note: If a part is not in the hardware kit, check to see whether it has been preassembled. Extra hardware may be included. If a part is - Weider Pro 395 B Bench | English Manual - Page 6
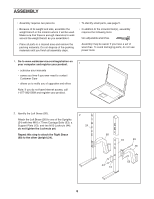
. Make sure that there is enough clearance to walk around the weight bench as you assemble it. • Place all parts in a cleared area 26) to one of the Uprights (24) with two M10 x 77mm Carriage Bolts (53), a Support Plate (13), and two M10 Locknuts (44); do not tighten the Locknuts yet. Repeat this - Weider Pro 395 B Bench | English Manual - Page 7
) to the Left Brace (26) with two M10 x 77mm Carriage Bolts (53), a Support Plate (13), and two M10 Locknuts (44); do not tighten the Locknuts yet. Repeat used in this step and in step 2. 3 53 25 53 26 13 44 4. Attach a Weight Storage Tube (29) to the Left Brace (26) with an M10 x 25mm Screw (49 - Weider Pro 395 B Bench | English Manual - Page 8
with two M8 x 20mm Flat Head Screws (43). 2 43 7. Attach the Stabilizer (3) to the Main Frame (1) with two M10 x 68mm Carriage Bolts (54), a 7 Support Plate (13), and two M10 Locknuts (44). Recessed Holes 13 44 1 3 54 8. Attach the Post Frame (4) to the Main Frame (1) with two M10 x 65mm - Weider Pro 395 B Bench | English Manual - Page 9
an M12 Washer (42) onto the Bolt, and tighten an M12 Locknut (45) onto the Bolt; do not overtighten the Locknut. Then, set the Backrest Support (9) in the desired pair of brackets on the Main Frame (1). See step 9. Tighten the M10 Locknut (44); do not overtighten the Locknut. See step 8. Tighten - Weider Pro 395 B Bench | English Manual - Page 10
12. Orient the Seat (15) as shown. 12 15 Attach the Seat (15) to the Seat Frame (10) with four M8 x 20mm Screws (47); start all of the Screws, and then tighten them. 10 47 47 13. Attach the Backrest (16) to the Backrest Frames (8) with four M8 x 40mm Screws (46) and four 13 M8 Washers (40); - Weider Pro 395 B Bench | English Manual - Page 11
15. Apply a generous amount of the included grease to an M12 x 80mm Bolt (50). 15 Grease Attach the Leg Lever (6) to the Leg Lever Post (5) with the M12 x 80mm Bolt (50) and an M12 Locknut (45); do not overtighten the Locknut; 45 5 6 50 the Leg Lever must pivot easily. 16. Insert the Long - Weider Pro 395 B Bench | English Manual - Page 12
Post (7) onto the post on the Left Brace (26). 17 47 7 26 19. Make sure that all parts are properly tightened before you use the weight bench. Extra parts may be included. The use of all remaining parts will be explained in ADJUSTMENT, beginning on page 13. 12 - Weider Pro 395 B Bench | English Manual - Page 13
weight bench can be adjusted. See the accompanying exercise guide to see the correct form for several exercises. Make sure that all parts are properly tightened each time the weight bench is used. Replace any worn parts immediately. The weight bench the holes in the Seat Support (11) and the hole in - Weider Pro 395 B Bench | English Manual - Page 14
LEG LEVER To use the Leg Lever (6), slide the desired weight plates (not included) onto the weight tube on the Leg Lever. Secure the weight plates with a Small Spring Collar (37). To use Olympic weight plates, slide an Olympic Adapter (23) onto the weight tube, and tighten the Set Screw (57) in the - Weider Pro 395 B Bench | English Manual - Page 15
plates with Small Spring Collars (37). To store Olympic weight plates (not included), slide Olympic Adapters (23) onto the Weight Storage Tubes (29), and tighten the Set Screws (57) in the Olympic Adapters. Secure Olympic weight plates with Large Spring Collars (38). 5 6 60 5 17 26 7 29 37 - Weider Pro 395 B Bench | English Manual - Page 16
the flexibility of your muscles and helps to prevent post-exercise problems. EXERCISE FORM Move through the full range of motion for each minutes after each set. • Toning-Rest for one minute after each set. • Weight Loss-Rest for 30 seconds after each set. STAYING MOTIVATED For motivation, keep a - Weider Pro 395 B Bench | English Manual - Page 17
EXERCISE LOG Make copies of this page, and use the copies to schedule and record your strength and aerobic workouts. Scheduling and recording your workouts will help you to make exercise a regular and enjoyable part of your life. Strength Date: Exercise 1. 2. 3. 4. 5. Lbs. Sets Reps Exercise 6. - Weider Pro 395 B Bench | English Manual - Page 18
Bolt 56 1 M12 x 147mm Bolt 57 3 Set Screw 58 1 Right Weight Rest 59 1 Right Spotter 60 1 Right Brace 61 1 Long Pad Tube 62 2 25mm x 1.5mm Round Cap * - User's Manual * - Exercise Guide * - Grease Packet Note: Specifications are subject to change without notice. For - Weider Pro 395 B Bench | English Manual - Page 19
EXPLODED DRAWING Model No. 831.15965.0 R0915A 15 16 20 18 20 18 20 12 30 18 12 57 23 62 18 61 45 6 30 62 5 47 50 45 42 45 31 42 10 11 30 18 19 20 21 8 4441 32 41 42 31 40 46 47 55 56 40 9 46 13 42 52 4 22 20 44 1 54 3 34 17 7 44 44 14 51 58 59 44 13 23 13 - Weider Pro 395 B Bench | English Manual - Page 20
or workmanship within 90 days of arrange for free repair (or replace- ment if repair proves impossible). This warranty does not apply when the Weight Bench Exerciser is used commercially or for rental purposes. This warranty gives you specific legal rights, and you may also have other rights which
-
 1
1 -
 2
2 -
 3
3 -
 4
4 -
 5
5 -
 6
6 -
 7
7 -
8
-
9
-
10
-
11
-
12
-
13
-
14
-
15
-
16
-
17
-
18
-
19
-
20
 |
 |

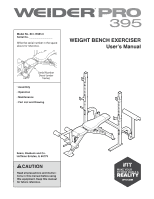
Model No. 831.15965.0
Serial No.
Write the serial number in the space
above for reference.
CAUTION
Read all precautions and instruc-
tions in this manual before using
this equipment. Keep this manual
for future reference.
• Assembly
• Operation
• Maintenance
• Part List and Drawing
Sears, Roebuck and Co.
Hoffman Estates, IL 60179
WEIGHT BENCH EXERCISER
User’s Manual
Serial Number
Decal (under
frame)