Weider Pro 400 Bench English Manual
Weider Pro 400 Bench Manual
 |
View all Weider Pro 400 Bench manuals
Add to My Manuals
Save this manual to your list of manuals |
Weider Pro 400 Bench manual content summary:
- Weider Pro 400 Bench | English Manual - Page 1
. If you have questions, or if there are missing parts, we will guarantee complete satisfaction through direct assistance from our Read all precautions and instructions in this manual before using this equipment. Save this manual for future reference. USERÕS MANUAL Patent Pending Visit our - Weider Pro 400 Bench | English Manual - Page 2
Table of Contents Warning Decal Placement 2 Important Precautions 3 Before You Begin 4 Assembly 5 Adjusting the Weight Rack 7 Exercise Guidelines 8 Part List 10 Exploded Drawing 11 Ordering Replacement Parts Back Cover Limited Warranty Back Cover Warning Decal Placement The decal shown - Weider Pro 400 Bench | English Manual - Page 3
reduce the risk of serious injury, read the following important precautions before using the weight rack. 1. Read all instructions in this manual before using the weight rack. Use the weight rack only as described in this manual. 10. If you feel pain or dizziness at any time while exercising, stop - Weider Pro 400 Bench | English Manual - Page 4
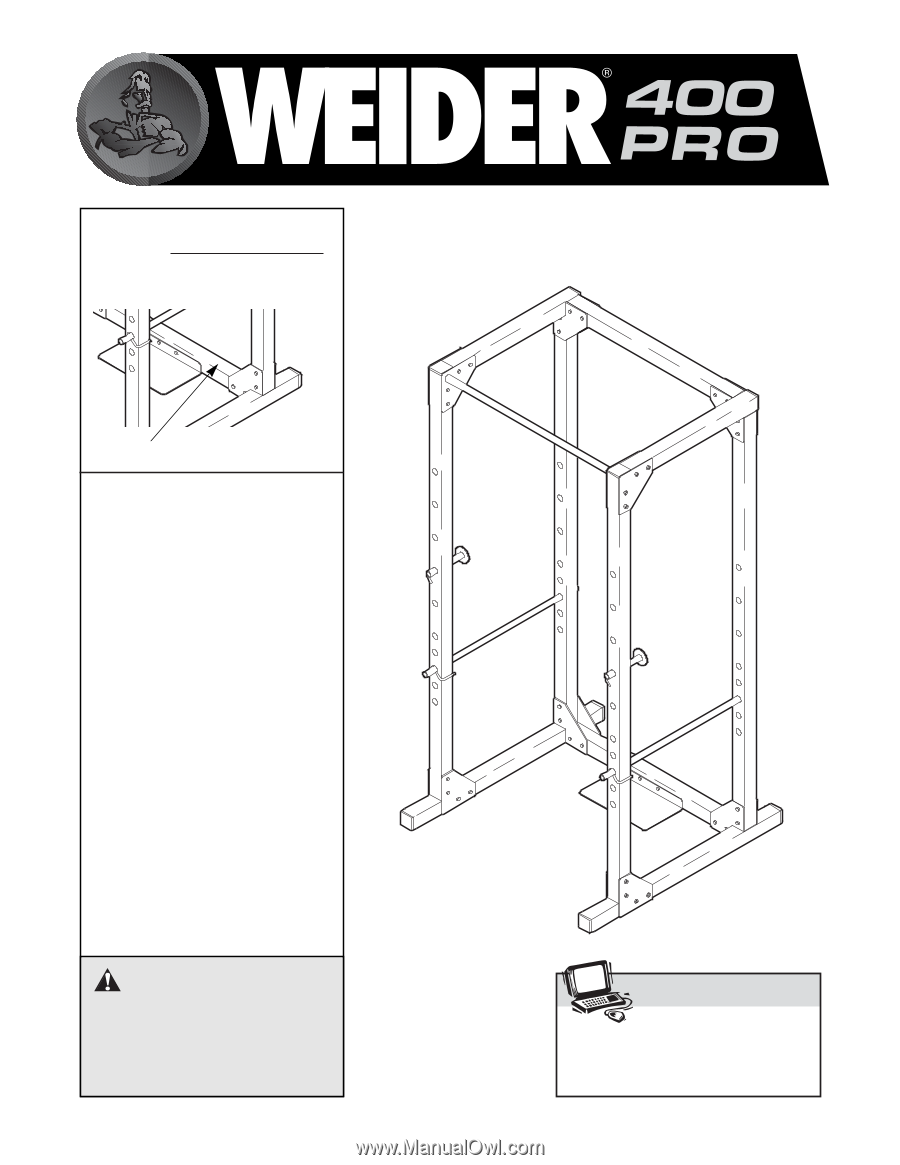
your benefit, read this manual carefully before using the weight rack. If you have additional questions, please call our Customer Service Department Before reading further, please review the drawing below and familiarize yourself with the parts that are labeled. Assembled Dimensions: Height: 81 - Weider Pro 400 Bench | English Manual - Page 5
and remove the packing materials. Do not dispose of the packing materials until assembly is completed. ¥ Tighten all parts as you assemble them, unless instructed to do otherwise. ¥ As you assemble the weight rack, make sure all parts are oriented as shown in the drawings. The following tools (not - Weider Pro 400 Bench | English Manual - Page 6
the Chin-up Bar (13) and two Joint Plates (6) to the Front Uprights (7) using four M10 x 80mm Bolts (4) and four M10 Nylon Locknuts (9). Do not tighten the Nylon Locknuts yet. 5. Press a 60mm Square Inner Cap (14) into the Left Frame (12). Attach the Left Frame to the left Uprights (7, 8) using - Weider Pro 400 Bench | English Manual - Page 7
17). 17 18 17 8. Make sure all parts are properly tightened before you use the weight rack. The use of all remaining parts will be explained in Adjusting 18 the Weight Bench. Adjusting the Weight Bench This section explains how to adjust the weight rack. See the EXERCISE GUIDELINES on page - Weider Pro 400 Bench | English Manual - Page 8
high amounts of weight. Weight Loss To lose weight, use a low amount of weight and increase the 10 minutes of stretching and light exercise to warm up. Warming parts of the body. Exercising in an uncontrolled manner will leave you feeling exhausted. On the exercise poster accompanying this manual - Weider Pro 400 Bench | English Manual - Page 9
the numbers of sets and repetitions completed. Record your weight and key body measurements at the end of every month. Remember, the key to achieving the greatest results is to make exercise a regular and enjoyable part of your everyday life. MUSCLE CHART Trapezius Deltoid Biceps Brachioradials - Weider Pro 400 Bench | English Manual - Page 10
1 Left Frame 13 1 Chin-up Bar 14 8 60mm Square Inner Cap 15 2 M10 x 75mm Bolt 16 2 Weight Rest 17 2 Small Weight Rest 18 2 25mm Round Inner Cap 19 2 M10 Washer # 1 UserÕs Manual # 1 Exercise Chart Note: Ò#Ó indicates a non-illustrated part. Specifications are subject to - Weider Pro 400 Bench | English Manual - Page 11
EXPELxOplDoEdDedDDRrAaWwiInNgGÑÑMMooddeellNNoo..WWEEBBEE1144110000 10 9 14 9 11 4 14 4 9 4 6 4 4 9 4 13 14 4 6 8 7 9 9 4 7 R1000A 9 14 12 9 8 9 4 9 17 4 14 4 9 1 9 9 2 19 9 9 18 6 4 4 19 5 9 14 14 6 4 15 4 4 16 3 6 14 6 9 11 - Weider Pro 400 Bench | English Manual - Page 12
WEIDER¨ PRO 400 weight rack) 3. The SERIAL NUMBER of the product (see the front cover of this manual) 4. The KEY NUMBER and DESCRIPTION of the desired part(s) (see the PART abnormal usage or repairs not provided by an ICON authorized service center, products used for commercial or rental purposes, or
-
 1
1 -
 2
2 -
 3
3 -
 4
4 -
 5
5 -
 6
6 -
 7
7 -
8
-
9
-
10
-
11
-
12
 |
 |
QUESTIONS?
As a manufacturer, we are com-
mitted to providing complete
customer satisfaction. If you
have questions, or if there are
missing parts, we will guarantee
complete satisfaction through
direct assistance from our factory.
TO AVOID UNNECESSARY
DELAYS, PLEASE CALL DIRECT
TO OUR TOLL-FREE CUSTOMER
HOT LINE. The trained techni-
cians on our customer hot line
will provide immediate assis-
tance, free of charge to you.
CUSTOMER HOT LINE:
1-800-999-3756
Mon.—Fri., 6 a.m.—6 p.m. MST
Model No. WEBE14100
Serial No.
Write the serial number in the space
above for reference.
CAUTION
Read all precautions and instruc-
tions in this manual before
using this equipment. Save this
manual for future reference.
Serial Number Decal
USER°S MANUAL
Patent Pending
Visit our website at
www.weiderfitness.com
new products, prizes,
fitness tips, and much more!