Weider Pro Xt75 English Manual
Weider Pro Xt75 Manual
 |
View all Weider Pro Xt75 manuals
Add to My Manuals
Save this manual to your list of manuals |
Weider Pro Xt75 manual content summary:
- Weider Pro Xt75 | English Manual - Page 1
in the space above for reference. Serial Number Decal USER'S MANUAL SEARS, ROEBUCK AND CO., HOFFMAN ESTATES, IL 60179 CAUTION Read all precautions and instructions in this manual before using this equipment. Save this manual for future reference. Visit our website at www.weiderfitness.com new - Weider Pro Xt75 | English Manual - Page 2
FULL 90-DAY WARRANTY Back Cover Note: A PART LIST/EXPLODED DRAWING is attached in the center of this manual. Remove the PART LIST/EXPLODED DRAWING before beginning assembly. WARNING DECAL PLACEMENT The decal shown at the right has been applied to the weight rack. If the decal is missing, or if it - Weider Pro Xt75 | English Manual - Page 3
bind as you are exercising, stop immediately and make sure that the cables are on the pulleys. 13. Always set both weight rests and both weight spotters at the same height. 5. Inspect and tighten all parts each time you use the weight rack. Replace any worn parts immediately. 6. Keep children under - Weider Pro Xt75 | English Manual - Page 4
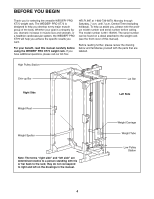
increase in muscle size and strength, or a healthier cardiovascular system, the WEIDER® PRO XT75 will help you achieve the specific results you want. For your benefit, read this manual carefully before using the WEIDER® PRO XT75 weight rack. If you have additional questions, please call our toll - Weider Pro Xt75 | English Manual - Page 5
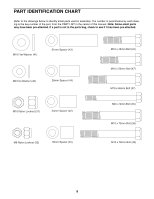
Refer to the drawings below to identify small parts used in assembly. The number in parentheses by each drawing is the key number of the part, from the PART LIST in the center of this manual. Note: Some small parts may have been pre-attached. If a part is not in the parts bag, check to see if it has - Weider Pro Xt75 | English Manual - Page 6
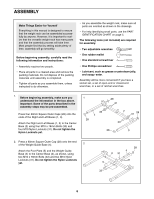
assembly is completed. • Tighten all parts as you assemble them, unless instructed to do otherwise. • As you assemble the weight rack, make sure all parts 3 2. Press a 60mm Square Outer Cap (28) onto the end of the Weight Guide Base (4). 2 Attach the Foot Plate (5) and the Weight Guide Base (4) - Weider Pro Xt75 | English Manual - Page 7
(22) into an adjustment hole in the Uprights. 20 Assemble the Left Weight Spotter (not shown) and Left Weight Rest (not shown) on the left Uprights (7, 8) in the same manner. Make sure both Weight Spotters and both Weight Rests are at the same height. 7 21 22 21 22 21 8 7 3 29 8 7 31 3 6 31 - Weider Pro Xt75 | English Manual - Page 8
(18) over the indicated holes in the Weight Guide Base (4). Hold the 9 Weight Carriage (15) on top of the Weight Bumpers. Insert the two Weight Guides (9) into the Weight Carriage (15), the Weight Bumpers (18), and the Weight Guide Base (4). Attach the Weight Guides using two M8 x 72mm Bolts (35 - Weider Pro Xt75 | English Manual - Page 9
(42), and an M10 Nylon Locknut (31). 31 41 42 15 26 42 41 37 13. Lift the High Cable (26) in the location shown. Attach two Pulleys (25) inside the bracket on the 13 Weight Guide Frame (14) using two M10 x 50mm Bolts (47) and two M10 Nylon Locknuts (31). 9 25 31 26 14 - Weider Pro Xt75 | English Manual - Page 10
the indicated hole in the Weight Guide Base (4). Attach the Low Cable using an M10 x 75mm Bolt (36), two M10 Flat Washers (41), two 28mm Spacers (44), and an M10 Nylon Locknut (31). Route the ball-end of the Low Cable (27) through the bracket on the Center Base (2). Attach a Pulley (25) inside the - Weider Pro Xt75 | English Manual - Page 11
38 30 18. Make sure all parts of the weight rack are properly tightened. In addition, pull each cable a few times to make sure the cables move smoothly over the pulleys. If the cables do not move smoothly, locate and correct the problem. When weights are used, the cables may be damaged if they are - Weider Pro Xt75 | English Manual - Page 12
SETTING UP THE RACK FOR SQUAT EXERCISES Squat exercises should be performed inside the rack (behind the dotted line in the picture). When performing squat exercises, set the Weight Rests (19, 48) and the Weight Spotters (20, 49) at a comfortable height. WARNING: Always move the bench (not included - Weider Pro Xt75 | English Manual - Page 13
Next, attach the Lat Bar (38) to the High Cable (26) or the Low Cable (not shown) with a Cable Clip (23). WARNING: Always disconnect the Lat Bar (38) when performing an exercise that does not require using the Lat Bar. TIGHTENING THE CABLES Woven cable, the type of cable used on the weight rack, can - Weider Pro Xt75 | English Manual - Page 14
requires moving through the full range of motion for each exercise, and moving only the appropriate parts of the body. Exercising in an uncontrolled manner will leave you feeling exhausted. On the exercise guide accompanying this manual you will find photographs showing the correct form for several - Weider Pro Xt75 | English Manual - Page 15
one minute after each set for a toning work- out. • Rest for 30 seconds after each set for a weight loss workout. Plan to spend the first couple of weeks familiarizing yourself with the equipment and learning the proper form for each exercise. COOLING DOWN End each workout with 5 to 10 minutes of - Weider Pro Xt75 | English Manual - Page 16
Right Frame Center Frame Left Frame Chin-up Bar Weight Guide Frame Weight Carriage Carriage Bushing Pulley Plate Weight Bumper Right Weight Rest Right Weight Spotter Square Bushing Adjustment Knob Cable Clip Cable Trap Pulley High Cable Low Cable Key No. Qty. 28 5 29 5 30 2 31 46 32 4 33 - Weider Pro Xt75 | English Manual - Page 17
EXPLODED DRAWING-Model No. WEBE24410 10 31 29 31 33 33 11 31 6 41 33 31 29 33 31 13 33 7 21 12 19 21 22 20 21 6 31 21 48 22 21 21 21 22 21 49 30 23 22 21 21 31 31 6 28 38 50 50 39 30 51 51 29 33 33 8 31 33 7 29 33 31 8 25 25 29 31 31 41 14 31 45 47 45 41 - Weider Pro Xt75 | English Manual - Page 18
number of your WEIDER® PRO XT75 are listed on a decal attached to the frame. See the front cover of this manual to find the location of the decal. All replacement parts are available for immediate purchase or special order when you visit your nearest SEARS Service Center. To request service or to
-
 1
1 -
 2
2 -
 3
3 -
 4
4 -
 5
5 -
 6
6 -
 7
7 -
8
-
9
-
10
-
11
-
12
-
13
-
14
-
15
-
16
-
17
-
18
 |
 |

Model No. 831.153220
Serial No.
Write the serial number in the space
above for reference.
CAUTION
Read all precautions and instruc-
tions in this manual before using
this equipment. Save this manual
for future reference.
Serial Number Decal
USER’S MANUAL
Visit our website at
www.weiderfitness.com
new products, prizes,
fitness tips, and much more!
SEARS, ROEBUCK AND CO.,
HOFFMAN ESTATES, IL 60179