Weslo Cadence 200 Treadmill Uk Manual
Weslo Cadence 200 Treadmill Manual
 |
View all Weslo Cadence 200 Treadmill manuals
Add to My Manuals
Save this manual to your list of manuals |
Weslo Cadence 200 Treadmill manual content summary:
- Weslo Cadence 200 Treadmill | Uk Manual - Page 1
or damaged parts, please call: 08457 089 009 or write: ICON Health & Fitness, Ltd. Customer Service Department Unit 4 Revie Road Industrial Estate Revie Road Beeston Leeds, LS118JG UK email: [email protected] CAUTION Read all precautions and instructions in this manual before using this equipment - Weslo Cadence 200 Treadmill | Uk Manual - Page 2
10 HOW TO FOLD AND MOVE THE TREADMILL 14 TROUBLESHOOTING 16 CONDITIONING GUIDELINES 18 ORDERING REPLACEMENT PARTS Back Cover Note: A PART IDENTIFICATION CHART, an EXPLODED DRAWING, and a PART LIST are attached in the center of this manual. WESLO is a registered trademark of ICON IP, Inc - Weslo Cadence 200 Treadmill | Uk Manual - Page 3
only as an exercise aid in determining heart rate trends in general. 17. Never leave the treadmill unattended while it is running. Always remove the key, unplug the power cord, and move the on/off switch to the off position when the treadmill is not in use. (See the drawing on page 5 for the - Weslo Cadence 200 Treadmill | Uk Manual - Page 4
the motor hood unless instructed to do so by an authorized service representative. Servicing other than the procedures in this manual should be performed by an authorized service representative only. 24. This treadmill is intended for in-home use only. Do not use this treadmill in any commercial - Weslo Cadence 200 Treadmill | Uk Manual - Page 5
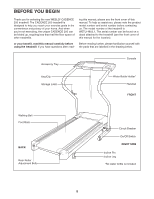
the location). or your benefit, read this manual carefully before Before reading further, please familiarise yourself with using the treadmill. If you have questions after read- the parts that are labelled in the drawing below. Accessory Tray Console Key/Clip Storage Latch Water Bottle Holder - Weslo Cadence 200 Treadmill | Uk Manual - Page 6
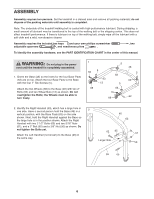
the included hex keys and your own phillips screwdriver adjustable spanners , and needlenose pliers . , two To identify the assembly hardware, see the PART IDENTIFICATION CHART in the center of this manual. WARNING: Do not plug in the power cord until the treadmill is completely assembled - Weslo Cadence 200 Treadmill | Uk Manual - Page 7
3. Hold a Frame Spacer (27) against the right side of the 3 Frame (79) as shown. Insert a 4" Bolt (70) into the indi- cated hole in the Frame Spacer and the Frame. Next, tighten a 3/4" Tek Screw (3) into the Frame Spacer and the Frame. Then, remove the Bolt. Repeat this step on the other side - Weslo Cadence 200 Treadmill | Uk Manual - Page 8
Handrail and the Frame Spacer 59 (27) into the Frame. Do not tighten the Bolt yet. Repeat this step on the left side of the treadmill. 27 79 46 29 66 70 7. Hold the Console Base (52) near the Right Handrail (59) and the Left Handrail (not shown). Insert the Wire - Weslo Cadence 200 Treadmill | Uk Manual - Page 9
the pin. Knob 2 48 Spring Collar Pin 53 Large Hole 12. Make sure that all parts used in assembly are properly tightened before you use the treadmill. Keep the included hex key in a secure place; the hex key is used to adjust the walking belt (see page 17). To protect the floor or carpet, place - Weslo Cadence 200 Treadmill | Uk Manual - Page 10
the power cord is damaged, it must be replaced with a manufacturer-recommended power cord. Socket on treadmill See drawing 1. Plug the indicated end of the adapter cover is secure and the screw has been tightened before using the power cord. 2 Screw Adapter Metal Clips Adapter Cover Pins See - Weslo Cadence 200 Treadmill | Uk Manual - Page 11
, always wear clean athletic shoes while using the treadmill. The first time the treadmill is used, observe the alignment of the walking belt, and center the walking belt if necessary (see page 17). 1 Insert the key fully into the console. See the instructions at the left. 2 Start the walking - Weslo Cadence 200 Treadmill | Uk Manual - Page 12
BURNING on page 18). • Pulse-This mode displays your heart rate when you use the pulse senEsToWr. E14805 (WETL14805) • Scan-This mode displays the To reset the displays, press the Stop button, remove the key, and then reinsert the key. Note: The console can display speed and distance in either - Weslo Cadence 200 Treadmill | Uk Manual - Page 13
the incline, remove the key and unplug the power cord. Next, fold the treadmill to the storage position (see HOW TO FOLD THE TREADMILL FOR STORAGE on page Pin CAUTION: Before using the treadmill, make sure that both incline legs are at the same height. Do not use the treadmill with the incline pins - Weslo Cadence 200 Treadmill | Uk Manual - Page 14
about halfway to the vertical position. 2. Move your right hand to the position shown and hold the treadmill firmly. Using your left hand, pull the lock knob to the left and hold it. Raise the treadmill until the frame passes the lock pin. Slowly release the lock knob. Make sure that the frame - Weslo Cadence 200 Treadmill | Uk Manual - Page 15
HOW TO LOWER THE TREADMILL FOR USE 1. Hold the upper end of the treadmill with your right hand as shown. Using your left hand, pull the lock knob to the left and hold it. Pivot the treadmill down until the frame is past the lock pin. Slowly release the lock knob. 2. Hold the frame firmly with - Weslo Cadence 200 Treadmill | Uk Manual - Page 16
TROUBLESHOOTING Most treadmill problems can be solved by following the steps below. Find the symptom that applies, and follow the steps listed. If further assistance is needed, please see the front cover of this manual. PROBLEM: The power does not turn on SOLUTION: a. Make sure that the power - Weslo Cadence 200 Treadmill | Uk Manual - Page 17
in the power cord, insert the key, and run the treadmill for a few minutes. Repeat until the walking belt is properly tightened. b 2"-3" Rear Roller Bolts c. If the walking belt still slows when walked on, please see the front cover of this manual. PROBLEM: The walking belt is off-center or - Weslo Cadence 200 Treadmill | Uk Manual - Page 18
. For aerobic exercise, adjust the speed and incline of the treadmill until your heart rate is near the highest number in your training zone. WORKOUT GUIDELINES Each workout should include the following three parts: A Warm-up-Start each workout with 5 to 10 minutes of stretching and light exercise - Weslo Cadence 200 Treadmill | Uk Manual - Page 19
SUGGESTED STRETCHES The correct form for several basic stretches is shown at the right. Move slowly as you stretch-never bounce. 1. Toe Touch Stretch Stand with your knees bent slightly and slowly bend forward from 1 your hips. Allow your back and shoulders to relax as you reach down toward - Weslo Cadence 200 Treadmill | Uk Manual - Page 20
Wheel Nut Belt Guide Belt Guide Screw Reed Switch Endcap Motor Bracket 51 1 Key/Clip 52 1 Console Manual Note: "#" indicates a non-illustrated part. Specifications are subject to change without notice. See the back cover of the user's manual for information about ordering replacement parts - Weslo Cadence 200 Treadmill | Uk Manual - Page 21
Frame Bolt (32)-2 Handrail Bolt (20)-4 PART IDENTIFICATION CHART Remove this chart and use it to identify small parts during assembly. Save this chart and the EXPLODED DRAWING/PART LIST for future reference. 1" Tek Screw (5)-4 3/4" Tek Screw (3)-2 3/4" Screw (2)-12 Silver Ground Screw (69)-1 - Weslo Cadence 200 Treadmill | Uk Manual - Page 22
EXPLODED DRAWING-Model No. WETL14805.1 R0905A 1 3 51 52 54 55 6 3 3 22 24 25 78 69 2 80 64 11 43 38 49 4 20 32 7 9 75 45 85 40 3 12 82 81 38 43 11 83 8 14 15 10 45 41 71 25 2 50 22 67 3 76 23 27 19 3 3 16 13 47 21 10 9 77 72 74 26 17 3 18 21 3 18 11 10 3873 - Weslo Cadence 200 Treadmill | Uk Manual - Page 23
• the MODEL NUMBER of the product (WETL14805.1) • the NAME of the product (WESLO CADENCE 200 treadmill) • the SERIAL NUMBER of the product (see the front cover of this manual) • the KEY NUMBER and DESCRIPTION of the desired part(s) (see the PART LIST and the EXPLODED DRAW- ING in the centre of this - Weslo Cadence 200 Treadmill | Uk Manual - Page 24
-
 1
1 -
 2
2 -
 3
3 -
 4
4 -
 5
5 -
 6
6 -
 7
7 -
8
-
9
-
10
-
11
-
12
-
13
-
14
-
15
-
16
-
17
-
18
-
19
-
20
-
21
-
22
-
23
-
24
 |
 |

Model No. WETL14805.1
Serial No.
Write the serial number in the
space above for future reference.
CAUTION
Read all precautions and instruc-
tions in this manual before using
this equipment. Save this manual
for future reference.
USER'S MANUAL
Serial
Number
Decal
QUESTIONS?
As a manufacturer, we are com-
mitted to providing complete
customer satisfaction. If you
have questions, or if there are
missing or damaged parts,
please call:
or write:
ICON Health & Fitness, Ltd.
Customer Service Department
Unit 4
Revie Road Industrial Estate
Revie Road
Beeston
Leeds, LS118JG
UK
email: [email protected]
08457 089 009