Weslo Cadence 200 Instruction Manual - Page 5
Before You Begin, Troubleshooting
 |
View all Weslo Cadence 200 manuals
Add to My Manuals
Save this manual to your list of manuals |
Page 5 highlights
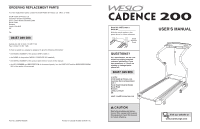
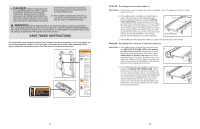
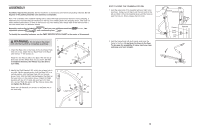
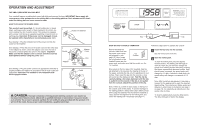
TROUBLESHOOTING Most treadmill problems can be solved by following the steps below. Find the symptom that applies, and follow the steps listed. If further assistance is needed, please see the front cover of this manual. PROBLEM: The power does not turn on SOLUTION: a. Make sure that the power cord is plugged into a properly earthed outlet (see page 10). If an extension cord is needed, use only a 3-conductor, 1mm2 (14-gauge) cord that is no longer than 1.5 m (5 ft.). IMPORTANT: The treadmill is not compatible with GFCI-equipped outlets. b. After the power cord has been plugged in, make sure that the key is fully inserted into the console. c. Check the circuit breaker located on the treadmill near the power cord. If the switch protrudes as shown, the circuit breaker has tripped. To reset the circuit breaker, wait for five minutes and then press the switch back in. d. Check the on/off switch located on the frame near the power cord. The switch must be in the "on" position. c Tripped Reset Tripped d On Position Reset PROBLEM: The power turns off during use SOLUTION: a. Check the circuit breaker located on the treadmill frame near the power cord (see c. above). If the circuit breaker has tripped, wait for five minutes and then press the switch back in. b. Make sure that the power cord is plugged in. If the power cord is plugged in, unplug it, wait for five minutes, and then plug it back in. c. Remove the key from the console. Reinsert the key fully into the console. d. Make sure that the on/off switch is in the "on" position (see d. above). e. If the treadmill still will not run, please see the front cover of this manual. PROBLEM: The displays of the console do not function properly SOLUTION: a. Remove the key from the console and UNPLUG THE POWER CORD. Remove the screws from the hood. Carefully remove the hood. Locate the Reed Switch (76) and the Magnet (47) on the left side of the Pulley (77). Turn the Pulley until the Magnet is aligned with the Reed Switch. Make sure that the gap between the Magnet and the Reed Switch is about 1/8". If necessary, loosen the Screw (3), move the Reed Switch slightly, and then retighten the Screw. Reattach the hood, and run the treadmill for a few minutes to check for a correct speed reading. a 1/8" 3 76 Top View 77 47 16 BEFORE YOU BEGIN Thank you for selecting the new WESLO® CADENCE 200 treadmill. The CADENCE 200 treadmill is designed to help you reach your exercise goals in the convenience and privacy of your home. And when you're not exercising, the unique CADENCE 200 can be folded up, requiring less than half the floor space of other treadmills. ing this manual, please see the front cover of this manual. To help us assist you, please note the product model number and serial number before contacting us. The model number of the treadmill is WETL14805.1. The serial number can be found on a decal attached to the treadmill (see the front cover of this manual for the location). or your benefit, read this manual carefully before Before reading further, please familiarise yourself with using the treadmill. If you have questions after read- the parts that are labelled in the drawing below. Accessory Tray Console Key/Clip Storage Latch Water Bottle Holder* Handrail FRONT Walking Belt Foot Rails BACK Rear Roller Adjustment Bolts Circuit Breaker On/Off Switch RIGHT SIDE Incline Pin Incline Leg *No water bottle is included 5
-
 1
1 -
 2
2 -
 3
3 -
 4
4 -
 5
5 -
 6
6 -
 7
7 -
 8
8 -
 9
9 -
 10
10 -
 11
11 -
12
 |
 |
