Weslo Cadence 630 Uk Manual - Page 3
Danger, Warning, Save These Instructions - treadmill manual
 |
View all Weslo Cadence 630 manuals
Add to My Manuals
Save this manual to your list of manuals |
Page 3 highlights
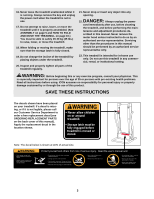
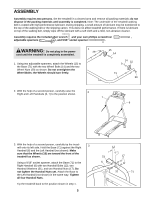
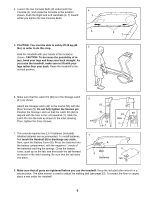
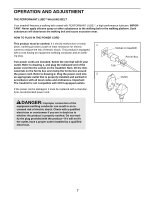
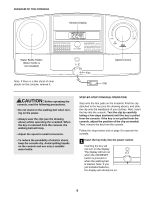
16. Never leave the treadmill unattended whilst it is running. Always remove the key and unplug the power cord when the treadmill is not in use. 17. Do not attempt to raise, lower, or move the treadmill until it is properly assembled. (See ASSEMBLY on page 5 and HOW TO FOLD AND MOVE THE TREADMILL on page 10.) You must be able to safely lift 20 kg (45 lbs.) to raise, lower, or move the treadmill. 18. When folding or moving the treadmill, make sure that the storage latch is fully closed. 19. Do not change the incline of the treadmill by placing objects under the treadmill. 20. Inspect and properly tighten all parts of the treadmill regularly. 21. Never drop or insert any object into any opening. DANGER: 22. Always unplug the power cord immediately after use, before cleaning the treadmill, and before performing the main- tenance and adjustment procedures de- scribed in this manual. Never remove the motor hood unless instructed to do so by an authorised service representative. Servicing other than the procedures in this manual should be performed by an authorised service representative only. 23. This treadmill is intended for in-home use only. Do not use this treadmill in any commercial, rental, or institutional setting. WARNING: Before beginning this or any exercise program, consult your physician. This is especially important for persons over the age of 35 or persons with pre-existing health problems. Read all instructions before using. ICON assumes no responsibility for personal injury or property damage sustained by or through the use of this product. SAVE THESE INSTRUCTIONS The decals shown have been placed on your treadmill. If a decal is missing, or if it is not legible, please call our Customer Service Department to order a free replacement decal (see ORDERING REPLACEMENT PARTS on the back cover of this manual). Apply the replacement decal in the location shown. Note: The decal below is shown at 40% of actual size. 3
-
 1
1 -
 2
2 -
 3
3 -
 4
4 -
 5
5 -
 6
6 -
 7
7 -
 8
8 -
 9
9 -
10
-
11
-
12
-
13
-
14
-
15
-
16
-
17
-
18
-
19
 |
 |