Weslo Cadence 860 English Manual - Page 8
Wne.ri
 |
View all Weslo Cadence 860 manuals
Add to My Manuals
Save this manual to your list of manuals |
Page 8 highlights
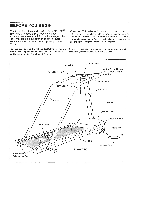
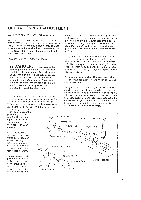
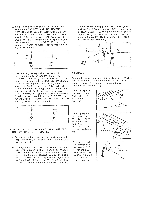
DIAGRAM OF THE CONSOLE i Ids f II r im,arrtm;;;;=.4 4bAr., •,, rurtnt; 0 ---1 6 F6 w ,, t r , A ....A :7.-S7ZYZY IC; 13f 47fs 1 i 44 Note: lf there is a thin sheet orreal plastic oh the face of the console, remove it. Be careful to avoid spilling liquids on the console. a CAUTION: Before operating the con- sole, read the following important precautions. • Do not stand on the walking belt when turning on the power. • Always wear the clip while operating the treadmill. When the SAFEKEY is removed from the console, the power will shut off. • After the speed control is moved, there will be a pause before the walking belt begins to move. • Adjust the speed in small increments until you are familiar with the treadmill. • The training zones marked above the speed control are guidelines only. Read CONDITIONING GUIDELINES on pages 12 and 13 to determine the proper exercise level, • To reduce the risk of electric shock, keep the console dry. Avoid spilling liquid on the console and use only a sealed water bottle. STEP BY STEP CONSOLE OPERATION Make sure that the power cord is properly plugged in. (See HOW TO PLUG IN THE POWER CORD on page 7.,)NeY•l, step onto the toot rails cf the treadmill. Find the clip attached to the SAFEKEY (see the drawing above), and slide the clip onto the waistband of your clothing. Follow the steps below to operate the console: Insert the SAFEKEY fully into the power switch. Note: The three displays will not turn on yet, unless batteries were ?..151 nstalled, 8 Press the Ora/RESET button. Wne.ri the ON/RESET button is pressed, the three displays will turn on. Note: It batteries were just installed, the displays wi€l already he or. I 144 Reset the speed control and start the walking belt. Slide the speed con(); fully to the left, to the "SPEED RESET' position. Next, slide the control to the right until the walking bell begins to move a: slow speed.
-
 1
1 -
2
-
 3
3 -
 4
4 -
 5
5 -
 6
6 -
 7
7 -
 8
8 -
 9
9 -
 10
10 -
 11
11 -
 12
12 -
 13
13 -
14
-
15
-
16
-
17
-
18
-
19
 |
 |
