Weslo Cadence 920 English Manual - Page 8
owd.4
 |
View all Weslo Cadence 920 manuals
Add to My Manuals
Save this manual to your list of manuals |
Page 8 highlights
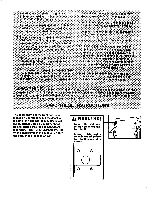
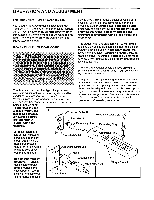
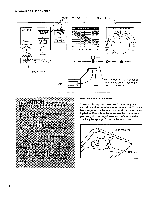
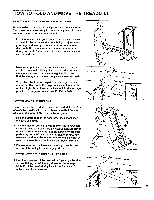
DIAGRAM OF THE CONSOLE Monitor Displays Speed Control WED "zoiwd.1.4.mily THUMB PULSE," TIME PULSE CAL/FAT CAL ler Far baol IA W NING: I • Road ON/RESET die Pulse Sensor DIST i E SP ED 3q BPM HEART RATE TRAINING ZONES V NMOOOO MOM 0 NENM O CI:Sjan Aie Ng O z$W MAN OO 114i'' ;fix::`:ENO OOO :ilAW MEM O O OO • O O CDOOO Aga 20 30 40 50 60 70 80 POWER SPEED RAINING ZONES At' 0)Ck AE O O SLOW RESET O FAST OPERATION ()INSERT KEY 0 RESET SPEED 0 SET SPEED Note: If there is a thin sheet of Clip clear plastic on the face of the Key console, remove it. anso e, raa Betere:b .eretin. towel :re tJry 000,4 11 §.. Ya ,g3 BATTERY INSTALLATION The console requires three "AA" batteries (not included); alkaline batteries are recommended. To install batteries, open the battery cover as shown in the drawing below. Press three batteries into the battery compartment, with the negative (-) ends of the batteries touching the springs. Close the battery cover. Battery Cover Batteries yrtj O4.0:At Miekk.: 8
-
 1
1 -
2
-
 3
3 -
 4
4 -
 5
5 -
 6
6 -
 7
7 -
 8
8 -
 9
9 -
 10
10 -
 11
11 -
 12
12 -
 13
13 -
14
-
15
-
16
-
17
-
18
-
19
 |
 |
