Weslo Cadence Ex16 Treadmill English Manual - Page 8
Caution
 |
View all Weslo Cadence Ex16 Treadmill manuals
Add to My Manuals
Save this manual to your list of manuals |
Page 8 highlights
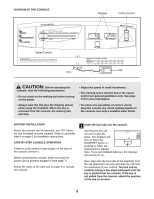
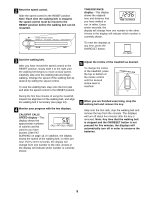
DIAGRAM OF THE CONSOLE Displays Incline Control Speed Control Clip Key CAUTION: Before operating the console, read the following precautions. • Do not stand on the walking belt when turning on the power. • Always wear the clip (see the drawing above) while using the treadmill. When the key is removed from the console, the walking belt will stop. • Adjust the speed in small increments. • The training zones marked above the speed control are general guidelines only. See page 14 for more information. • To reduce the possibility of electric shock, keep the console dry. Avoid spilling liquids on the console. Use only a sealable water bottle. BATTERY INSTALLATION Before the console can be operated, two "AA" batteries (not included) must be installed. Refer to assembly step 6 on page 6 for installation instructions. STEP-BY-STEP CONSOLE OPERATION If there is a thin sheet of clear plastic on the face of the console, remove it. Before operating the console, make sure that the power cord is properly plugged in (see page 7). Follow the steps at the right and on page 9 to operate the console. 1 Insert the key fully into the console. Inserting the key will not turn on the displays. The displays will turn on when the ON/RESET button is pressed or when the walking belt is started. Note: If you just installed batteries, the displays will already be on. Next, step onto the foot rails of the treadmill. Find the clip attached to the key and slide the clip onto the waistband of your clothes. Test the clip by carefully taking a few steps backward until the key is pulled from the console. If the key is not pulled from the console, adjust the position of the clip as needed. 8
-
 1
1 -
2
-
 3
3 -
 4
4 -
 5
5 -
 6
6 -
 7
7 -
 8
8 -
 9
9 -
 10
10 -
 11
11 -
 12
12 -
 13
13 -
14
-
15
-
16
-
17
-
18
-
19
 |
 |
