Weslo Cadence J3.8 Treadmill User Manual
Weslo Cadence J3.8 Treadmill Manual
 |
View all Weslo Cadence J3.8 Treadmill manuals
Add to My Manuals
Save this manual to your list of manuals |
Weslo Cadence J3.8 Treadmill manual content summary:
- Weslo Cadence J3.8 Treadmill | User Manual - Page 1
, or if parts are damaged or missing, PLEASE CONTACT OUR CUSTOMER SERVICE DEPARTMENT DIRECTLY. CALL TOLL-FREE: 1-888-936-4266 Mon.-Fri., 8:00 until 17:00 EST (excluding holidays) OR E-MAIL US: [email protected] CAUTION Read all precautions and instructions in this manual before using - Weslo Cadence J3.8 Treadmill | User Manual - Page 2
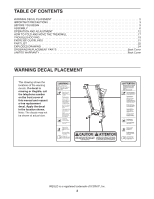
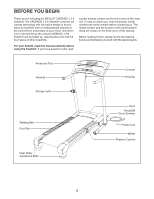
MOVE THE TREADMILL 17 TROUBLESHOOTING 19 EXERCISE GUIDELINES 21 PART LIST 22 EXPLODED DRAWING 24 ORDERING REPLACEMENT PARTS Back Cover cover of this manual and request a free replacement decal. Apply the decal in the location shown. Note: The decals may not be shown at actual size. WESLO is a - Weslo Cadence J3.8 Treadmill | User Manual - Page 3
. (See TROUBLESHOOTING on page 19 if the treadmill is not working properly.) 9. Never allow more than one person on the treadmill at a time. 10. Wear appropriate exercise clothes when using the treadmill. Do not wear loose clothes that could become caught in the treadmill. Athletic support clothes - Weslo Cadence J3.8 Treadmill | User Manual - Page 4
procedures de- scribed in this manual. Never remove the motor hood unless instructed to do so by an authorized service representative. Servicing other than the procedures in this manual should be performed by an authorized service representative only. 27. The treadmill is intended for in-home - Weslo Cadence J3.8 Treadmill | User Manual - Page 5
when youʼre not exercising, the unique CADENCE J 3.8 treadmill can be folded up, requiring less than half the floor space of other treadmills. For your benefit, read this manual carefully before using the treadmill. If you have questions after read- ing this manual, please see the front cover of - Weslo Cadence J3.8 Treadmill | User Manual - Page 6
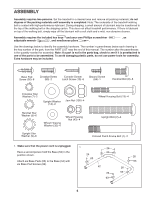
of the walking belt or the shipping carton. This does not affect treadmill performance. If there is lubricant on top of the walking belt, part, from the PART LIST near the end of this manual. The number after the parentheses is the quantity needed for assembly. Note: If a part is not in the parts - Weslo Cadence J3.8 Treadmill | User Manual - Page 7
Housing Nuts (43). 3 32 45 43 13 32 45 13 52 32 43 32 4. Position the Base (52) as close to the front of the treadmill as possible, as shown. 4 See the upper inset drawing. Wrap the wire tie in the Right Upright (54) around the end of the Wire Harness - Weslo Cadence J3.8 Treadmill | User Manual - Page 8
5. See the left inset drawing. Identify the two Frame Spacers (11). Open the included packet 5 of grease, and apply grease to both sides of both Frame Spacers. Then, identify the outer side of each Frame Spacer. Hold a Frame Spacer (11) between the Right Upright (54) and the Lift Frame (23), - Weslo Cadence J3.8 Treadmill | User Manual - Page 9
7. Set the Console (91) face-down on a soft sur- 7 face to avoid scratching the Console. Hold the Console Right Handrail (33), which has a large hole in the location shown, near the Console. Next, insert the console wire and tie into the hole Wire 85 Tie Bracket 7 10 in the side of the - Weslo Cadence J3.8 Treadmill | User Manual - Page 10
Ground Screw (84). 52 5 8 5 53 8 Ground Wire Hole 39 84 11. See the lower drawing. Position the Uprights 11 (53, 54) so that the treadmill Frame (51) is cen- tered between the Uprights. Firmly tighten the two Colored Patch Frame Bolts (1) and the four Upright Bolts (2) (only one side is - Weslo Cadence J3.8 Treadmill | User Manual - Page 11
). Then, tighten the knob onto the pin. 12 48 Knob 10 Large Hole 53 Spring Collar Pin 13. Make sure that all parts are properly tightened before you use the treadmill. Keep the included hex keys in a secure place. The large hex key is used to adjust the walking belt (see page - Weslo Cadence J3.8 Treadmill | User Manual - Page 12
minimum surge dissipation of 450 joules. The surge suppressor must be electrically rated for 120 volts AC and 15 amps. There must be a in damage to the control system of the treadmill. If the control system is damaged, the walking belt may change speed, accelerate or stop unexpectedly, which may - Weslo Cadence J3.8 Treadmill | User Manual - Page 13
exercise feedback. You can even measure your heart rate using the built-in pulse sensor. The console also offers four speed programs. Each program automatically controls the speed of the treadmill as it guides you through an effective workout. IMPORTANT: If there is a sheet of clear plastic - Weslo Cadence J3.8 Treadmill | User Manual - Page 14
Select the manual mode. When the key is inserted, the manual mode will be selected. If you have selected a speed program, reselect the manual mode by Start button or the Speed increase button. 4 Change the incline of the treadmill as desired. To change the incline of the treadmill, press the Incline - Weslo Cadence J3.8 Treadmill | User Manual - Page 15
the upper display. Press the Speed increase button to change the still while measuring your heart rate. When you are finished exercising treadmill to the lowest setting. The incline must be at the lowest setting when you fold the treadmill to the storage position, or you may damage the treadmill - Weslo Cadence J3.8 Treadmill | User Manual - Page 16
the speed setting that is programmed for the first period of the program. Hold the handrails and begin walking. 4 Change the incline of the treadmill as desired. See step 4 on page 14. 5 Follow your progress with the track and the displays. See step 5 on pages 14 and 15. 6 Measure your heart rate - Weslo Cadence J3.8 Treadmill | User Manual - Page 17
that the catch is resting against the latch pin. To protect the floor or carpet from damage, place a mat under the treadmill. Keep the treadmill out of direct sunlight. Do not leave the treadmill in the storage position in temperatures above 85° F (30° C). Frame Latch Pin Latch Knob Catch HOW TO - Weslo Cadence J3.8 Treadmill | User Manual - Page 18
USE 1. Hold the upper end of the treadmill with your right hand as shown. Using your left hand, pull the latch knob to the left and hold it. Next, lower the frame until - Weslo Cadence J3.8 Treadmill | User Manual - Page 19
TROUBLESHOOTING Most treadmill problems can be solved by following the steps below. Find the symptom that applies, and follow the steps listed. If further assistance is needed, please see the front cover of this manual. PROBLEM: The power does not turn on SOLUTION: a. Make sure that the power - Weslo Cadence J3.8 Treadmill | User Manual - Page 20
in the power cord, insert the key, and run the treadmill for a few minutes. Repeat until the walking belt is properly tightened. b 2-3 in. Rear Roller Bolts c. If the walking belt still slows when walked on, see the front cover of this manual. PROBLEM: The walking belt is off-center or slips when - Weslo Cadence J3.8 Treadmill | User Manual - Page 21
problems. The pulse sensor is not a medical device. Various factors may affect the accuracy of heart rate rate as a guide to find the proper intensity level. The chart below shows recommended heart rates your heart rate is near the highest number in your training zone. WORKOUT GUIDELINES Warming up - Weslo Cadence J3.8 Treadmill | User Manual - Page 22
Model No. WCTL34308.0 R0608A To locate the parts listed below, see the EXPLODED DRAWING near the end of this manual. Key No. Qty. Description Key No. Screw 26 6 Base Pad Screw 27 2 Walking Platform Bolt 28 4 Belt Guide Screw 29 2 Rear Roller Adjustment Bolt 30 2 Motor Bolt 31 1 - Weslo Cadence J3.8 Treadmill | User Manual - Page 23
102 6 103 2 104 1 Description Incline Motor Nut, Lower Belt Guide 5 mm Hex Key Frame Endcap Releasable Tie Rear Foot, Right Filter Wire 4" Blue Wire, 2F 6" Red Wire, M/F 4" White Wire, M/F Userʼs Manual *These parts are not illustrated. Specifications are subject to change without notice. 23 - Weslo Cadence J3.8 Treadmill | User Manual - Page 24
EXPLODED DRAWING A-Model No. WCTL34308.0 R0608A 24 75 27 21 42 60 36 29 95 25 89 3 46 25 67 44 83 21 16 11 41 19 62 101 41 31 25 56 10 64 93 28 50 25 71 19 41 25 101 78 4 68 41 6 25 76 11 19 44 75 27 19 21 42 86 51 104 10 28 50 78 44 16 93 74 55 36 95 61 44 - Weslo Cadence J3.8 Treadmill | User Manual - Page 25
EXPLODED DRAWING B-Model No. WCTL34308.0 R0608A 47 47 47 65 58 82 2 72 100 40 23 92 30 34 38 59 79 2 44 38 34 21 42 42 21 57 20 66 20 37 20 98 21 106 87 90 21 99 49 25 - Weslo Cadence J3.8 Treadmill | User Manual - Page 26
EXPLODED DRAWING C-Model No. WCTL34308.0 77 77 88 R0608A 10 10 10 33 10 7 85 102 22 10 10 102 10 5 8 8 10 7 85 102 39 77 5 8 5 77 5 8 24 48 10 3 4 80 53 54 1 11 9 14 2 2 11 52 103 13 32 32 43 43 35 49 9 63 105 26 39 63 69 45 63 70 16 26 69 63 84 26 13 - Weslo Cadence J3.8 Treadmill | User Manual - Page 27
EXPLODED DRAWING D-Model No. WCTL34308.0 R0608A 91 15 12 4 4 4 4 4 4 4 73 4 4 4 27 - Weslo Cadence J3.8 Treadmill | User Manual - Page 28
part(s) (see the PART LIST and EXPLODED DRAWING near the end of this manual) LIMITED WARRANTY ICON OF CANADA, INC. (ICON) warrants this product to be free from defects in workmanship and material, under normal use and service usage or repairs not provided by an ICON authorized service center;
-
 1
1 -
 2
2 -
 3
3 -
 4
4 -
 5
5 -
 6
6 -
 7
7 -
8
-
9
-
10
-
11
-
12
-
13
-
14
-
15
-
16
-
17
-
18
-
19
-
20
-
21
-
22
-
23
-
24
-
25
-
26
-
27
-
28
 |
 |
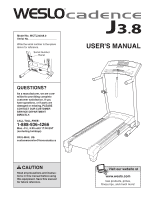
USER'S MANUAL
Model No. WCTL34308.0
Serial No.
CAUTION
Read all precautions and instruc-
tions in this manual before using
this equipment. Save this manual
for future reference.
Visit our website at
www.weslo.com
new products, prizes,
fitness tips, and much more!
QUESTIONS?
As a manufacturer, we are com-
mitted to providing complete
customer satisfaction. If you
have questions, or if parts are
damaged or missing, PLEASE
CONTACT OUR CUSTOMER
SERVICE DEPARTMENT
DIRECTLY.
CALL TOLL-FREE:
1-888-936-4266
Mon.–Fri., 8:00 until 17:00 EST
(excluding holidays)
OR E-MAIL US:
Serial Number
Decal
Write the serial number in the space
above for reference.