Weslo Cadence Lx25 Treadmill English Manual - Page 6
tightening
 |
View all Weslo Cadence Lx25 Treadmill manuals
Add to My Manuals
Save this manual to your list of manuals |
Page 6 highlights
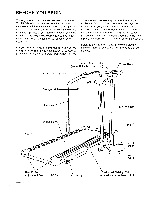
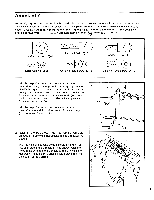
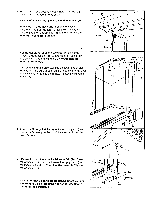
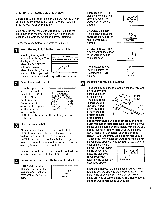
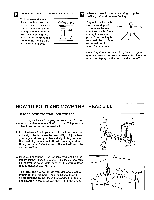
3. With the help of a second person, hold the Console (11) near the right Upright (14) as shown. Insert the Wire Harness (26) into the Right Upright (14). Route the Wire Harness (26) through the notch in the bracket on the right Handrail (2) as shown. Insert the bracket into the right Upright (14). Make sure that the Wire Harness is not pinched. 4. Set the Handrails (2) on the Uprights (14) as shown. Thread a Handrail Bolt (15) with a Handrail Washer (16) into each Upright and Handrail. Do not tighten the Handrail Bolts yet. Tighten a Handrail Screw (32) into the lower end of each Handrail (2). Be sure to push on the heads of the Handrail Screws while tightening them. Next, tighten the Handrail Bolts (15). 3 11 Bracket 26 -0 14 4 .. 4-46.- 11 15 14 2 2 • 16 15 14 32 5. Attach the Storage Latch (12) to the left Upright (14) with two Latch Screws (13). Be careful not to overtighten the 5 Latch Screws. 14 6. Remove the backing from the Adhesive Clip (74). Press the Adhesive Clip onto the base of the Uprights (14) in 6 the indicated location. Press the Allen Wrench (73) into the Adhesive Clip. 7. Make sure that all parts are tightened before you use the treadmill. To protect the floor or carpet, place a 6 mat under the treadmill. 32 N7
-
 1
1 -
 2
2 -
 3
3 -
 4
4 -
 5
5 -
 6
6 -
 7
7 -
 8
8 -
 9
9 -
 10
10 -
 11
11 -
 12
12 -
13
-
14
-
15
-
16
-
17
-
18
-
19
 |
 |
