Weslo Cadence Lx45 English Manual
Weslo Cadence Lx45 Manual
 |
View all Weslo Cadence Lx45 manuals
Add to My Manuals
Save this manual to your list of manuals |
Weslo Cadence Lx45 manual content summary:
- Weslo Cadence Lx45 | English Manual - Page 1
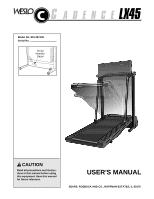
® Model No. 831.297100 Serial No. Serial Number Decal CAUTION Read all precautions and instructions in this manual before using this equipment. Save this manual for future reference. USER'S MANUAL SEARS, ROEBUCK AND CO., HOFFMAN ESTATES, IL 60179 - Weslo Cadence Lx45 | English Manual - Page 2
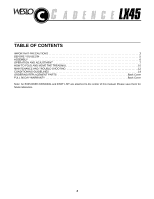
7 HOW TO FOLD AND MOVE THE TREADMILL 10 MAINTENANCE AND TROUBLE-SHOOTING 12 CONDITIONING GUIDELINES 14 ORDERING REPLACEMENT PARTS Back Cover FULL 90 DAY WARRANTY Back Cover Note: An EXPLODED DRAWING and PART LIST are attached to the center of this manual. Please save them for future reference - Weslo Cadence Lx45 | English Manual - Page 3
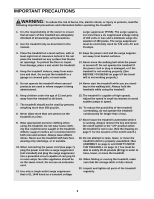
is not working properly.) 5. Do not operate the treadmill where aerosol products are used or where oxygen is being administered. 14. Never start the treadmill while you are standing on the walking belt. Always hold the handrails while using the treadmill. 6. Keep children under the age of 12 and - Weslo Cadence Lx45 | English Manual - Page 4
maintenance and adjustment procedures described in this manual. Never remove the motor hood unless instructed to do so by an authorized service representa- tive. Servicing other than the procedures in this manual should be performed by an authorized service representative only. 23. This treadmill - Weslo Cadence Lx45 | English Manual - Page 5
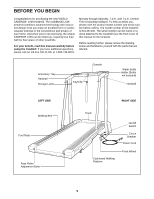
cover of this manual for the location). Before reading further, please review the drawing below and familiarize yourself with the parts that are labeled. Accessory Tray Handrail Storage Latch Console Key/Clip Water Bottle Holder (Bottle not included) Handrail LEFT SIDE Walking Belt Foot Rails - Weslo Cadence Lx45 | English Manual - Page 6
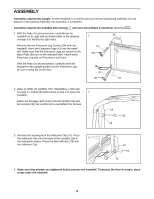
36 34 2. Refer to HOW TO LOWER THE TREADMILL FOR USE on page 11. Follow the instructions in step 2 to lower the 2 treadmill. Attach the Storage Latch (12) to the left 4. Make sure that all parts are tightened before you use the treadmill. To protect the floor or carpet, place a mat under the - Weslo Cadence Lx45 | English Manual - Page 7
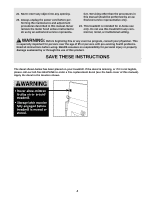
serviceman if you are in doubt as to whether the product is properly grounded. Do not modify the plug provided with the product-if it will not fit the outlet, have a proper outlet installed by a qualified electrician. Your treadmill, like any other type of sophisticated electronic equipment, can be - Weslo Cadence Lx45 | English Manual - Page 8
POWER CORD on page 7). • Do not stand on the walking belt when turning on the power. • Always wear the clip (see the drawing above) while operating the treadmill. Next, step onto the foot rails of the treadmill. Find the clip attached to the key (see the drawing above), and slide the clip onto the - Weslo Cadence Lx45 | English Manual - Page 9
will flash start the walking belt, follow the instructions below. and a number will appear in the display. This number If the manual mode is selected: SPEED v button repeatedly to change the Change the incline of the treadmill, if desired. maximum speed setting. If the maximum speed setting is - Weslo Cadence Lx45 | English Manual - Page 10
of fat calories). Every seven When the manual seconds, the display will change from one key from the con- This display shows sole. Store the key the speed of the in a secure place. In walking belt raise, lower, or move the treadmill. 1. Hold the treadmill with your hands in the locations - Weslo Cadence Lx45 | English Manual - Page 11
catch. 1. Hold the handrails and place one foot on the base as shown. 2. Tilt the treadmill back until it rolls freely on the front wheels. Carefully move the treadmill to the desired location. Never move the treadmill without tipping it back, or the base pads may come off. To reduce the risk of - Weslo Cadence Lx45 | English Manual - Page 12
MAINTENANCE AND TROUBLE-SHOOTING Most treadmill problems can be solved by following the simple steps below. If further assistance is needed, call our toll-free HELPLINE at 1-800-736-6879, Monday through Saturday, 7 a.m. until 7 p.m. Central Time (excluding holidays). PROBLEM: The power does not - Weslo Cadence Lx45 | English Manual - Page 13
insert the key and run the treadmill for a few minutes. Repeat until the walking belt is properly tightened. b 3"-4" Rear Roller Adjustment Bolts c. If the walking belt still slows when walked on, please call our toll-free HELPLINE. PROBLEM: The walking belt is off-center when walked on SOLUTION - Weslo Cadence Lx45 | English Manual - Page 14
individuals with pre-existing health problems. prolonged periods of time speed and incline of the treadmill until your heart rate is your cardiovascular system, the key to achieving the desired heart rate as a guide. The chart below shows should include the following three parts: To find the proper - Weslo Cadence Lx45 | English Manual - Page 15
SUGGESTED STRETCHES The correct form for several basic stretches is shown at the right. Move slowly as you stretch-never bounce. 1. Toe Touch Stretch Stand with your knees bent slightly and slowly bend forward from your hips. Allow your back and shoulders to relax as you reach down toward your - Weslo Cadence Lx45 | English Manual - Page 16
Spacer Isolator Belly Pan Fastener Choke Motor Locknut Belt Guide Belly Pan Releasable Tie Cable Tie Clamp Motor Belly Pan Key No. Qty. 55 4 56 4 57 Screw Latch Catch Walking Platform Walking Belt Front Roller Adjustment Ground Wire User's Manual * Includes all parts shown in the box # These - Weslo Cadence Lx45 | English Manual - Page 17
EXPLODED DRAWING-Model No. 831.297100 R0198A 1 92 93 96 35 16 17 8 35 9 14 3 93 94 6 15 55 55 32 4 55 7 2 91 8 3 22 22 89 8 35 35 63 22 8 63 10 7 78 35 30 5 35 46 77 75 62 74 90 5 73 76 62 31 72 47 64 22 65 11* 61 12 30 41 16 92 18 19* 20 21 16 37 36 38 - Weslo Cadence Lx45 | English Manual - Page 18
the following information: • The NAME OF THE PRODUCT (WESLO CADENCE® LX45 treadmill) • The MODEL NUMBER OF THE PRODUCT (831.297100) • The KEY NUMBER AND DESCRIPTION OF THE PART (see the EXPLODED DRAWING and PART LIST included in this manual) REPLACEMENT PARTS If parts become worn and need to be
-
 1
1 -
 2
2 -
 3
3 -
 4
4 -
 5
5 -
 6
6 -
 7
7 -
8
-
9
-
10
-
11
-
12
-
13
-
14
-
15
-
16
-
17
-
18
 |
 |

USER'S MANUAL
®
Serial
Number
Decal
Model No. 831.297100
Serial No.
CAUTION
Read all precautions and instruc-
tions in this manual before using
this equipment. Save this manual
for future reference.
SEARS, ROEBUCK AND CO., HOFFMAN ESTATES, IL 60179