Weslo Momentum 620 Elliptical English Manual - Page 6
IMPORTANT: If the Console has
 |
View all Weslo Momentum 620 Elliptical manuals
Add to My Manuals
Save this manual to your list of manuals |
Page 6 highlights
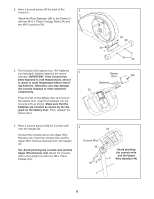
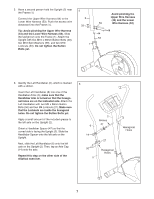
2. Have a second person lift the back of the 2 Frame (1). Attach the Rear Stabilizer (28) to the Frame (1) with two M10 x 75mm Carriage Bolts (34) and two M10 Locknuts (33). 33 1 33 28 34 3. The Console (23) requires four "AA" batteries (not included); alkaline batteries are recom- 3 mended. IMPORTANT: If the Console has Battery Door Tab been exposed to cold temperatures, allow it to warm to room temperature before insert- Batteries ing batteries. Otherwise, you may damage the console displays or other electronic 23 components. Press the tab on the battery door and remove the battery door. Insert four batteries into the Console (23) as shown. Make sure that the batteries are oriented as shown by the diagram on the battery door. Then, reattach the battery door. 4. Have a second person hold the Console (23) near the Upright (2). Connect the console wire to the Upper Wire Harness (44). Insert the console wire and the Upper Wire Harness downward into the Upright (2). Tip: Avoid pinching the console wire and the Upper Wire Harness (44). Attach the Console (23) to the Upright (2) with four M6 x 18mm Screws (43). 4 Console Wire 44 43 23 Avoid pinching the console wire and the Upper 2 Wire Harness (44) 6
-
 1
1 -
 2
2 -
 3
3 -
 4
4 -
 5
5 -
 6
6 -
 7
7 -
 8
8 -
 9
9 -
 10
10 -
 11
11 -
 12
12 -
13
-
14
-
15
-
16
 |
 |
