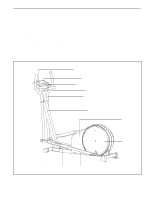
Weslo Momentum 700 English Manual - Page 8
M6 x 16mm Button Screws 54 and two M6 Nylon
 |
View all Weslo Momentum 700 manuals
Add to My Manuals
Save this manual to your list of manuals |
Page 8 highlights
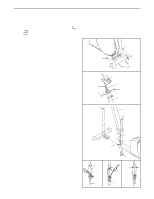
7. Attach the T-handle (10) to the Upright (3) with two 7 M6 x 16mm Button Screws (54) and two M6 Nylon Locknuts (55). 54 3 8. Make sure that there are four Pedal Arm Bushings (11) in each Pedal Arm (12). Identify the Left Pedal (31), which has an "L" molded into its bottom surface. Attach the Left Pedal to one of the Pedal Arms (12) using three M4 x 19mm Flange Screws (9). 8 11 Attach the Right Pedal (not shown) in the same way. 9 63 10 63 55 31 12 11 9. Apply a thin film of grease to the left Handlebar (8) and the Crank Arm (59) in the indicated locations. Slide a Nylon Spacer (39) onto the Handlebar (8) and a Pedal Arm Spacer (41) onto the Crank Arm (59). Next, slide the Pedal Arm (12) with the Left Pedal (31) onto the Handlebar and the Crank Arm. Secure the Pedal Arm by tapping one 3/4" Axle Cap (43) onto the Handlebar and another one onto the Crank Arm. Attach the other Pedal Arm (not shown) to the right side of the elliptical in the same way. 9 8 Grease 39 43 31 12 43 10. The Console (6) requires two "AA" batteries (not included). Alkaline batteries are recommended. 10 To install batteries, first locate the battery clip under the Console (6). Insert two batteries into the battery clip as shown. Make sure that the batteries are turned so the negative ends of the batteries (marked "-") are touching the springs in the battery clip. Grease 59 41 6 Batteries Battery Clip 11. Make sure that all parts of the elliptical are properly tightened. Place a mat under the elliptical to protect the floor or carpet from damage. 8
-
 1
1 -
2
-
 3
3 -
 4
4 -
 5
5 -
 6
6 -
 7
7 -
 8
8 -
 9
9 -
 10
10 -
 11
11 -
 12
12 -
 13
13 -
14
-
15
-
16
 |
 |
