Western Digital TV Live Hub Media Center Instruction Manual - Page 22
Step 3 - Connecting to Your Network, Wired Network Connection
 |
View all Western Digital TV Live Hub Media Center manuals
Add to My Manuals
Save this manual to your list of manuals |
Page 22 highlights
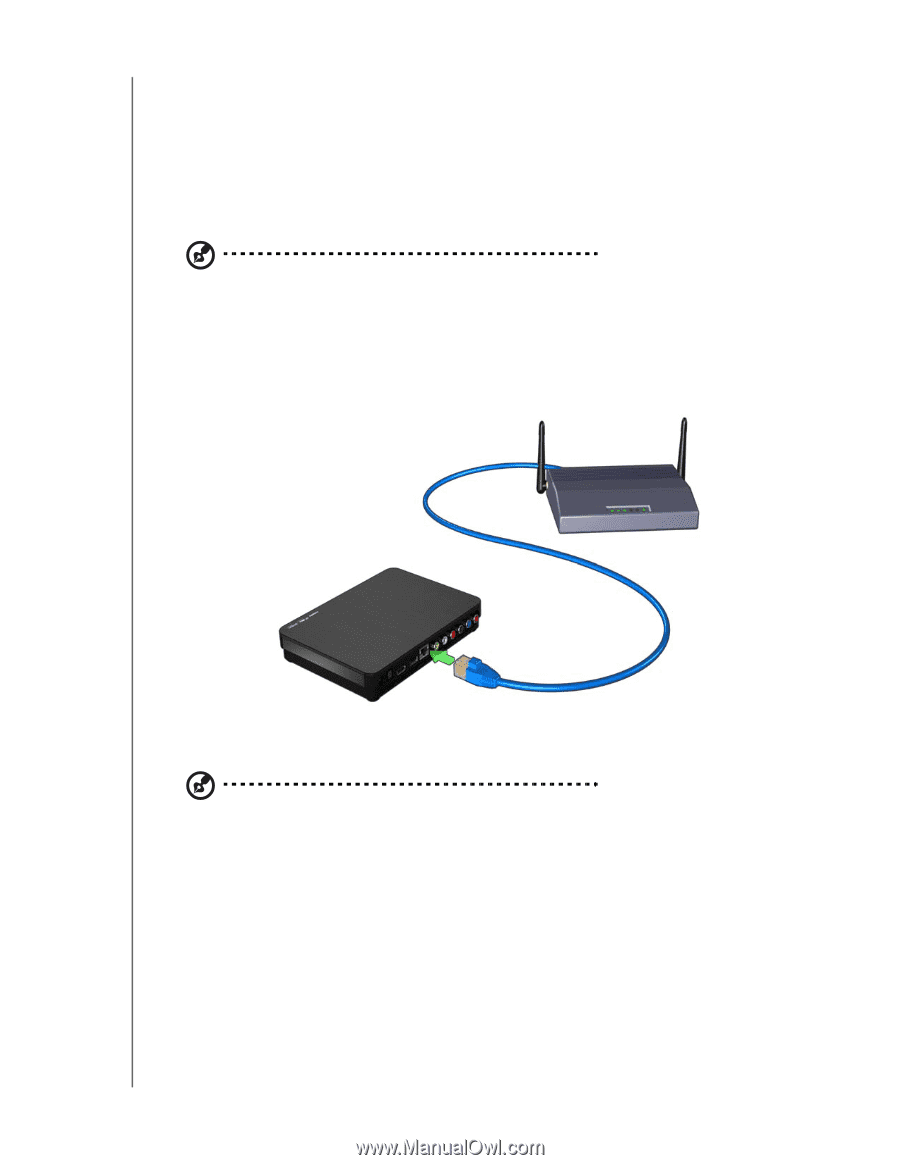
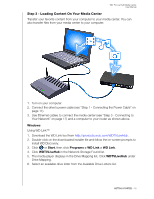
WD TV Live Hub Media Center User Manual Step 3 - Connecting to Your Network The media center can be connected to your home network so you can transfer files back and forth from your networked computer to the media center, and access the Internet and network storage using a wired or wireless network connection. A network connection provides access to locally stored and online media content. Wired Network Connection Note: Ethernet cables are sold separately. To connect to a home network using an Ethernet cable: 1. Plug an Ethernet cable (sold separately) into the Ethernet connector on the media center. 2. Plug the opposite end of the Ethernet cable directly into a LAN port on a router or network switch (if using a switch, it must be connected to the router). For detailed instructions on wireless and wired network connections and configuration, see "Network Setup" on page 69. Note: Streaming over Wi-Fi™ may be unstable due to various reasons such as a weak network connection, signal strength, variable speeds, or other environmental factors. You can create instant high-speed, wired network connections and gain fast, reliable access to the Internet without running wires all over your house using WD Livewire™ powerline AV network kit (sold separately). For more information, visit http://products.wdc.com/WDLivewire. Transferring Media Content From Your Computer See "Step 3 - Loading Content On Your Media Center" on page 18. Accessing Media Content From the Network See "Network Services" on page 76. Accessing Online Media Content See "Internet Services" on page 93. GETTING STARTED - 17
-
 1
1 -
2
-
3
-
4
-
5
-
6
-
7
-
8
-
9
-
10
-
11
-
12
-
13
-
14
-
15
-
16
-
 17
17 -
 18
18 -
 19
19 -
 20
20 -
 21
21 -
 22
22 -
 23
23 -
 24
24 -
 25
25 -
 26
26 -
 27
27 -
28
-
29
-
30
-
31
-
32
-
33
-
34
-
35
-
36
-
37
-
38
-
39
-
40
-
41
-
42
-
43
-
44
-
45
-
46
-
47
-
48
-
49
-
50
-
51
-
52
-
53
-
54
-
55
-
56
-
57
-
58
-
59
-
60
-
61
-
62
-
63
-
64
-
65
-
66
-
67
-
68
-
69
-
70
-
71
-
72
-
73
-
74
-
75
-
76
-
77
-
78
-
79
-
80
-
81
-
82
-
83
-
84
-
85
-
86
-
87
-
88
-
89
-
90
-
91
-
92
-
93
-
94
-
95
-
96
-
97
-
98
-
99
-
100
-
101
-
102
-
103
-
104
-
105
-
106
-
107
-
108
-
109
-
110
-
111
-
112
-
113
-
114
-
115
-
116
-
117
-
118
-
119
-
120
-
121
-
122
-
123
-
124
-
125
-
126
-
127
-
128
-
129
-
130
-
131
-
132
-
133
-
134
-
135
-
136
-
137
-
138
-
139
-
140
-
141
-
142
-
143
-
144
-
145
-
146
-
147
-
148
-
149
-
150
-
151
-
152
-
153
-
154
-
155
-
156
-
157
-
158
-
159
-
160
-
161
-
162
-
163
-
164
-
165
-
166
-
167
-
168
-
169
-
170
-
171
-
172
-
173
-
174
-
175
-
176
-
177
-
178
-
179
-
180
-
181
-
182
-
183
-
184
-
185
-
186
-
187
-
188
-
189
-
190
-
191
-
192
-
193
-
194
-
195
-
196
-
197
-
198
-
199
-
200
-
201
-
202
-
203
-
204
-
205
-
206
-
207
-
208
-
209
-
210
-
211
-
212
-
213
-
214
-
215
-
216
-
217
-
218
-
219
-
220
-
221
-
222
-
223
-
224
-
225
-
226
-
227
-
228
-
229
-
230
-
231
-
232
-
233
-
234
-
235
-
236
-
237
-
238
-
239
-
240
-
241
 |
 |