Western Digital WDG1SU5000N Quick Install Guide (pdf) - Page 3
Installing the Drive - my book premium es
 |
UPC - 718037119274
View all Western Digital WDG1SU5000N manuals
Add to My Manuals
Save this manual to your list of manuals |
Page 3 highlights
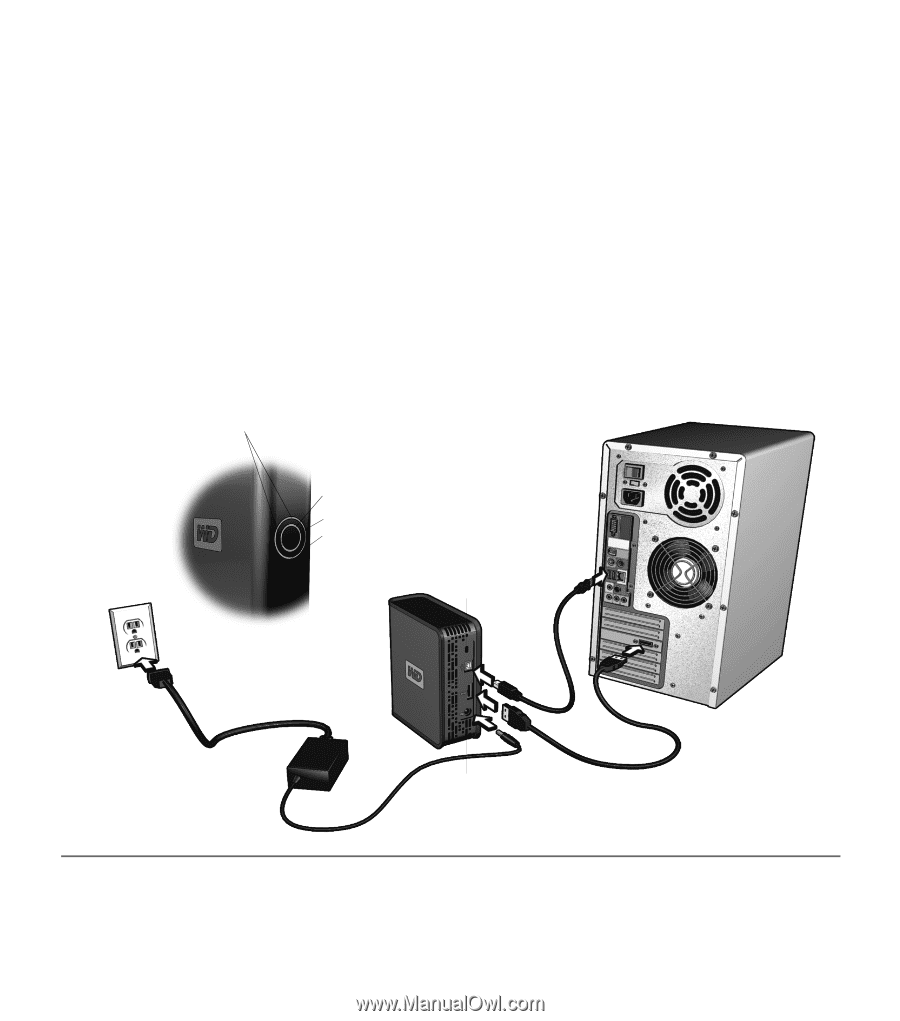
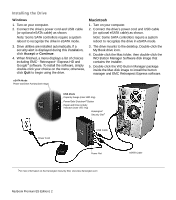
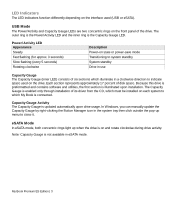
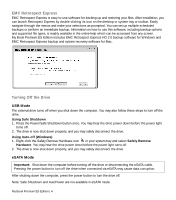
Installing the Drive Windows 1. Turn on your computer. 2. Connect the drive's power cord and USB cable (or optional eSATA cable) as shown. Note: Some SATA controllers require a system reboot to recognize the drive in eSATA mode. 3. Drive utilities are installed automatically. If a security alert is displayed during this installation, click Accept or Continue. 4. When finished, a menu displays a list of choices including EMC® Retrospect® Express HD and Google™ software. To install the software, simply double-click your choice on the menu; otherwise, click Quit to begin using the drive. Macintosh 1. Turn on your computer. 2. Connect the drive's power cord and USB cable (or optional eSATA cable) as shown. Note: Some SATA controllers require a system reboot to recognize the drive in eSATA mode. 3. The drive mounts to the desktop. Double-click the My Book drive icon. 4. Double-click the Mac folder, then double-click the WD Button Manager Software disk image that contains the installer. 5. Double-click the WD Button Manager package inside the Mac disk image to install the button manager and EMC Retrospect Express software. eSATA Mode Power and Drive Activity (both rings) USB Mode Capacity Gauge (inner LED ring) Power/Safe Shutdown™ Button Power and Drive Activity indicator (outer LED ring) Kensington® Security Slot† Power Cord USB Cable Power Port eSATA Cable †For more information on the Kensington Security Slot, visit www.kensington.com. My Book Premium ES Edition | 2
-
 1
1 -
 2
2 -
 3
3 -
 4
4 -
 5
5 -
 6
6 -
 7
7 -
 8
8 -
 9
9 -
10
-
11
-
12
-
13
-
14
-
15
-
16
-
17
-
18
-
19
-
20
-
21
-
22
-
23
-
24
-
25
-
26
-
27
-
28
-
29
-
30
-
31
-
32
-
33
-
34
-
35
-
36
-
37
-
38
-
39
-
40
-
41
-
42
-
43
-
44
-
45
-
46
-
47
-
48
-
49
-
50
-
51
-
52
-
53
-
54
-
55
-
56
-
57
-
58
-
59
-
60
-
61
-
62
-
63
-
64
-
65
-
66
-
67
-
68
-
69
-
70
-
71
-
72
-
73
-
74
-
75
-
76
-
77
-
78
-
79
-
80
-
81
-
82
-
83
-
84
-
85
-
86
-
87
-
88
-
89
-
90
-
91
-
92
-
93
-
94
-
95
-
96
-
97
-
98
-
99
-
100
-
101
-
102
-
103
-
104
-
105
-
106
-
107
-
108
-
109
-
110
-
111
-
112
-
113
-
114
-
115
-
116
-
117
-
118
-
119
-
120
-
121
 |
 |