Western Digital WDXU1200BB Quick Install Guide (pdf) - Page 2
Connecting the Drive - hard drive
 |
View all Western Digital WDXU1200BB manuals
Add to My Manuals
Save this manual to your list of manuals |
Page 2 highlights
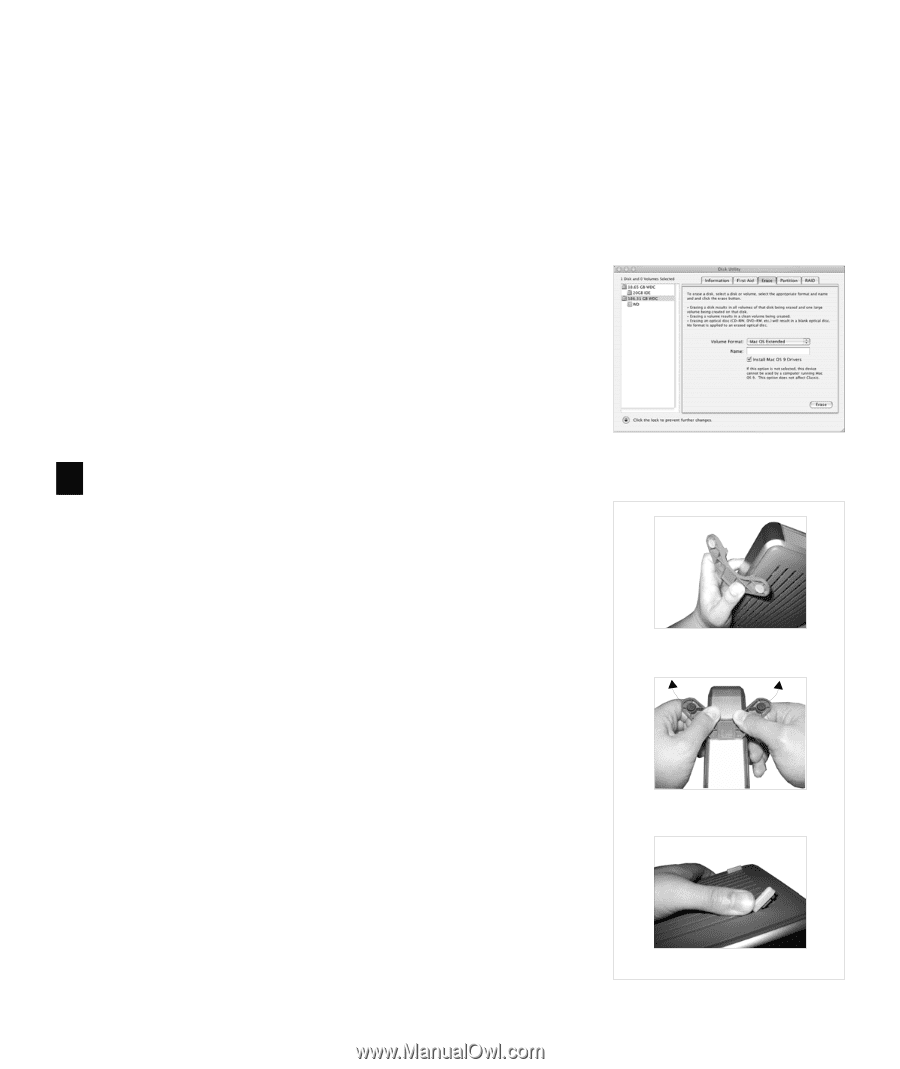
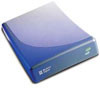
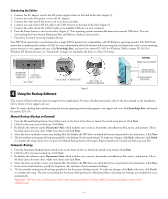
Macintosh Important: Macintosh users must reinitialize the WD drive to HFS Extended Format (or other Mac OS drive format) before using the installation CD. Skip to Section 3 to connect the drive, then follow the steps below to format and set up the drive. Mac OS v9.2.2 1. To format the drive, select Control Panel > Extensions Manager from the Apple menu. 2. Disable File Exchange from the extensions list by clearing the adjacent check box, and click Restart. 3. After restarting, a message appears prompting you to initialize the drive. Enter a name, select Mac OS Extended, and click Initialize. 4. Click Continue to confirm drive initialization. A hard drive icon with the name you assigned appears on the desktop after formatting is completed. To re-enable File Exchange, select the check box in Extensions Manager and click Restart. 5. After restarting, a new hard drive icon appears on your desktop and your new external USB hard drive is ready to use. 6. Proceed to Section 4 to use the backup software. Mac OS X v10.2.8+ 1. To format the drive, select Applications > Utilities > Disk Utility. Select your new drive on the left panel, and click the Erase tab on the right panel (Figure 3). If prompted, click OK. 2. Select Mac OS Extended from the Volume Format menu, and enter a name for your drive. 3. Click Erase to begin drive formatting. A hard drive icon with the name you assigned appears on the desktop after formatting is completed. Note: To partition the drive into multiple volumes, select the Partition tab from the Disk Utility program menu and follow the instructions. 4. If prompted, restart the system. A new hard drive icon appears on your desktop and your external USB hard drive is ready to use. 5. Proceed to Section 4 to use the backup software. Figure 3 3 Connecting the Drive Note: For a single drive, WD recommends using the stands for vertical placement with the Power button on top for easy access. For stacking multiple drives, use the feet for horizontal placement. Installing the Stands for Vertical Placement 1. Power off the external hard drive and disconnect all its cables. 2. Align the edge of the stand onto the side of the drive adjacent to the back (Figure 4). 3. Press the other edge of the stand toward the drive until the stand snaps firmly into place. Note: Space the stands approximately 3-4 inches apart and approximately 2-3 inches from the edge of the drive for balance and stability. 4. Repeat this process for the other stand. Removing the Stands 1. Power off the external hard drive and disconnect all its cables. 2. Place the drive upside down on a clean and steady surface. 3. Using both hands, grasp the base of the stand and carefully bend the stand upward until the stand snaps away from the side of the drive (Figure 4). Installing the Feet for Horizontal Placement 1. Power off the external hard drive and disconnect all its cables. 2. Place the drive upside down on a clean and steady surface. 3. The back of the drive is keyed with a small crossbar at each corner within the ventilation slots for feet placement. Align the notch of the foot to the crossbar and insert one end of the foot into the ventilation slot at a slight angle. The feet are keyed to ensure proper insertion. 4. Press the foot into the groove until it snaps firmly into place. 5. Repeat this process for the three remaining feet. Removing the Feet 1. Power off the external hard drive and disconnect all its cables. 2. Place the drive upside down on a clean and steady surface. 3. Carefully dislodge the foot by firmly pushing it off the ventilation slot (Figure 4). 4. Repeat this process for the three remaining feet. INSTALL STANDS REMOVE STANDS REMOVE FEET Figure 4 - 2 -
-
 1
1 -
 2
2 -
 3
3 -
 4
4
 |
 |