Westinghouse LCM17W7 User Manual - Page 8
Front Control Panel and Rear Side Connectors
 |
View all Westinghouse LCM17W7 manuals
Add to My Manuals
Save this manual to your list of manuals |
Page 8 highlights
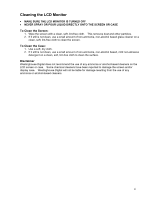
Front Control Panel and Rear Side Connectors 1. "-" and "+" Buttons 2. MENU Button 3. LED Display 4. and Buttons 5.INPUT/OK Button 6. Power Button 7. AC Power Connector 8. Audio In 9. Digital DVI-D Connector 10. Analog VGA Connector 11. Ventilation Openings 12. Security Lock Anchor When the OSD Menu is displayed: Increase/Decrease Volume (While in the Volume Menu) When the OSD Menu is not displayed: Increase/Decrease Volume Enter/Exit the OSD Menu The LED is lit green when in the monitor is in use and orange when in power-saving mode. When the OSD Menu is displayed: Highlight a menu option or adjust the value of a selected option When the OSD Menu is not displayed: Adjust the backlight brightness When the OSD Menu is displayed: Select a menu option When the OSD Menu is not displayed: Switch the signal input between analog and digital Power On/Off Use the AC power cord to connect the monitor to a grounded AC outlet. Use the 3.5mm audio cable to connect to your PC Audio Output. Use a DVI-D cable (not included) to connect to a computer with a DVI-compatible output terminal (DVI-D: 24 pins) with WXGA output capability. Use an analog VGA cable (not included) to connect to your PC VGA Output. Note: Do not block the ventilation openings. This may cause the monitor to overheat or malfunction. Secure the LCD monitor by using a Kensington Micro Saver Security Lock. 7
-
 1
1 -
2
-
 3
3 -
 4
4 -
 5
5 -
 6
6 -
 7
7 -
 8
8 -
 9
9 -
 10
10 -
 11
11 -
 12
12 -
 13
13 -
14
-
15
-
16
 |
 |
