Whirlpool DU1055XTVQ Installation Instructions
Whirlpool DU1055XTVQ - 24" Tall Tub Dishwasher Manual
 |
UPC - 883049128115
View all Whirlpool DU1055XTVQ manuals
Add to My Manuals
Save this manual to your list of manuals |
Whirlpool DU1055XTVQ manual content summary:
- Whirlpool DU1055XTVQ | Installation Instructions - Page 1
® INSTALLATION INSTRUCTIONS UNDERCOUNTER DISHWASHER PLASTIC GIANT TUB MODELS INSTRUCTIONS D'INSTALLATION LAVE-VAISSELLE ENCASTRÉ MODÈLES À TRÈS GRANDE CUVE EN PLASTIQUE Table of Contents 2 Table des matières 21 W10282553A - Whirlpool DU1055XTVQ | Installation Instructions - Page 2
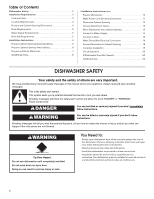
Table of Contents Dishwasher Safety 2 Installation Requirements 3 Tools and Parts 3 Location Requirements 3 Product and Cabinet Opening Dimensions 4 Drain Requirements 5 Water Supply Requirements 5 Electrical Requirements 5 Installation Instructions 6 Prepare Cabinet Opening-Existing - Whirlpool DU1055XTVQ | Installation Instructions - Page 3
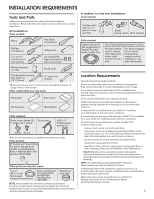
Location Requirements Grounded electrical supply required. Do not run drain lines, water lines or electrical wiring where they can interfere with or contact dishwasher motor or legs. The location where the dishwasher will be installed must provide clearance between motor and flooring. Motor should - Whirlpool DU1055XTVQ | Installation Instructions - Page 4
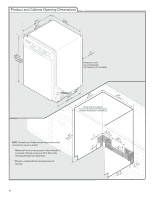
and Cabinet Opening Dimensions (64.1 (62.2 cm) cm) (60.6 cm) w(8ri6ethmcmwovh)eemdeil.ns (1.9 cm)* *Insulation may be compressed. (not used on all models) (532.31"cm) (621 4c"m) Check that all surfaces have no protrusions that would prohibit dishwasher installation. (612c4m" )** NOTE - Whirlpool DU1055XTVQ | Installation Instructions - Page 5
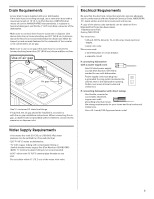
Use ¹⁄₂" minimum I.D. drain line fittings. • If required, the air gap should be installed in accordance with the air gap installation instructions. When connecting the 49°C) water at dishwasher O.D. copper tubing with compression fitting or flexible braided water supply line (Part Number 4396897RP) - Whirlpool DU1055XTVQ | Installation Instructions - Page 6
Utilities 1 Check water and electrical placement Water line (15.2 6" cm) Cable If the water line and the cable extend to the locations shown, proceed to the "Install Drain Hose" section. If they do not reach far enough, follow the instructions in the "Prepare Cabinet Opening- New Utilities - Whirlpool DU1055XTVQ | Installation Instructions - Page 7
(Part Number 302797 not included) Hot water line Measure overall length of copper tubing or flexible braided water supply line. Attach to the hot water line using a connection configuration that is in compliance with local codes and ordinances. The water line to the dishwasher should have a manual - Whirlpool DU1055XTVQ | Installation Instructions - Page 8
dishwasher inlet on the front left side of the dishwasher. 4 Flush water supply line Connect the ³⁄₈" compression fitting to the water supply line prior to installing Teflon®† tape with compression fittings. Install Drain Hose IMPORTANT: Always use a new drain hose. Check local codes to determine - Whirlpool DU1055XTVQ | Installation Instructions - Page 9
drain hose connection of the disposer or a waste tee must be made before the drain trap and at least 20" (50.8 cm) above the floor where the dishwasher will be installed needle-nose pliers to remove plug. 3. Attach drain hose to disposer inlet with 3 large silver drain hose clamp (provided). Use - Whirlpool DU1055XTVQ | Installation Instructions - Page 10
on its back Using a ¹⁄₄" hex head socket, nut driver or Phillips screwdriver, remove terminal box cover. Retain for later use. 5 Install strain relief Helpful Tip: Place cardboard under dishwasher until installed in cabinet opening to avoid damaging floor covering. Do not use door panel as - Whirlpool DU1055XTVQ | Installation Instructions - Page 11
motor to lower part of dishwasher tub. Pull cord through strain relief in terminal bow. Select UL Listed/CSA Approved twist-on wire connectors rated to connect your power supply cord to 16-gauge dishwasher wiring. Ground wire Ground wire Washer Ground connector Remove the green grounding - Whirlpool DU1055XTVQ | Installation Instructions - Page 12
this step. Visit www.whirlpool.com under FAQ tab. to floor where dishwasher will be installed (you will removed screw to secure cover. NOTE: Do not plug into outlet until instructed. 12 3 2 1 Turn both leveler legs to the same height. Put wheels in the required position determined from "Dishwasher - Whirlpool DU1055XTVQ | Installation Instructions - Page 13
) 1. Remove the brackets from the parts package. 2. Break off the end of the bracket along the scored line. Score line Score line 3. With another person holding the dishwasher to avoid it from tipping, open dishwasher door, and place towel over pump assembly and spray arm of dishwasher. This - Whirlpool DU1055XTVQ | Installation Instructions - Page 14
too quickly- Decrease spring tension Water line Drain hose Cable Direct Wire Only IMPORTANT: Double-check correct placement of utilities. Grasp the sides of the dishwasher at the edges of the door panel. Tilt dishwasher backward on wheels and move dishwasher close to cabinet opening. NOTE: Do - Whirlpool DU1055XTVQ | Installation Instructions - Page 15
line, drain hose, power supply cord or direct wire between dishwasher and cabinet. Remove cardboard from under dishwasher. NOTE: It is all right if dishwasher fits tightly into cabinet opening. Do not remove representation of this step. Visit www.whirlpool.com/watersupply under FAQ tab. NOTE: - Whirlpool DU1055XTVQ | Installation Instructions - Page 16
remove towel. If needed, see website for animated representation of this step. Visit www.whirlpool.com/drain under FAQ tab. Make Direct Wire Electrical Connection NOTE: If the power supply cord was connected earlier proceed to "Secure Dishwasher touch dishwasher motor or lower part of dishwasher tub - Whirlpool DU1055XTVQ | Installation Instructions - Page 17
dishwasher. Connect ground wire to green ground connector in terminal box. Do not use an extension cord. Failure to follow these instructions . Close cover ensuring wires are not pinched. Use ¹⁄₄" nut driver and previously removed screw to secure cover. NOTE: Do not pre-twist stranded wire. Twist on - Whirlpool DU1055XTVQ | Installation Instructions - Page 18
4 Check door clearance Check that top of door does not contact screws, brackets, or countertop. If it does, adjust leveling legs. 5 Check inner spacing Open dishwasher door, remove lower dish rack, and place towel over pump assembly and lower spray arm of dishwasher. This will keep the screws from - Whirlpool DU1055XTVQ | Installation Instructions - Page 19
2 Reinstall access panels Remove towel from dishwasher. Reinstall the lower dish rack. If needed, see website for animated representation of this step. Visit www.whirlpool.com/anchoring under FAQ tab. Complete Installation 1 Reinstall access panels Insulation (on some models) Hold the two panels - Whirlpool DU1055XTVQ | Installation Instructions - Page 20
, low energy consumption motor, your dishwasher washes longer to ensure exceptional cleaning. Certain models are equipped with an optical water sensor so the first cycle will run longer to calibrate to optical sensor. Selecting certain options could increase cycle time past 3.5 hours. Rinse Aid is - Whirlpool DU1055XTVQ | Installation Instructions - Page 21
Outillage et pièces 22 Exigences d'emplacement 22 Dimensions - Produit et cavité d'encastrement 23 Spécifications de l'évacuation 24 Spécifications de l'alimentation en eau 24 Spécifications électriques 24 Instructions d'installation 25 Préparation de la cavité d'encastrement - Raccordement - Whirlpool DU1055XTVQ | Installation Instructions - Page 22
pièces Rassembler les outils et pièces nécessaires avant de commencer l'installation. Lire et observer les instructions fournies avec chacun des outils de la liste ci-dessous. Pour toutes les installations Outillage nécessaire : Pince Tournevis à lame plate Tournevis Phillips Tourne-écrou ou cl - Whirlpool DU1055XTVQ | Installation Instructions - Page 23
en gris sur l'illustration de la section "Dimensions - Produit et cavité d'installation". Dimensions - Produit et cavité d'encastrement (64,1 plus étroit de la cavité. (1,9 cm)* (621 4c"m) (612c4m" )** (8m63,44in"c*m) (10,24"cm) (7,63"cm) (17,2 cm) (4,4 (26,7 cm) cm) (6,4 cm) (15,9 cm - Whirlpool DU1055XTVQ | Installation Instructions - Page 24
¹⁄₂" ou plus. • Si un brise-vide est nécessaire, il doit être installé conformément aux instructions d'installation fournies avec le produit; un tuyau de caoutchouc (pas fourni) sera nécessaire pour effectuer une opération de soudure à moins de 6" (15,2 cm) de l'électrovanne d'admission d'eau. 24 - Whirlpool DU1055XTVQ | Installation Instructions - Page 25
(longueur et position), passer à la section "Installation du tuyau d'évacuation"; si ces éléments ne sont pas assez longs, voir les instructions à la section "Préparation de la cavité (3,8 cm) dans le panneau latéral ou à l'arrière du placard. Voir Dimensions - Produit et cavité d'encastrement. 25 - Whirlpool DU1055XTVQ | Installation Instructions - Page 26
de ³⁄₄" (1,9 cm) dans le panneau latéral du placard de droite ou à l'arrière. Voir Dimensions - Produit et cavité d'encastrement. 2 Câblage direct - Préparation du trou (15,2 c6m" ) Installer un câble depuis le tableau de distribution jusqu'à la cavité d'encastrement du lave-vaisselle, à travers - Whirlpool DU1055XTVQ | Installation Instructions - Page 27
coudé. Raccord flexible à tresse d'acier : Fixer l'écrou sur le coude à l'aide d'une clé plate ou d'une clé à molette de REMARQUE : Ne pas utiliser de ruban adhésif Teflon®† avec les raccords de compression. Installation du tuyau d'évacuation IMPORTANT : Utiliser toujours un tuyau d'évacuation neuf - Whirlpool DU1055XTVQ | Installation Instructions - Page 28
sur le tuyau jusqu'à sa position finale. Si le tuyau d'évacuation a été coupé, utiliser une bride à vis de 1 2" (3,8 à 5 cm) (pas fournie). 5 5. Installer un tuyau de caoutchouc (pas fourni) entre le brise-vide et l'entrée du broyeur à déchets - utiliser des brides à vis (pas fournies - Whirlpool DU1055XTVQ | Installation Instructions - Page 29
lave-vaisselle Risque de basculement Ne pas utiliser le lave-vaisselle jusqu'à ce qu'il soit complètement installé. Ne pas appuyer sur la porte ouverte. Le non-respect de ces instructions peut causer des blessures graves ou des coupures. Risque du poids excessif Utiliser deux personnes ou plus pour - Whirlpool DU1055XTVQ | Installation Instructions - Page 30
conserver la vis et le couvercle pour réutilisation. 5 Installation du serre-câble Installer le cordon d'alimentation de telle manière qu'il ne borne. Ne pas utiliser un câble de rallonge. Le non-respect de ces instructions peut causer un décès, un incendie ou un choc électrique. 2 Cordon d' - Whirlpool DU1055XTVQ | Installation Instructions - Page 31
, consulter le site Internet www.whirlpool.com - onglet FAQ. On instruction. Dimensions de la cavité d'encastrement 1 Mesure des dimensions Mesurer la hauteur de la cavité d'encastrement entre les placards, entre le sol et la face inférieure du plan de travail, à l'emplacement d'installation - Whirlpool DU1055XTVQ | Installation Instructions - Page 32
fixation Risque du poids excessif Utiliser deux personnes ou plus pour déplacer et installer le lave-vaisselle. Le non-respect de cette instruction peut causer une blessure au dos ou d'autre blessure. À l'aide d'au moins deux personnes, mettre le lavevaisselle en position verticale. IMPORTANT : Le - Whirlpool DU1055XTVQ | Installation Instructions - Page 33
de la porte Faire intervenir deux personnes ou plus pour redresser le lavevaisselle. REMARQUE : Ne pas installer le panneau de plinthe avant d'en avoir reçu l'instruction. 2 Déplacement du lave-vaisselle à proximité de l'ouverture Canalisation d'eau Raccordement direct uniquement Tuyau d'évacuation - Whirlpool DU1055XTVQ | Installation Instructions - Page 34
5 Fermeture trop rapide -Réduire la tension des ressorts Si la porte se ferme trop rapidement, réduire la tension des ressorts : déplacer le point d'ancrage de l'extrémité du ressort vers l'avant du lave-vaisselle. REMARQUE : Utiliser le même point d'ancrage (encoche) pour chaque ressort (côté - Whirlpool DU1055XTVQ | Installation Instructions - Page 35
assurer que la rondelle de caoutchouc est correctement installée dans le raccord. Enfiler le raccord de main jusqu'à ce que le raccord soit serré. À l'aide d'une pince, vérifier l'étanchéité du raccord tour vidéo de cette étape. Visiter www.whirlpool.com/watersupply sous l'onglet FAQ. REMARQUE - Whirlpool DU1055XTVQ | Installation Instructions - Page 36
cessaire, consulter le site Internet www.whirlpool.com/drain (onglet FAQ) qui présente ble de rallonge. Le non-respect de ces instructions peut causer un décès, un incendie ou un connexion. 3 Câblage direct - Raccordement des autres conducteurs Installer le câble d'alimentation de telle manière qu' - Whirlpool DU1055XTVQ | Installation Instructions - Page 37
liaison à la terre Si nécessaire, consulter le site Internet www.whirlpool.com/electrical (onglet FAQ) qui présente une description vidéo ensemble de montage latéral (pièce no 8212560). Exécuter les instructions pour installer les brides fournies avec l'ensemble. 2 Extraction du panier inférieur ( - Whirlpool DU1055XTVQ | Installation Instructions - Page 38
réglage des pieds. 5 Centrage transversal Retirer la serviette de protection qui avait été placée au fond du lave-vaisselle. Réinstaller le panier inférieur. Si nécessaire, consulter le site Internet www.whirlpool.com/anchoring (onglet FAQ) qui présente une description vidéo de cette étape. Achever - Whirlpool DU1055XTVQ | Installation Instructions - Page 39
lave-vaisselle. Réinstaller les vis à travers les trous du panneau d'accès et les fentes du panneau inférieur à l'aide d'un tournevis adaptateur. Ne pas utiliser un câble de rallonge. Le non-respect de ces instructions peut causer un décès, un incendie ou un choc électrique. 1 Cordon d'alimentation - Whirlpool DU1055XTVQ | Installation Instructions - Page 40
ût d'une intervention de service, essayer d'abord les installation ou de remplacement du tuyau sur celui-ci, pour référence ultérieure. W10282553A © 2010 Whirlpool Corporation. All rights reserved. ® Registered Trademark/TM Trademark of Whirlpool, U.S.A., Whirlpool Canada LP Licensee in Canada
-
 1
1 -
 2
2 -
 3
3 -
 4
4 -
 5
5 -
 6
6 -
 7
7 -
8
-
9
-
10
-
11
-
12
-
13
-
14
-
15
-
16
-
17
-
18
-
19
-
20
-
21
-
22
-
23
-
24
-
25
-
26
-
27
-
28
-
29
-
30
-
31
-
32
-
33
-
34
-
35
-
36
-
37
-
38
-
39
-
40
 |
 |
INSTALLATION INSTRUCTIONS
UNDERCOUNTER DISHWASHER
PLASTIC GIANT TUB MODELS
INSTRUCTIONS D'INSTALLATION
LAVE-VAISSELLE ENCASTRÉ
MODÈLES À TRÈS GRANDE CUVE EN PLASTIQUE
Table of Contents . . . . . . . . . . . . . . . . . . . . . . . . . . . . . . . . . . . . . . . . . . . . . . . . 2
Table des matières . . . . . . . . . . . . . . . . . . . . . . . . . . . . . . . . . . . . . . . . . . . . . . 21
W10282553A
®