Whirlpool DU1100XTPB Installation Instructions
Whirlpool DU1100XTPB - Dishwasher - on Manual
 |
UPC - 050946960272
View all Whirlpool DU1100XTPB manuals
Add to My Manuals
Save this manual to your list of manuals |
Whirlpool DU1100XTPB manual content summary:
- Whirlpool DU1100XTPB | Installation Instructions - Page 1
you have an electrical inspection. Call your dealer when you have questions or need service. When you call, you will need the dishwasher model and serial numbers. IMPORTANT : Lire et conserver ces instructions. Ce qui : • facilitera l'installation. • vous aidera plus tard si vous avez des questions - Whirlpool DU1100XTPB | Installation Instructions - Page 2
many important safety messages in this manual and on your appliance. Always read dishwasher as specified in these instructions. ✓ have everything you need to properly install dishwasher. ✓ contact a qualified installer. Installation must be performed by a qualified service technician. The dishwasher - Whirlpool DU1100XTPB | Installation Instructions - Page 3
nécessaires avant de commencer l'installation. Lire et suivre les instructions fournies avec l'un ou l'autre des outils énumérés head screws • drain hose Make sure all these parts are included. See parts list for accessories available for your dishwasher. ® Teflon is a registered trademark of E.I. - Whirlpool DU1100XTPB | Installation Instructions - Page 4
l'hiver" dans le Guide d'utilisation et d'entretien. S'assurer que la tuyauterie, le câblage et le tuyau de décharge se trouvent dans la zone ombragée. Voir les dimensions à la page 6. HELPFUL TIP: If the floor in the dishwasher opening is uneven (example: tile flooring only part way into opening - Whirlpool DU1100XTPB | Installation Instructions - Page 5
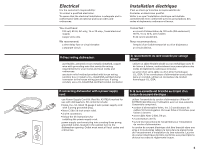
use Power Supply Cord Kit (Part No. 4317824) marked for use with dishwashers. Kit contents include: • Volex, Inc., UL listed 16 gauge 3 wire power supply cord with 3 prong grounded plug. • Neer C-500 7/8 inch strain relief. • 2 wire connectors. • follow the kit instructions for installing the power - Whirlpool DU1100XTPB | Installation Instructions - Page 6
émité. Ne pas souder à moins de 15 cm (6 po) de la valve d'arrivée d'eau. Drain You must: ✓ use the new drain hose supplied with your dishwasher. If this is not suitable, use a new drain hose with a maximum length of 12 feet (3.7 m) that meets all current AHAM/IAPMO test standards, is resistant - Whirlpool DU1100XTPB | Installation Instructions - Page 7
cordon électrique 3,8 cm (1 1/2 po) *Measured from the lowest point on the underside of countertop. May be reduced to 33-7/8" (86 cm) by removing wheels from dishwasher. *Mesuré à partir du point le plus bas du dessous du comptoir. Peut être baissé à 86 cm (33 7/8 po) lorsque les roulettes du lave - Whirlpool DU1100XTPB | Installation Instructions - Page 8
d'entreprendre l'installation du lave-vaisselle. Le non-respect de ces instructions peut causer un décès ou un choc électrique. A. Prepare cabinet passer à l'étape 10, page 10. If you are installing a new dishwasher, complete all of the following steps: Electrical Follow all national and local - Whirlpool DU1100XTPB | Installation Instructions - Page 9
(15,2 cm) ả HELPFUL TIP: Wiring the dishwasher will be easier if you route wire into the Optional locations are shown. Wood cabinet: Sand hole until smooth. Metal cabinet: Cover hole with Grommet (Part No. 302797) supplied with the power supply cord kit. Cordon de courant électrique : Percer un - Whirlpool DU1100XTPB | Installation Instructions - Page 10
copper tubing Ầ required. Attach copper tubing to water line with manual shutoff valve. Carefully feed copper tubing through hole in cabinet ( far enough into the cabinet opening to connect it to dishwasher inlet on the front left of dishwasher. Mesurer la longueur totale du tube Ầ de cuivre requis - Whirlpool DU1100XTPB | Installation Instructions - Page 11
clamps* Ậ to connect air gap to waste tee ắ. This connection ắ must be before drain trap Ắ and at least 20" (50.8 cm) above the floor where dishwasher will be installed. Go to step 12. Pas de broyeur de déchets + brise-siphon 1. Couper l'extrémité du tuyau de décharge Ẩ au besoin (ne pas - Whirlpool DU1100XTPB | Installation Instructions - Page 12
trap Ắ and at least 20" (50.8 cm) above the floor where dishwasher will be installed. It is recommended that the drain hose be looped up and securely fastened to the underside of the counter. Go to step 12. Ẩ * Parts available from local plumbing supply stores. Pas de broyeur de déchets, pas de - Whirlpool DU1100XTPB | Installation Instructions - Page 13
back or other injury. Grasp sides of dishwasher door and put dishwasher on its back. Risque de basculement Ne pas utiliser le lave-vaisselle jusquíà ce qu'il soit complètement installé. Ne pas appuyer sur la porte ouverte. Le non-respect de ces instructions peut causer des blessures graves ou des - Whirlpool DU1100XTPB | Installation Instructions - Page 14
Si le raccordement est par cordon de courant électrique, procéder à l'installation et suivre les instructions qui accompagnent le cordon de courant électrique. HELPFUL TIP: Put cardboard under dishwasher until it is installed in cabinet opening. The cardboard will help protect floor covering during - Whirlpool DU1100XTPB | Installation Instructions - Page 15
: Built-up floors. Measure height of opening from underside of countertop to built-up floor. If the height is at least 33-3/4" (84.5 cm), the dishwasher will fit into the opening without modification to the countertop or flooring. Put wheels ẫ in position 1 and turn the front leveler legs up all the - Whirlpool DU1100XTPB | Installation Instructions - Page 16
-vaisselle et le placard. Centrer le lave-vaisselle dans l'ouverture. HELPFUL TIP: Built-up floors. Tilt dishwasher backward to move into opening. Once in position, support front of dishwasher by lowering or shimming front feet. CONSEIL UTILE : Planchers surélevés : Incliner le lave-vaisselle vers - Whirlpool DU1100XTPB | Installation Instructions - Page 17
correct que le lave-vaisselle soit bien serré dans l'ouverture. Ne pas ôter l'isolant car il agit comme matériel d'insonorisation. Align front of dishwasher door panel Ằ with cabinet doors ằ. You may need to adjust alignment to look good with your cabinets. Aligner le devant du panneau de porte du - Whirlpool DU1100XTPB | Installation Instructions - Page 18
de ces instructions peut causer un décès, un incendie ou un choc électrique. Route direct wire so that it does not touch dishwasher motor Faire passer le câble de telle sorte qu'il ne touche pas au or lower part of dishwasher tub. Pull direct wire - Whirlpool DU1100XTPB | Installation Instructions - Page 19
. Do not use an adapter. Do not use an extension cord. Failure to follow these instructions can result in death, fire, or electrical shock. Check that power supply cord does not touch dishwasher motor or lower part of dishwasher tub. Go to step 5. Risque de choc électrique Brancher sur une prise de - Whirlpool DU1100XTPB | Installation Instructions - Page 20
. contact avec la base, le châssis ou le moteur. Make sure the water line stays within the shaded area shown on page 7 when the dishwasher is installed in the S'assurer que le conduit d'eau reste à l'intérieur de la partie ombragée indiquée à la page 7 lorsque la lave-vaisselle est cabinet - Whirlpool DU1100XTPB | Installation Instructions - Page 21
Drain Connection Raccordement à l'égout 7. To help minimize vibration noise, route drain hose to avoid Pour minimiser le bruit de vibration, acheminer le tuyau contact with motor, door springs, water line, cabinet, d'évacuation en évitant tout contact avec moteur, ressort de flooring or the - Whirlpool DU1100XTPB | Installation Instructions - Page 22
la porte ouverte. Le non-respect de ces instructions peut causer des blessures graves ou des coupures. 1. Open dishwasher door and place towel Ạ over pump Si vis du support et déplacer légèrement la cuve. Serrer les vis. Vérifier si le haut de la porte touche les vis, les supports ou le comptoir - Whirlpool DU1100XTPB | Installation Instructions - Page 23
Read the Use and Care Guide that came with your dishwasher. Check that all parts have been installed and no steps were skipped. Check that you have all the tools you used. At fuse box or circuit breaker, turn on electrical power supply to dishwasher. Start dishwasher and allow it to complete - Whirlpool DU1100XTPB | Installation Instructions - Page 24
cm) min. with wheels removed 86 cm (33 7/8 po) min. avec roulettes enlevées 21" (53,3 cm) Back view Vue arrière 23-7/8" (60,6 cm) Part No. 8535437 Pièce N° 8535437 Printed in U.S.A. Imprimé aux É.-U. 05/2004
-
 1
1 -
 2
2 -
 3
3 -
 4
4 -
 5
5 -
 6
6 -
 7
7 -
8
-
9
-
10
-
11
-
12
-
13
-
14
-
15
-
16
-
17
-
18
-
19
-
20
-
21
-
22
-
23
-
24
 |
 |

Installation Instructions
Undercounter Dishwasher
What do I need to have to
install the dishwasher?
What do I need to do before
I install the dishwasher?
How do I install the
dishwasher?
• Tools, parts & materials
1
• Requirements
3-6
• Dishwasher dimensions
Back cover
• Prepare cabinet
8-12
• Prepare dishwasher
13-17
• Connect dishwasher
18-21
• Secure dishwasher
22
• Check operation
23
IMPORTANT:
Read and save these instructions.
Doing so will:
• make installation easier.
• help you in the future if you have questions.
• help if you have an electrical inspection.
Call your dealer when you have questions or need
service. When you call, you will need the dishwasher
model and serial numbers.
Instructions d’installation
Lave-vaisselle encastré
Que me faut-il pour installer le
lave-vaisselle?
Que dois-je faire avant
d’installer le lave-vaisselle?
Comment dois-je installer le
lave-vaisselle?
• Outils, pièces et matériaux
1
• Spécifications
3-6
• Dimensions du produit
Couverture
arrière
• Préparation de l’encastrement
8-12
• Préparation du lave-vaisselle
13-17
• Raccordement du lave-vaisselle
18-21
• Fixation du lave-vaisselle
22
• Vérification du fonctionnement
23
IMPORTANT :
Lire et conserver ces instructions.
Ce qui :
• facilitera l’installation.
• vous aidera plus tard si vous avez des questions.
• aidera en cas d’inspection des installations
électriques.
Appelez marchand quand vous avez des questions ou si
vous avez besoin de service. Lors de votre appel, il vous
faut les numéros de modèle et de série du lave-
vaisselle.
Pièce N° 8535437
Part No. 8535437