Whirlpool DU810SWPU Installation Instructions
Whirlpool DU810SWPU Manual
 |
View all Whirlpool DU810SWPU manuals
Add to My Manuals
Save this manual to your list of manuals |
Whirlpool DU810SWPU manual content summary:
- Whirlpool DU810SWPU | Installation Instructions - Page 1
INSTALLATION INSTRUCTIONS UNDERCOUNTER DISHWASHER INSTRUCTIONS D'INSTALLATION LAVE-VAISSELLE SOUS PLAN DE TRAVAIL Table of Contents 2 Table des matières 19 W10282559A - Whirlpool DU810SWPU | Installation Instructions - Page 2
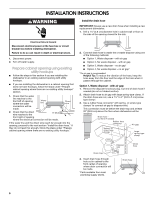
door until latched. ■ Observe all governing codes and ordinances. ■ Install this dishwasher as specified in these instructions. ■ Installation should be performed by a qualified service technician. The dishwasher must be installed to meet all electrical and plumbing national and local codes and - Whirlpool DU810SWPU | Installation Instructions - Page 3
may be subject to freezing, have it winterized by authorized service personnel. Make sure pipes, wires and drain hose are within the shaded area shown in the "Cutout dimensions" section. Helpful Tip: If the floor in the dishwasher opening is uneven (example: tile flooring only partway into opening - Whirlpool DU810SWPU | Installation Instructions - Page 4
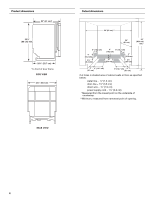
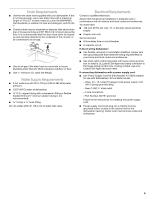
Product dimensions 24" (61 cm)* Cutout dimensions 20³⁄₄" (52.7 cm) *To front of door frame SIDE VIEW Cut holes in shaded area of cabinet walls or floor as specified below: water line 1.3 cm) drain line - 1¹⁄₂" (3.8 cm) direct wire 1.9 cm) power supply cord - 1¹⁄₂" (3.8 cm) *Measured from the - Whirlpool DU810SWPU | Installation Instructions - Page 5
relief. - 3 wire connectors. - Part Number 302797 grommet Follow the kit instructions for installing the power supply cord. ■ Power supply cord must plug into a mating 3 prong, grounded outlet, located in the cabinet next to the dishwasher opening. Outlet must meet all local codes and ordinances. 5 - Whirlpool DU810SWPU | Installation Instructions - Page 6
INSTALLATION INSTRUCTIONS Install the drain hose IMPORTANT: Always use a new drain hose when installing a new replacement dishwasher. 1. Drill a 1¹⁄₂" (3.8 cm) diameter hole in cabinet wall or floor on the side of the opening closest to the sink. 1. Disconnect power. 2. Turn off water supply. - Whirlpool DU810SWPU | Installation Instructions - Page 7
with 1¹⁄₂" to 2" (3.8 to 5 cm) screw-type clamp*. This connection must be before the drain trap and at least 20" (50.8 cm) above the floor where dishwasher will be installed. It is recommended that the drain hose be looped up and securely fastened to the underside of the counter. Drain hose cut - Whirlpool DU810SWPU | Installation Instructions - Page 8
Copper tubing 3. Attach copper tubing to the water line with a manual shutoff valve. 4. Slowly feed copper tubing through hole in cabinet. the drain trap and at least 20" (50.8 cm) above the floor where dishwasher will be installed. Drain hose cut here if needed Rubber hose connector Spring- or - Whirlpool DU810SWPU | Installation Instructions - Page 9
with 1¹⁄₂" to 2" (3.8 to 5 cm) screw-type clamp*. This connection must be before the drain trap and at least 20" (50.8 cm) above the floor where dishwasher will be installed. It is recommended that the drain hose be looped up and securely fastened to the underside of the counter. Drain hose cut - Whirlpool DU810SWPU | Installation Instructions - Page 10
strain relief. - If you are installing a power supply cord kit, do so now, following kit instructions. The power supply cord kit must be UL Listed and marked for use with dishwashers (that is, Power Supply Cord Kit Part Number 4317824). 1 Wheel Minimum Wheel cutout height position 3 2 34 - Whirlpool DU810SWPU | Installation Instructions - Page 11
not kink or pinch copper tubing, drain hose, power supply cord or direct wire between dishwasher and cabinet. Helpful Tip: Once the dishwasher is in position, you may have to support the front of the dishwasher by raising, lowering or shimming front feet. With some installations, it may be easier - Whirlpool DU810SWPU | Installation Instructions - Page 12
on wires to be sure both are secured. 3. Connect the wires as follows using twist-on connectors sized to connect direct wire to 16-gauge dishwasher wire: 7. Reinstall terminal box cover with wires inside terminal box. The cover must be outside the box on the left side. 8. Make sure no wires - Whirlpool DU810SWPU | Installation Instructions - Page 13
cord into the outlet until instructed to do so. 10. Check that power supply cord does not touch dishwasher motor or lower part of dishwasher tub. Drain hose Located near back Hose clamp Do not remove Drain hose Located near front NOTE: Depending on the model, the drain connector may be located - Whirlpool DU810SWPU | Installation Instructions - Page 14
-type clamp is used instead of spring-type clamp, use a nut driver to tighten the drain hose securely to the drain hose connector. Secure dishwasher in cabinet opening 3. Place the lower panel behind the access panel. Grounding clip 4. Slide the lower panel over and down onto the screws. 5. Hold - Whirlpool DU810SWPU | Installation Instructions - Page 15
To change door panel color (For models so equipped.) NOTE: If your model has a plastic door color panel, both sides of the panel are the same color. 1. Handle panels gently. Insert finger under one end of retainer and - Whirlpool DU810SWPU | Installation Instructions - Page 16
more than 4 lbs (1.8 kg), you must use Heavy Duty Spring Kit, Part Number 4318050. Maximum door panel weight is 8 lbs (3.6 kg). Dishwasher door panel and access panel (if model is so equipped) can be customized to match wood cabinets. A standard 6.4 mm) wood panel* can be used as is for customizing - Whirlpool DU810SWPU | Installation Instructions - Page 17
models with frames around the door and access panels. Install customized wood panels in door and access panel. 1. Cut wood door and access panels using specified dimensions. Make sure wood grain direction matches cabinet wood grain. 2. File or sand edges of wood panels to avoid slivers. Dishwasher - Whirlpool DU810SWPU | Installation Instructions - Page 18
use. Check operation 1. Read the Use and Care Guide that came with your dishwasher. 2. Check that all parts have been installed dishwasher and see "If dishwasher does not operate" section. If dishwasher does not operate First try the solutions suggested here to possibly avoid the cost of a service - Whirlpool DU810SWPU | Installation Instructions - Page 19
les dispositions de tous les codes et règlements en vigueur. ■ Installer le lave-vaisselle conformément aux prescriptions des présentes instructions. ■ L'installation devrait être exécutée par un technicien qualifié. Veiller à respecter les dispositions de tous les codes et règlements locaux et - Whirlpool DU810SWPU | Installation Instructions - Page 20
relevé des dimensions et lors du réglage de l'aplomb du lave-vaisselle. Pour commander des pièces ou un ensemble, consulter votre marchand local ou Whirlpool Pièces : 1-800-442-8991. 20 - Whirlpool DU810SWPU | Installation Instructions - Page 21
Dimensions du produit Dimensions de l'espace d'installation *Jusqu'au devant du cadre de la porte Découper les trous dans la zone marquée en gris du plancher ou des parois des placards, selon les spécifications ci-dessous : Canalisation d'eau 1,3 cm) Canalisation d'évacuation - 1¹⁄₂" (3,8 cm) Câ - Whirlpool DU810SWPU | Installation Instructions - Page 22
Neer C-500. - 3 connecteurs de fils. - bague de protection - pièce n° 302797. Pour l'installation du cordon d'alimentation, procéder conformément aux instructions fournies avec l'ensemble. ■ La fiche du cordon d'alimentation devra être branchée sur une prise de courant à 3 alvéoles de configuration - Whirlpool DU810SWPU | Installation Instructions - Page 23
du tuyau d'évacuation". Si la canalisation d'eau et le câble électrique ne sont pas suffisamment longs, procéder conformément aux instructions de la section "Préparation de l'emplacement d'installation entre les placards lorsque les canalisations et câbles n'ont pas été installés". 2. Employer - Whirlpool DU810SWPU | Installation Instructions - Page 24
Option 2 - pas de broyeur à déchets - avec brise-siphon : 1. Si nécessaire, couper l'extrémité du tuyau d'évacuation (ne pas couper dans la section ondulée). 2. Connecter le tuyau d'évacuation sur le dispositif brise-siphon avec la grosse bride à ressort. Si le tuyau d'évacuation a été coupé, - Whirlpool DU810SWPU | Installation Instructions - Page 25
5. Faire passer l'autre extrémité du câble à travers le trou percé dans le placard. L'extrémité du câble doit pouvoir parvenir jusqu'à l'angle avant droit de l'espace d'installation. Option 2 - raccordement par cordon d'alimentation : REMARQUE : Une prise de courant murale à 3 alvéoles de - Whirlpool DU810SWPU | Installation Instructions - Page 26
Option 2 - pas de broyeur à déchets - avec brise-siphon : 1. Si nécessaire, couper l'extrémité du tuyau d'évacuation (ne pas couper dans la section ondulée). 2. Connecter le tuyau d'évacuation sur le dispositif brise-siphon avec la grosse bride à ressort. Si le tuyau d'évacuation a été coupé, - Whirlpool DU810SWPU | Installation Instructions - Page 27
, installer maintenant le cordon d'alimentation conformément aux instructions fournies avec l'ensemble. La trousse du cordon d'alimentation ); il sera cependant plus difficile de placer le lave-vaisselle à sa position de service finale. Si on enlève les roues, on devra veiller à protéger le - Whirlpool DU810SWPU | Installation Instructions - Page 28
ou le câble de raccordement direct entre le lave-vaisselle et le placard. Conseil utile : Lorsque le lave-vaisselle est à sa position de service, il peut être nécessaire de soutenir l'avant - soulever/ abaisser ou caler les pieds avant. 7. Enlever la feuille de carton placée sous le lave - Whirlpool DU810SWPU | Installation Instructions - Page 29
Raccordement électrique Voir la section "Spécifications électriques". On doit disposer : ■ d'une source d'électricité appropriée, et d'une liaison à la terre selon la méthode recommandée. Si vous êtes : ■ pour le câblage direct, utiliser l'option 1. ■ pour l'alimentation par un cordon d'alimentation - Whirlpool DU810SWPU | Installation Instructions - Page 30
conducteur ne soit coincé entre le couvercle et la boîte. 9. Ne pas brancher le cordon du lave-vaisselle dans une prise avant que les instructions ne le précisent. 10. Vérifier l'absence de tout contact entre le cordon d'alimentation et le moteur du lave-vaisselle ou la partie inférieure - Whirlpool DU810SWPU | Installation Instructions - Page 31
4. Placer la bride du tuyau de vidange sur le connecteur de tuyau de vidange. éè è 2. Contrôler le bon aplomb du lave-vaisselle, et le centrage latéral de l'appareil dans l'ouverture. 3. Assujettir le lave-vaisselle au plan de travail ou aux côtés des placards avec deux vis Phillips n° 10 x ¹⁄₂". - Whirlpool DU810SWPU | Installation Instructions - Page 32
Alimentation de l'appareil par câblage direct : 2. Soulever chaque extrémité du panneau de porte. À l'aide d'une main, cintrer le panneau inférieur. Enlever le panneau. Ne pas enlever la plaque d'espacement. Alimentation de l'appareil par cordon d'alimentation : 3. Insérer un côté du panneau de - Whirlpool DU810SWPU | Installation Instructions - Page 33
fournis avec le lavevaisselle. Pour les panneaux de porte personnalisés d'un poids supérieur à 1,8 kg (4 lb), vous doit utiliser l'ensemble de ressorts de service rigoureux, Pièce N° 4318050. Le poids maximal du panneau de porte est de 3,6 kg (8 lb). Il est possible d'installer sur le lave-vaisselle - Whirlpool DU810SWPU | Installation Instructions - Page 34
■ Découper les panneaux en bois, de telle manière que l'orientation du grain du bois corresponde à celle du grain des portes des placards. ■ Limer et poncer les bords des panneaux en bois pour éviter les éclats. ■ Le lave-vaisselle est source d'humidité. Appliquer un bouchepores résistant à l' - Whirlpool DU810SWPU | Installation Instructions - Page 35
4. Soulever chaque extrémité du panneau de porte. À l'aide d'une main, cintrer le panneau inférieur. Enlever le pannea et la plaque d'espacement et les conserver pour usage futur. 7. Vérifier le fonctionnement de la porte. Elle devrait se fermer facilement, sans effort, et ne pas s'ouvrir sous l' - Whirlpool DU810SWPU | Installation Instructions - Page 36
Contrôle du fonctionnement 1. Lire le manuel d'utilisation et d'entretien fourni avec l'appareil. 2. Vérifier que toutes les pièces ont été installées et qu'aucune étape n'a été omise. 3. Vérifier la présence de tous les outils utilisés. 4. Mettre le lave-vaisselle en marche et commander l'exécution
-
 1
1 -
 2
2 -
 3
3 -
 4
4 -
 5
5 -
 6
6 -
 7
7 -
8
-
9
-
10
-
11
-
12
-
13
-
14
-
15
-
16
-
17
-
18
-
19
-
20
-
21
-
22
-
23
-
24
-
25
-
26
-
27
-
28
-
29
-
30
-
31
-
32
-
33
-
34
-
35
-
36
 |
 |

INSTALLATION INSTRUCTIONS
UNDERCOUNTER DISHWASHER
INSTRUCTIONS D'INSTALLATION
LAVE-VAISSELLE SOUS PLAN DE TRAVAIL
Table of Contents
.......................
2
Table des matières
....................
19
W10282559A