Whirlpool G7CE3034XB Owners Manual - Page 10
Bridge Element, Warm Zone Element
 |
View all Whirlpool G7CE3034XB manuals
Add to My Manuals
Save this manual to your list of manuals |
Page 10 highlights
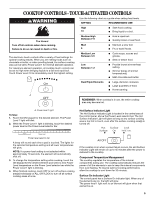
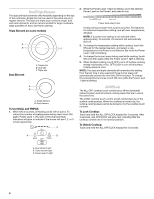
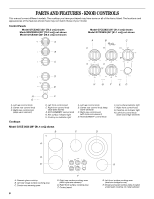
B C A A. Triple zone B. Dual zone C. Single zone To Use SINGLE: 1. Push in and turn knob from the OFF position to the SINGLE zone anywhere between Low and High. 2. Turn knob to OFF when finished. To Use DUAL and TRIPLE: 1. Push in and turn knob from the OFF position to the DUAL or TRIPLE zone anywhere between Low and High. 2. Turn knob to OFF when finished. Bridge Element (on some models) The bridge element allows flexibility in the left side cooking area. Use the bridge area to create an oblong heated area to cook with large cookware. A B C To use SINGLE (A): 1. Push in and turn rear left knob from OFF position anywhere between Low and High. 2. Turn knob to OFF when finished. To use both Single elements and Bridge (A + B + C): 1. Turn on Single and Bridge (C + B). 2. Turn on Single (A). 3. Turn knobs to OFF when finished. Warm Zone Element (on some models) WARNING Food Poisoning Hazard Do not let food sit for more than one hour before or after cooking. Doing so can result in food poisoning or sickness. The Warm Zone feature can be used to keep cooked foods warm. One hour is the recommended maximum time to maintain food quality. Do not use it to heat cold foods. When the Keep Warm function is in use, it will not glow red like the cooking zones, but the indicator light will glow on the control panel. The Warm Zone feature can be used alone or when any of the other surface cooking areas are being used, and can be set from Low to High for different levels of heating. The Warm Zone Element area will not glow red when cycling on. However, the hot surface indicator light will glow as long as the Warm Zone Element area is too hot to touch. ■ Use only cookware and dishes recommended for oven and cooktop use. ■ Cover all foods with a lid or aluminum foil. When warming baked goods, allow a small opening in the cover for moisture to escape. ■ Do not use plastic wrap to cover food. Plastic wrap may melt. ■ Use pot holders or oven mitts to remove food. A. Single size B. Bridge area C. Single size Use the bridge element to create an oblong heated area to cook with oblong pans. To use SINGLE (C): 1. Push in and turn front left knob from OFF position to the SINGLE zone anywhere between Low and High. 2. Turn knob to OFF when finished. To use SINGLE and BRIDGE area (C + B): 1. Push in and turn front left knob from OFF position to the BRIDGE zone anywhere between Low and High. 2. Turn knob to OFF when finished. To Use: 1. Push in and turn Warm Zone knob to desired setting. 2. Turn knob to OFF when finished. 10
-
 1
1 -
2
-
3
-
4
-
 5
5 -
 6
6 -
 7
7 -
 8
8 -
 9
9 -
 10
10 -
 11
11 -
 12
12 -
 13
13 -
 14
14 -
 15
15 -
16
-
17
-
18
-
19
-
20
-
21
-
22
-
23
-
24
-
25
-
26
-
27
-
28
-
29
-
30
-
31
-
32
 |
 |
