Whirlpool GBS277PDB Owners Manual - Page 10
Cooking in Stages, Sensor Cooking, Sensor Popcorn
 |
View all Whirlpool GBS277PDB manuals
Add to My Manuals
Save this manual to your list of manuals |
Page 10 highlights
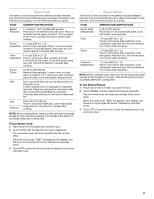
Cooking in Stages The microwave oven can be set to cook at different cooking powers for various lengths of time, up to 3 stages, plus a defrosting stage. To Cook in Stages: 1. Place food on the turntable and close the door. 2. Touch COOK TIME. "STAGE 1 ENTER COOK TIME" will scroll across display. Enter the length of time to cook during the 1st stage. 3. Touch COOK POWER, then enter the desired cooking power for the 1st stage. See "Microwave Cooking Power." 4. Repeat steps 2 and 3 for each additional stage. 5. Touch START. Two tones will sound between stages. When the cycle ends, "END" will appear in the display, and the end-of-cycle tones will sound, followed by reminder tones. 6. Touch OFF or open the door to clear the display and/or stop reminder tones. Cook time may be added in 30-second increments during the cycling stage by touching JET START control. Sensor Cooking A sensor in the microwave oven detects humidity released from the food as it heats, and adjusts the cook time accordingly. Many sensor cycles require the covering of foods. Microwavesafe containers or steamers with loose-fitting lids are recommended. The loose-fitting lid allows enough steam to escape to be detected by the sensor. When covering foods with plastic wrap, be sure to leave a large enough vent opening to allow the steam to escape. NOTES: ■ The microwave oven should be plugged in for at least 3 minutes. ■ The microwave oven cavity and the exterior of the cooking container should be dry. ■ The room temperature should not exceed 95°F (35°C). ■ If the door is opened during a sensor cycle, sensing will stop and the program will be canceled. Sensor Popcorn The sensor in the microwave oven determines the appropriate popping time of commercially packaged microwavable popcorn. NOTE: During Popcorn function, as with all microwave cooking functions, the microwave oven should be attended at all times. Listen for popping to slow to 1 pop every 1 or 2 seconds, then stop the cycle. ■ To avoid damage to the microwave oven, do not use regular paper bags or glassware. ■ Pop only 1 package of popcorn at a time. ■ Follow manufacturer's instructions when using a microwave popcorn popper. ■ For best cooking results, do not try to pop unpopped kernels. ■ Use fresh bags of popcorn for optimal results. ■ Cooking results may vary by brand and fat content. For bag sizes not listed in this section, follow directions on the package. There are 2 popcorn functions: Regular and Snack. Use Regular for bag sizes 3.5 oz (99 g) and 3.0 oz (85 g). Use Snack for bag size 1.75 oz (50 g). To Use POPCORN: 1. Place popcorn bag on the turntable and close the door. 2. Touch POPCORN once for Regular, or twice for Snack. Touch START, or wait for the microwave oven to start the popping cycle automatically. When the cycle ends, "END" will appear in the display, and the end-of-cycle tones will sound, followed by reminder tones. 3. Touch OFF or open the door to clear the display and/or stop reminder tones. 10
-
 1
1 -
2
-
3
-
4
-
 5
5 -
 6
6 -
 7
7 -
 8
8 -
 9
9 -
 10
10 -
 11
11 -
 12
12 -
 13
13 -
 14
14 -
 15
15 -
16
 |
 |
