Whirlpool GCEM2990TQ Installation Instructions
Whirlpool GCEM2990TQ Manual
 |
View all Whirlpool GCEM2990TQ manuals
Add to My Manuals
Save this manual to your list of manuals |
Whirlpool GCEM2990TQ manual content summary:
- Whirlpool GCEM2990TQ | Installation Instructions - Page 1
85772"_3 www.whNpooLcom - Whirlpool GCEM2990TQ | Installation Instructions - Page 2
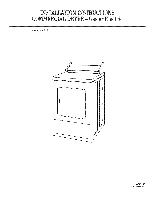
and Parts 4 Ebctricat Requirements 6 Gas Supply Requirements 7 Venting Requirements 8 INSTALLATION INSTRUCTIONS = GAS DRYER 10 Move Dryer into Position 10 Make Gas Connection 10 Connect Vent 10 Complete InstaUation 10 INSTALLATION INSTRUCTIONS = ELECTRIC DRYER ........ 11 Move Dryer - Whirlpool GCEM2990TQ | Installation Instructions - Page 3
reaction that could cause a load to catch fire. Do not repair or replace any part of the dryer or attempt any servicing unless specifically recommended in this Use and Care Guide or in published user-repair instructions that you understand and have the skills to carry out. m Do not dry articles - Whirlpool GCEM2990TQ | Installation Instructions - Page 4
vent) Pliers Putty knife Parts supplied Remove parts bag from dryer drum. Check that all parts were included. [] Dryer foot (4) Explosion Hazard Keep . See "Recessed Area and Closet Installation Instructions" below for minimum spacing requirements. NOTE: The dryer must not be installed in an area - Whirlpool GCEM2990TQ | Installation Instructions - Page 5
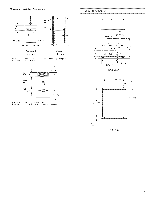
minimum for a closet door. Louvered doors with equivalent air openings are acceptable. Product Dimensions 29" (73.7 cm) 16 _ ! (40.6 cm) ELECTRIC 141%2 ' [ 4" "--'[ "_ (10.2cm) _/ dia. 281/4'' ;m_E (71 _8cm) 4¾" 183Z-,W (46.7 cm) [ 1 V4" (3.2 cm) Back view _ - Whirlpool GCEM2990TQ | Installation Instructions - Page 6
instructions can result in death, fire, or electrical shock, IMPORTANT: The dryer must be electrically , AC-only electrical supply (or four-wire or three-wire, 120/208-volt, if specified on the model/seria! rating or service representative or personnel if you are in doubt as to whether the dryer is - Whirlpool GCEM2990TQ | Installation Instructions - Page 7
the model/serial plate. Burner input adjustments are not required when the dryer is operated service technician. Gas conversion kit part numbers are listed on the gas valve burner base. A A. Gas supp!y line B. Shutoff valve "open" position C. To dryer [] Installed in a confined area: If the dryer - Whirlpool GCEM2990TQ | Installation Instructions - Page 8
instructions or fire. can result in death WARNING: To reduce the risk of fire, this dryer MUST BE EXHAUSTED OUTDOORS. [] The dryer and supported when the dryer is Whirlpool Service Manual, "Exhausting Whirlpool Dryers," Part No. LIT603197, available from your Whirlpool parts distributor. if dryer - Whirlpool GCEM2990TQ | Installation Instructions - Page 9
elbow on the end of the vent at least 2 feet (61 cm) above the highest part of the building. The opening wall or roof shall have a diameter 1A" (! .3 cm fumes. Fumes create acids which, when drawn through the dryer heating units, can damage dryers and loads being dried. A clean-out cover should be - Whirlpool GCEM2990TQ | Installation Instructions - Page 10
, move dryer to desired installation location. 2, Take tape off front corners of dryer. Open dryer and remove the literature and parts packages. to follow these instructions can result in death, fire, or electrical shock, 1, Remove red cap from gas pipe. 2, Connect gas supply to dryer. Use pipe- - Whirlpool GCEM2990TQ | Installation Instructions - Page 11
move dryer to desired installation location. 2, Take tape off front corners of dryer. Open dryer and remove the literature and parts packages. "Four-wire connection" instructions. Use a UL-Iisted power supply cord rated 240-volt min., 30-amp and marked for use with a clothes dryer. Fire Hazard Use a - Whirlpool GCEM2990TQ | Installation Instructions - Page 12
sections together. Install power supply cord through the A. Strain relief clamp sections B, Dryer cabinet C. Strain relief screws strain relief. 4+ Complete installation following instructions for your type of electrical connection: + Four-wire (recommended method) Power Supply Cord, Four-wire - Whirlpool GCEM2990TQ | Installation Instructions - Page 13
to outer terminal block screws, Tighten screws, 8, Tighten strain relief screws, 9, Insert tab of the terminal block cover into slot of the dryer rear panel, Secure cover with hold-down screw, 10, After reattaching the terminal cover, connect a separate copper ground wire from the external ground - Whirlpool GCEM2990TQ | Installation Instructions - Page 14
install direct wire cable through the flexible metallic conduit, L______ __j ...... S A. Conduit connector B. Dryer cabinet C. Connector screw 4, Complete installation following instructions for your type of electrical connection: Four-wire (recommended method) * Three-wire (if four-wire is not - Whirlpool GCEM2990TQ | Installation Instructions - Page 15
Direct Wire, Three=wire electrical connection: Three wire with ground wire: green or bare wire cut short. Wire is not used. Dryer is grounded through neutral conductor. A to disconnect box L of wires stripped of _ insulation Use this method where Bocat codes permit connecting neutraB ground - Whirlpool GCEM2990TQ | Installation Instructions - Page 16
more often, depending on dryer usage. if dryer does not operate check the fomlowing: m Electric supply is connected. m Commercial Laundry Support Center will answer any questions about operating or maintaining your dryer not covered in the Insta!lation instructions. The Commemial Laundry Support
-
 1
1 -
 2
2 -
 3
3 -
 4
4 -
 5
5 -
 6
6 -
 7
7 -
8
-
9
-
10
-
11
-
12
-
13
-
14
-
15
-
16
 |
 |
85772"_3
www.whNpooLcom