Whirlpool GI7FVCXXQ Owners Manual - Page 6
Remove and Replace Freezer Drawer, IMPORTANT, Remove Drawer Front, Replace Drawer Front, Adjust
 |
View all Whirlpool GI7FVCXXQ manuals
Add to My Manuals
Save this manual to your list of manuals |
Page 6 highlights
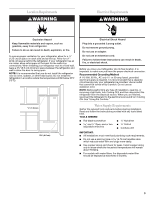
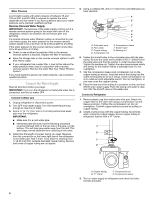
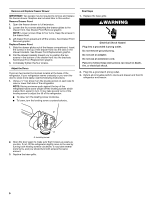
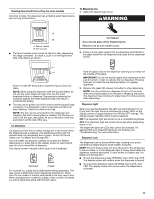
Remove and Replace Freezer Drawer IMPORTANT: Two people may be required to remove and replace the freezer drawer. Graphics are included later in this section. Remove Drawer Front 1. Open the freezer drawer to full extension. 2. Loosen the four screws attaching the drawer glides to the drawer front. See Drawer Front Removal graphic. NOTE: Loosen screws three to four turns. Keep the screws in the drawer front. 3. Lift drawer front upward and off the screws. See Drawer Front Removal graphic. Replace Drawer Front 1. Slide the drawer glides out of the freezer compartment. Insert the screws in the top of the drawer front into the slots in the drawer brackets. See Drawer Front Replacement graphic. 2. Pull the drawer brackets toward you to position the two screws in the bottom of the drawer front into the brackets. See Drawer Front Replacement graphic. 3. Completely tighten the four screws. Adjust the Doors There are two leveler foot screws located at the base of the refrigerator. If your refrigerator seems unsteady or you want the door to close more easily, use the following instructions. 1. Using a ¹⁄₄" hex driver, turn the leveling screw on each side to raise or lower that side of the refrigerator. NOTE: Having someone push against the top of the refrigerator takes some weight off the leveling screws which makes them easier to turn. It may take several turns of the leveling screw to adjust the tilt of the refrigerator. ■ To raise, turn the leveling screw clockwise. ■ To lower, turn the leveling screw counterclockwise. Final Steps 1. Replace the base grille. WARNING Electrical Shock Hazard Plug into a grounded 3 prong outlet. Do not remove ground prong. Do not use an adapter. Do not use an extension cord. Failure to follow these instructions can result in death, fire, or electrical shock. 2. Plug into a grounded 3 prong outlet. 3. Return all removable parts to doors and drawer and food to refrigerator and freezer. A A. Leveling screw 2. Open the door again to make sure that it closes as easily as you like. If not, tilt the refrigerator slightly more to the rear by turning both leveling screws clockwise. It may take several more turns, and you should turn both screws the same amount. 3. Replace the base grille. 6
-
 1
1 -
 2
2 -
 3
3 -
 4
4 -
 5
5 -
 6
6 -
 7
7 -
 8
8 -
 9
9 -
 10
10 -
 11
11 -
 12
12 -
13
-
14
-
15
-
16
-
17
-
18
-
19
-
20
-
21
-
22
-
23
-
24
-
25
-
26
-
27
-
28
-
29
-
30
-
31
-
32
-
33
-
34
-
35
-
36
-
37
-
38
-
39
-
40
-
41
-
42
-
43
-
44
-
45
-
46
-
47
-
48
-
49
-
50
-
51
-
52
-
53
-
54
-
55
-
56
-
57
-
58
 |
 |
