Whirlpool GJC3055RS Installation Instructions
Whirlpool GJC3055RS - Smoothtop Electric Cooktop Manual
 |
UPC - 050946998756
View all Whirlpool GJC3055RS manuals
Add to My Manuals
Save this manual to your list of manuals |
Whirlpool GJC3055RS manual content summary:
- Whirlpool GJC3055RS | Installation Instructions - Page 1
ELECTRIC COOKTOP INSTALLATION INSTRUCTIONS INSTRUCTIONS D'INSTALLATION DE LA TABLE DE CUISSON Table of Contents COOKTOP SAFETY ...1 INSTALLATION INSTRUCTIONS ...2 Tools and Parts ...2 Location Requirements ...2 Electrical Requirements...3 Prepare Cooktop for Installation ...4 Install Cooktop ...5 - Whirlpool GJC3055RS | Installation Instructions - Page 2
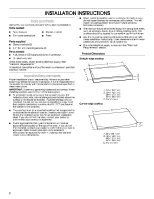
find this label, contact your dealer to confirm that your oven is approved. Refer to oven manufacturer's Installation Instructions for approval for built-in undercounter use and proper cutout dimensions. B s A C A. 22¹⁄₈" (56.1 cm) B. 16 42.1 cm) 30 77.1 cm) 36 92.3 cm) C. 2⁷⁄₈" (7.3 cm) 2 - Whirlpool GJC3055RS | Installation Instructions - Page 3
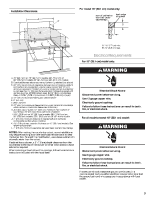
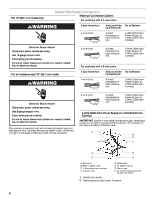
power before servicing. Use 12 gauge copper wire. Electrically ground cooktop. Failure to follow these instructions can result in death, fire, or electrical shock. For all models except 15" (38.1 cm) model: WARNING NOTES: After making the countertop cutout, some installations may require - Whirlpool GJC3055RS | Installation Instructions - Page 4
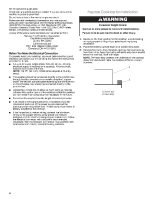
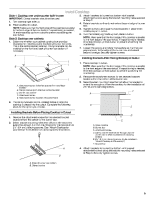
the underside of the cooktop glass from debris and helps the cooktop sit flat on uneven counters. Before You Make the Electrical Connection: To properly install your cooktop, you must determine the type of electrical connection you will be using and follow the instructions provided for it here - Whirlpool GJC3055RS | Installation Instructions - Page 5
is the recommended location. Clamp brackets can be installed on the front and back of burner box bottom, if necessary. A Installing Brackets After Placing Cooktop in Cutout B C D 1. Place cooktop in cutout. NOTE: Make sure that the front edge of the cooktop is parallel to the front edge of the - Whirlpool GJC3055RS | Installation Instructions - Page 6
to 3-Wire Cable from Cooktop For all models except 15" (38.1 cm) model: 4-wire direct WARNING 5" (12.7 cm) 3-wire direct Electrical Shock Hazard Disconnect power before servicing. Use 8 gauge copper wire. Electrically ground cooktop. Failure to follow these instructions can result in death - Whirlpool GJC3055RS | Installation Instructions - Page 7
the green or bare ground wire (in the junction box) using the UL listed wire nuts. 9. Install junction box cover. 10. Reconnect power. 4-Wire Cable from Power Supply to 3-Wire Cable from Cooktop IMPORTANT: Use the 4-wire cable from power supply where local codes do not permit connecting the frame - Whirlpool GJC3055RS | Installation Instructions - Page 8
Use and Care Guide. NOTE: If the cooktop does not work after turning on the power, check that a circuit breaker has not tripped or a house fuse has not blown. See "Troubleshooting" section in the Use and Care Guide for further information. If you need Assistance or Service: Please reference the - Whirlpool GJC3055RS | Installation Instructions - Page 9
SÉCURITÉ DE LA TABLE DE CUISSON Votre sécurité et celle des autres est très importante. Nous donnons de nombreux messages de sécurité importants dans ce manuel et sur votre appareil ménager. Assurez-vous de toujours lire tous les messages de sécurité et de vous y conformer. Voici le symbole d'alerte - Whirlpool GJC3055RS | Installation Instructions - Page 10
Dimensions du produit Table de cuisson - Whirlpool GJC3055RS | Installation Instructions - Page 11
REMARQUES : Après avoir découpé l'ouverture qui recevra la table de cuisson, il peut être nécessaire d'entailler la paroi latérale du placard inférieur pour permettre le passage de la boîte de brûleur. Pour éviter cette modification, utiliser un placard inférieur dont la taille des parois latérales - Whirlpool GJC3055RS | Installation Instructions - Page 12
S'assurer que la connexion électrique et le calibre des fils sont appropriés et conformes - Whirlpool GJC3055RS | Installation Instructions - Page 13
Installation de la table de cuisson Style 1 : Table de cuisson sur four encastré sous comptoir IMPORTANT : Ne pas utiliser de brides de fixation. 1. Tourner le côté droit - Whirlpool GJC3055RS | Installation Instructions - Page 14
Raccordement électrique Pour le modèle de 15" (38,1 cm) uniquement : Pour tables de cuisson avec câble - Whirlpool GJC3055RS | Installation Instructions - Page 15
4. Serrer les vis du connecteur de conduit, le cas échéant. 5. Connecter ensemble les deux connecteurs noirs avec le connecteur de fils (homologation UL). 6. Connecter ensemble les deux connecteurs rouges avec le connecteur de fils (homologation UL). 7. Connecter ensemble les deux connecteurs blancs - Whirlpool GJC3055RS | Installation Instructions - Page 16
Câble
-
 1
1 -
 2
2 -
 3
3 -
 4
4 -
 5
5 -
 6
6 -
 7
7 -
8
-
9
-
10
-
11
-
12
-
13
-
14
-
15
-
16
 |
 |
ELECTRIC COOKTOP INSTALLATION INSTRUCTIONS
INSTRUCTIONS D’INSTALLATION DE
LATABLE DE CUISSON
COOKTOP SAFETY
8286066
Table of Contents
Table des Matières
COOKTOP SAFETY
.................................
1
INSTALLATION INSTRUCTIONS
...........
2
Tools and Parts
.....................................
2
Location Requirements
.........................
2
Electrical Requirements
.........................
3
Prepare Cooktop for Installation
...........
4
Install Cooktop
......................................
5
Make Electrical Connection
..................
6
Attach Cooktop to Countertop
..............
8
Complete Installation
.............................
8
SÉCURITÉ DE LA TABLE DE CUISSON9
INSTRUCTIONS D’INSTALLATION
.......
9
Outillage et pièces
.................................
9
Exigences d’emplacement
....................
9
Spécifications électriques
...................
11
Préparation de la table de cuisson
pour l'installation
.................................
12
Installation de la table de cuisson
.......
13
Raccordement électrique
....................
14
Fixation de la table de cuisson
au plan de travail
.................................
16
Achever l'installation
...........................
16
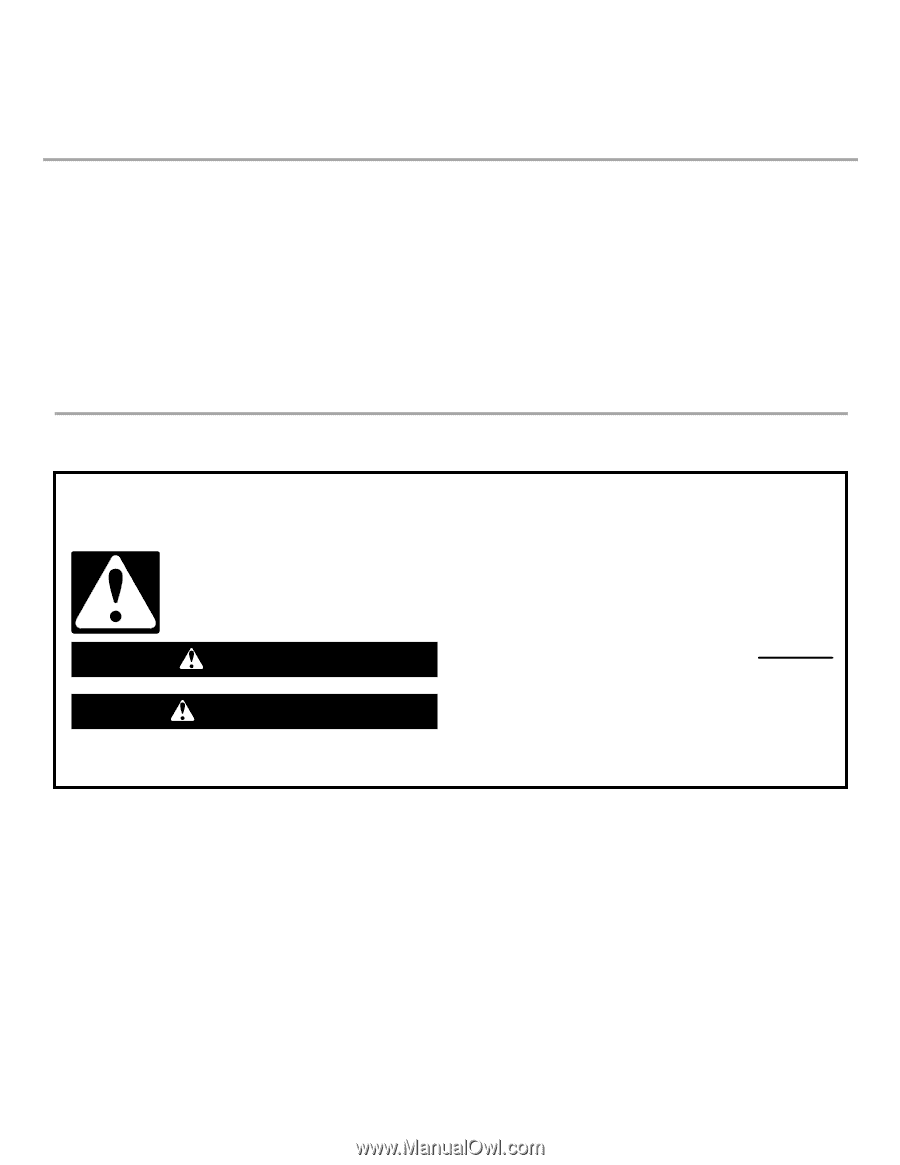
You can be killed or seriously injured if you don't immediately
You
can be killed or seriously injured if you don't follow
All safety messages will tell you what the potential hazard is, tell you how to reduce the chance of injury, and tell you what can
happen if the instructions are not followed.
Your safety and the safety of others are very important.
We have provided many important safety messages in this manual and on your appliance. Always read and obey all safety
messages.
This is the safety alert symbol.
This symbol alerts you to potential hazards that can kill or hurt you and others.
All safety messages will follow the safety alert symbol and either the word “DANGER” or “WARNING.”
These words mean:
follow instructions.
instructions.
DANGER
WARNING
IMPORTANT:
Installer:
Leave installation instructions with the homeowner.
Homeowner:
Keep installation instructions for future reference.
Save installation instructions for local electrical inspector's use.
IMPORTANT :
Installateur :
Remettre les instructions d'installation au propriétaire.
Propriétaire :
Conserver les instructions d'installation pour référence ultérieure.
Conserver les instructions d'installation pour consultation par l'inspecteur local des installations électriques.