Whirlpool GY397LXUQ Installation Instructions
Whirlpool GY397LXUQ Manual
 |
View all Whirlpool GY397LXUQ manuals
Add to My Manuals
Save this manual to your list of manuals |
Whirlpool GY397LXUQ manual content summary:
- Whirlpool GY397LXUQ | Installation Instructions - Page 1
SLIDE-IN ELECTRIC RANGES INSTRUCTIONS D'INSTALLATION DES CUISINIÈRES ÉLECTRIQUES ENCASTRABLE Table of Contents/Table des matières RANGE SAFETY 2 INSTALLATION REQUIREMENTS 3 Tools and Parts 3 Location Requirements 3 Electrical Requirements - U.S.A. Only 4 Electrical Requirements - Canada - Whirlpool GY397LXUQ | Installation Instructions - Page 2
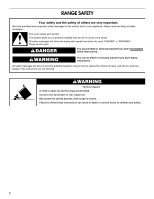
RANGE SAFETY Your safety and the safety of others are very important. We have provided many important safety messages in this manual and the range and be killed. Connect anti-tip bracket to rear range foot. Reconnect the anti-tip bracket, if the range is moved. Failure to follow these instructions - Whirlpool GY397LXUQ | Installation Instructions - Page 3
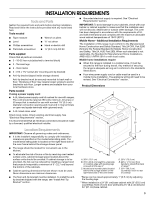
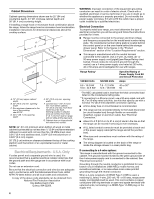
. See "Electrical Connection" section. Product Dimensions A F B* Location Requirements IMPORTANT: Observe all governing codes and ordinances. ■ It is the installer's responsibility to comply with installation clearances specified on the model/serial rating plate. The model/serial rating plate is - Whirlpool GY397LXUQ | Installation Instructions - Page 4
install your range, you must determine the type of electrical connection you will be using and follow the instructions provided for it here. ■ Range must be connected to the proper electrical voltage and frequency as specified on the model/serial number rating plate. The model/serial number rating - Whirlpool GY397LXUQ | Installation Instructions - Page 5
uses a 3-wire receptacle of NEMA Type 10-50R. 3-wire receptacle (10-50R) Electrical Requirements - Canada Only WARNING ■ Check with a qualified electrical installer if you are not sure the range is properly grounded. Range Rating* 120/240 Volts 8.8 - 16.5 KW 16.6 - 22.5 KW 120/208 Volts 7.8 - 12 - Whirlpool GY397LXUQ | Installation Instructions - Page 6
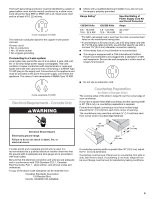
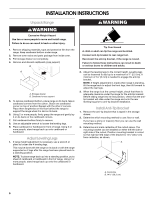
INSTRUCTIONS Unpack Range WARNING Excessive Weight Hazard Use two or more people to move and install range. Failure to do so can result in back or other injury. 1. Remove shipping materials, tape and protective film from the range. Keep cardboard bottom under range. 2. Remove oven racks and parts - Whirlpool GY397LXUQ | Installation Instructions - Page 7
grounded outlet. Failure to follow these instructions can result in death, fire, or electrical shock. Electrical Shock Hazard Disconnect power before servicing. Use 8 gauge copper or 6 gauge aluminum wire. Electrically ground range. Failure to follow these instructions can result in death, fire, or - Whirlpool GY397LXUQ | Installation Instructions - Page 8
cord through the opening in the cord/conduit plate on bottom of range. Allow enough slack to easily attach the wiring to the terminal block against the power supply cord. ■ Use Phillips screwdriver to remove screws and slide cord/conduit plate down and out. Style 2: Direct wire strain relief ■ - Whirlpool GY397LXUQ | Installation Instructions - Page 9
to the terminal block. 5. Replace back panel and screws on rear of range. 6. Complete installation following instructions for your type of electrical connection: 4-wire (recommended) 3-wire (if 4-wire is not available) Electrical Connection Options If your home has: And you will be Go to Section - Whirlpool GY397LXUQ | Installation Instructions - Page 10
supply cord replacement, only use a power cord rated at 250 volts minimum, 40 amps or 50 ranges. 5. Replace terminal block access cover. Direct Wire Installation: Copper or Aluminum Wire This range may be connected directly to the fuse disconnect or circuit breaker box. Depending on your electrical - Whirlpool GY397LXUQ | Installation Instructions - Page 11
1. Part of metal ground strap must be cut out and removed. A B C 4. Attach terminal lugs 35 lbs-in. (4.0 N-m) 5. Use Phillips screwdriver to connect the bare (green) ground wire to the range with the ground-link screw. The ground wire must be attached first and must not contact any other terminal. - Whirlpool GY397LXUQ | Installation Instructions - Page 12
Verify Anti-Tip Bracket Location 1. Making sure the anti-tip bracket is installed: ■ Look for the anti-tip bracket securely attached to floor or wall. ■ Slide range back so rear range foot is engaged with anti-tip bracket. B C D E Level Range 1. Place rack in oven. Place level on rack and check - Whirlpool GY397LXUQ | Installation Instructions - Page 13
bracket is installed: ■ Look for the anti-tip bracket securely attached to floor or wall. ■ Slide range back so rear range foot is under anti-tip bracket. 6. Check that range is level. For direct-wired ranges: WARNING Electrical Shock Hazard Disconnect power before servicing. Replace all parts and - Whirlpool GY397LXUQ | Installation Instructions - Page 14
est le danger potentiel et vous disent comment réduire le risque de blessure et ce qui peut se produire en cas de non-respect des instructions. AVERTISSEMENT Risque de basculement Un enfant ou une personne adulte peut faire basculer la cuisinière ce qui peut causer un décès. Joindre la bride - Whirlpool GY397LXUQ | Installation Instructions - Page 15
de commencer l'installation. Lire et suivre les instructions fournies avec les avec une cuisinière. Pour service 250 volts minimum, 40 A ou dimensions constituent les valeurs minimales des dégagements de séparation. ■ La bride antibasculement de plancher doit être installée. Pour l'installation - Whirlpool GY397LXUQ | Installation Instructions - Page 16
installation d'une hotte ou d'un ensemble hotte/microondes au-dessus de la cuisinière, suivre les instructions fournies avec la hotte concernant les dimensions du tiroir de remisage) D. 29⁷⁄₈" (75,9 cm) E. Longueur de la poignée au support à l'arrière de la cuisinière : 28 71,9 cm)** F. Du coin du - Whirlpool GY397LXUQ | Installation Instructions - Page 17
non-respect de cette instruction peut causer un décès, un 178 Rexdale Blvd. Toronto, ON M9W 1R3 CANADA ■ En cas de doute quant à la placée à portée de la position de service finale de la cuisinière. Préparation de plus de 30" (76,2 cm), ajuster la dimension de ³⁄₈" (1 cm). Il faut que le plan de - Whirlpool GY397LXUQ | Installation Instructions - Page 18
deux ou plus de personnes pour déplacer et installer la cuisinière. Le non-respect de cette instruction peut causer une blessure au dos ou d'autre plancher dans le sens de la longueur derrière la cuisinière à titre de support de la cuisinière lorsque celle-ci est placée sur sa partie postérieure. - Whirlpool GY397LXUQ | Installation Instructions - Page 19
la cuisinière" dans le Guide d'utilisation et d'entretien. 7. Brancher le cordon électrique dans la prise de courant appropriée. Faire glisser la cuisinière à son emplacement final. Vérifier que le câble flexible ou le cordon électrique ne sont pas déformés. 8. Réinstaller le tiroir de remisage. 19 - Whirlpool GY397LXUQ | Installation Instructions - Page 20
surface et le four. Pour des instructions spécifiques concernant l'utilisation de la cuisinière, consulter le Guide d'utilisation et d'entretien. Si la de la cuisinière AVERTISSEMENT 3. S'assurer que la bride antibasculement est installée : ■ Vérifier que la bride antibasculement est bien fixée au
-
 1
1 -
 2
2 -
 3
3 -
 4
4 -
 5
5 -
 6
6 -
 7
7 -
8
-
9
-
10
-
11
-
12
-
13
-
14
-
15
-
16
-
17
-
18
-
19
-
20
 |
 |

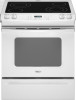
INSTALLATION INSTRUCTIONS
SLIDE-IN ELECTRIC RANGES
INSTRUCTIONS D’INSTALLATION DES CUISINIÈRES
ÉLECTRIQUES ENCASTRABLE
Table of Contents/Table des matières
RANGE SAFETY
.............................................................................
2
INSTALLATION REQUIREMENTS
................................................
3
Tools and Parts
............................................................................
3
Location Requirements
................................................................
3
Electrical Requirements - U.S.A. Only
.........................................
4
Electrical Requirements - Canada Only
.......................................
5
Countertop Preparation
...............................................................
5
INSTALLATION INSTRUCTIONS
..................................................
6
Unpack Range
..............................................................................
6
Adjust Leveling Legs
....................................................................
6
Install Anti-Tip Bracket
.................................................................
6
Electrical Connection - U.S.A. Only
.............................................
7
Verify Anti-Tip Bracket Location
................................................
12
Level Range
................................................................................
12
Complete Installation
.................................................................
13
Moving the Range
......................................................................
13
SÉCURITÉ DE LA CUISINIÈRE
...................................................
14
EXIGENCES D'INSTALLATION
...................................................
15
Outillage et pièces
......................................................................
15
Exigences d'emplacement
.........................................................
15
Spécifications électriques
..........................................................
17
Préparation du plan de travail
....................................................
17
INSTRUCTIONS D'INSTALLATION
.............................................
18
Déballage de la cuisinière
..........................................................
18
Réglage des pieds de nivellement
.............................................
18
Installation de la bride antibasculement
....................................
18
Vérification de l'emplacement de la bride antibasculement
......
19
Réglage de l'aplomb de la cuisinière
.........................................
19
Achever l'installation
..................................................................
19
Déplacement de la cuisinière
.....................................................
20
IMPORTANT:
Save for local electrical inspector's use.
IMPORTANT :
À conserver pour consultation par l'inspecteur local des installations électriques.
8101P750-60