Whirlpool IC14B Use & Care Guide - Page 10
Meat Drawer, Crisper, Utility or Egg Bin
 |
View all Whirlpool IC14B manuals
Add to My Manuals
Save this manual to your list of manuals |
Page 10 highlights
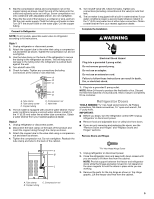
Meat Drawer (on some models) To remove and replace the meat drawer: 1. Slide meat drawer out to the stop. 2. Lift front of meat drawer with one hand while supporting bottom of drawer with other hand. Slide drawer out the rest of the way. 3. Replace the drawer by sliding it back in fully past the drawer stop. Meat Drawer Cover (on some models) To remove and replace the meat drawer cover: 1. Remove the meat drawer. 2. Push the cover back to release the rear clips from the shelf. Tilt the cover up at the front, and pull it forward. 3. Replace the meat drawer cover by fitting the notches and clips on the cover over the rear and center crossbars on the shelf. 4. Lower cover into place and pull the cover forward to secure the rear clips onto the shelf. 5. Replace the meat drawer. NOTE: In some models the meat pan moves sideways on the shelf to allow for flexible positioning. Crisper Cover Style 1 - Plastic Cover To remove and replace the crisper cover: 1. Remove the crisper(s). 2. Lift the front of the cover to remove the cover support. Then lift the cover up and slide it out. 3. Replace the cover by fitting the cover tabs into lowest cabinet slots and pushing them in. Lower the front retainers into place. Meat Storage Guide Store most meat in original wrapping as long as it is airtight and moisture-proof. Rewrap if necessary. See the following chart for storage times. When storing meat longer than the times given, freeze the meat. Fresh fish or shellfish use same day as purchased Chicken, ground beef, variety meats (liver 1-2 days Cold cuts, steaks/roasts 3-5 days Cured meats 7-10 days Leftovers - Cover leftovers with plastic wrap, aluminum foil, or plastic containers with tight lids. Crisper (on some models) Crisper Drawers To remove and replace the crisper drawer: 1. Slide the crisper drawer straight out to the stop. Lift the front and slide the drawer out the rest of the way. 2. Replace the drawer by sliding the drawer in fully past the stop. 4. Insert cover support (with the long tab toward the front) into the groove on the underside of the cover. NOTE: If the support needs adjustment, turn the base of the support clockwise to raise or counterclockwise to lower. Style 2 - Glass Cover To remove and replace the crisper cover: 1. Pull the glass straight out. 2. Replace the glass by pushing it straight in. Utility or Egg Bin (on some models) Depending on your model, you may have a one, two or three piece bin. Eggs may be stored in the egg tray or loose in the bin. NOTE: Store eggs in a covered container for long-term storage. If your model does not have an egg storage bin, store eggs in their original container on an interior shelf. 10
-
 1
1 -
2
-
3
-
4
-
 5
5 -
 6
6 -
 7
7 -
 8
8 -
 9
9 -
 10
10 -
 11
11 -
 12
12 -
 13
13 -
 14
14 -
 15
15 -
16
-
17
-
18
-
19
-
20
-
21
-
22
-
23
-
24
-
25
-
26
-
27
-
28
-
29
-
30
-
31
-
32
 |
 |
