Whirlpool SF362LXTT Installation Instructions - Page 6
Installation Instructions
 |
UPC - 883049054957
View all Whirlpool SF362LXTT manuals
Add to My Manuals
Save this manual to your list of manuals |
Page 6 highlights
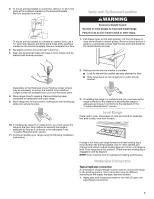
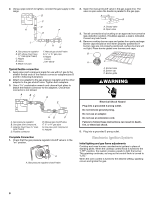
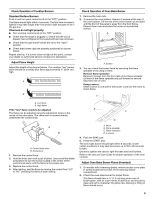
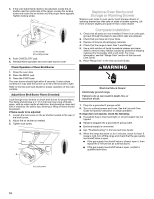
Burner Input Requirements Input ratings shown on the model/serial rating plate are for elevations up to 2,000 ft (609.6 m). For elevations above 2,000 ft (609.6 m), ratings are reduced at a rate of 4% for each 1,000 ft (304.8 m) above sea level. Gas Supply Pressure Testing Line pressure testing above ½ psi gauge (14" WCP) The range and its individual manual shutoff valve must be disconnected from the gas supply piping system during any pressure testing of that system at test pressures greater than ½ psi (3.5 kPa). Line pressure testing at ½ psi gauge (14" WCP) or lower The range must be isolated from the gas supply piping system by closing its individual manual shutoff valve during any pressure testing of that system at test pressures equal to or less than ½ psi (3.5 kPa). INSTALLATION INSTRUCTIONS Unpack Range WARNING Excessive Weight Hazard Use two or more people to move and install range. Failure to do so can result in back or other injury. Install Anti-Tip Bracket WARNING 1. Remove shipping materials, tape and protective film from range. Remove oven racks and parts package from inside oven. 2. Do not remove the shipping base at this time. A A. Shipping base 3. On Ranges Equipped with Storage Drawers: Remove the storage drawer. Use a ³⁄₈" drive ratchet to lower the rear leveling legs one-half turn. Use channel lock pliers to lower front leveling legs one-half turn. On Ranges Equipped with Warming Drawers: Use channel lock pliers to lower the front and rear leveling legs one-half turn. A D C Tip Over Hazard A child or adult can tip the range and be killed. Connect anti-tip bracket to rear range foot. Reconnect the anti-tip bracket, if the range is moved. Failure to follow these instructions can result in death or serious burns to children and adults. Contact a qualified floor covering installer for the best procedure for drilling mounting holes through your type of floor covering. Before moving range, slide range onto shipping base, cardboard or hardboard. 1. Remove template from the anti-tip bracket kit (found inside the oven cavity) or from the back of this manual. 2. Place template on the floor in cabinet opening so that the left edge is against cabinet and top edge is against rear wall, molding or cabinet. 3. Tape template into place. 4. If countertop is not flush with cabinet opening edge, align template with overhang. B A. ³⁄₈" drive ratchet B. Rear leveling leg C. Channel lock pliers D. Front leveling leg If cabinet opening is wider than that specified in the "Location Requirements" section, adjust template so range will be centered in cabinet opening. 6
-
 1
1 -
 2
2 -
 3
3 -
 4
4 -
 5
5 -
 6
6 -
 7
7 -
 8
8 -
 9
9 -
 10
10 -
 11
11 -
 12
12 -
13
-
14
-
15
-
16
 |
 |