Whirlpool UXI1200DYS Installation Guide - Page 6
Installation Instructions
 |
View all Whirlpool UXI1200DYS manuals
Add to My Manuals
Save this manual to your list of manuals |
Page 6 highlights
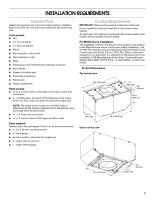
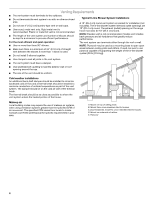
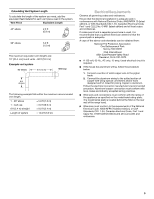
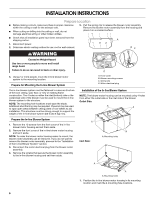
INSTALLATION INSTRUCTIONS Prepare Location ■ Before making cutouts, make sure there is proper clearance within the ceiling or wall for the exhaust vent. ■ When cutting or drilling into the ceiling or wall, do not damage electrical wiring or other hidden utilities. 5. Pull the spring clip to release the blower motor assembly. Remove the blower motor assembly from the housing and place it on a covered surface. ■ Check that all installation parts have been removed from the shipping carton. A 1. Disconnect power. 2. Determine which venting method to use: roof or wall exhaust. BC WARNING Excessive Weight Hazard Use two or more people to move and install range hood. Failure to do so can result in back or other injury. 3. Using 2 or more people, move the in-line blower motor system to the mounting location. Prepare for Mounting the In-line Blower System D A. Front cover B. Blower mounting screws C. Spring clip D. Motor electrical plug The in-line blower system must be fastened to a secure structure of the roof, ceiling, wall, floor, or new or existing frame construction. The 4 holes on either the inlet (bottom) side or the outlet (top) side of the blower must be used to mount the in-line blower system to the structure. NOTE: The mounting hole locations must span the studs. Additional stud framing may be required. Plywood may be used to span open areas between ceiling joists or roof rafters to aid installation. This structure must be strong enough to support the weight of the in-line blower system (50 lb [22.6 kg] min). Installation of the In-line Blower System NOTE: The blower motor housing can be mounted using 4 holes from either the outlet side or the inlet side of the blower. Outlet Side: A A Prepare the In-line Blower System 1. Remove the 10 screws from the front cover of the in-line blower motor housing and set them aside. 2. Remove the front cover of the in-line blower motor housing and set it aside. NOTE: To make the blower motor housing easier to mount, the blower motor assembly can be removed. If you do not want to remove the blower motor assembly, proceed to the "Installation of the In-line Blower System" section. 3. Disconnect the motor electrical plug from the blower motor assembly. 4. Remove the screws that secure the blower motor assembly to the in-line blower housing and set them aside. A Inlet Side: A A. Mounting holes A A A. Mounting holes 1. Position the in-line blower motor housing in its mounting location and mark the 4 mounting hole locations. 6
-
 1
1 -
 2
2 -
 3
3 -
 4
4 -
 5
5 -
 6
6 -
 7
7 -
 8
8 -
 9
9 -
 10
10 -
 11
11 -
 12
12 -
13
-
14
-
15
-
16
-
17
-
18
-
19
-
20
 |
 |
