Whirlpool UXT5530AAB Use & Care Guide - Page 7
Installation Instructions
 |
View all Whirlpool UXT5530AAB manuals
Add to My Manuals
Save this manual to your list of manuals |
Page 7 highlights
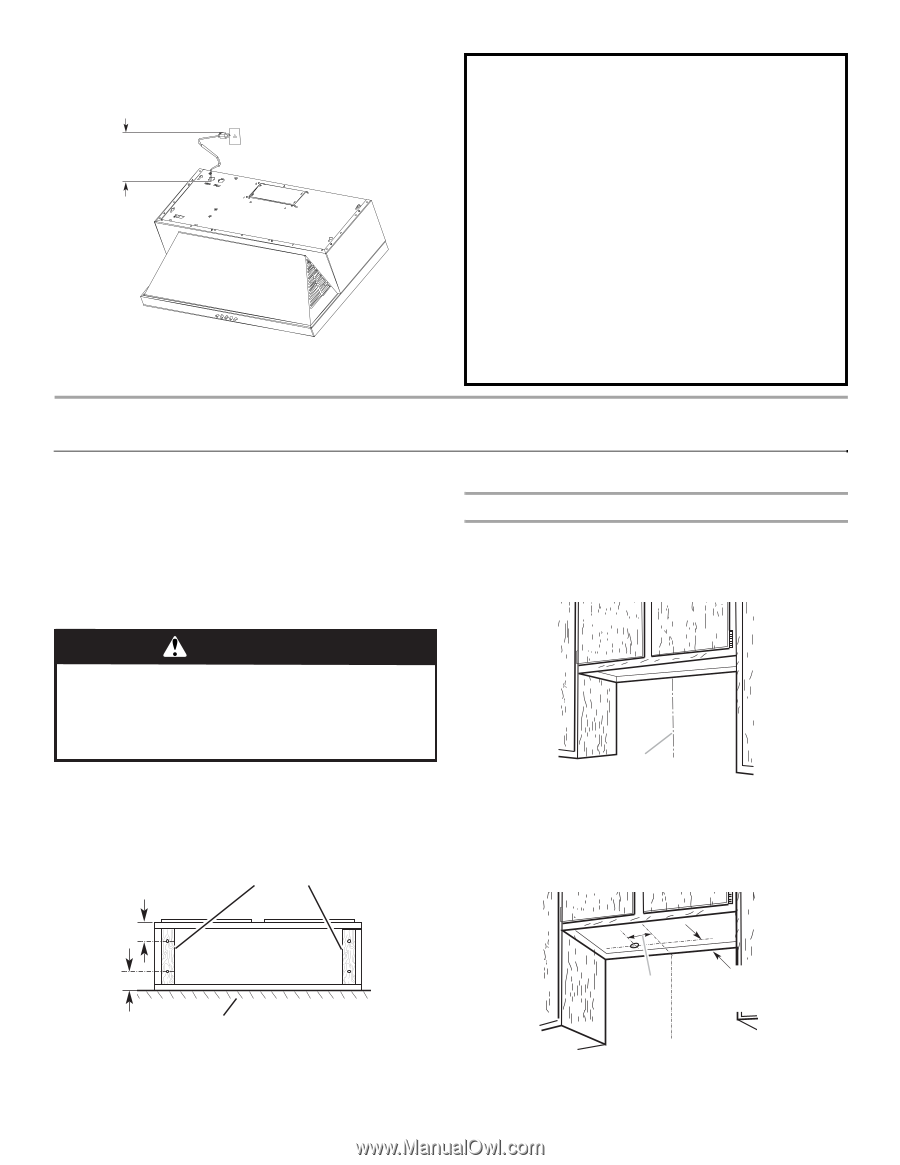
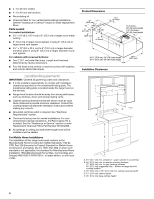
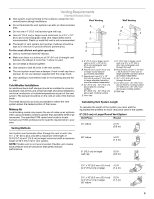
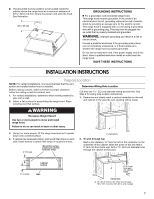
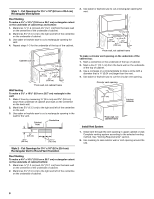
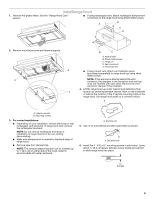
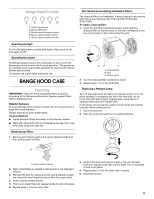
■ The grounded 3 prong outlet is to be located inside the cabinet above the range hood at a maximum distance of 33 85.0 cm) from where the power cord exits the hood. See illustration. 33 85 cm) GROUNDING INSTRUCTIONS ■ For a grounded, cord-connected range hood: This range hood must be grounded. In the event of an electrical short circuit, grounding reduces the risk of electric shock by providing an escape wire for the electric current. This range hood is equipped with a cord having a grounding wire with a grounding plug. The plug must be plugged into an outlet that is properly installed and grounded. WARNING: Improper grounding can result in a risk of electric shock. Consult a qualified electrician if the grounding instructions are not completely understood, or if doubt exists as to whether the range hood is properly grounded. Do not use an extension cord. If the power supply cord is too short, have a qualified electrician install an outlet near the range hood. SAVE THESE INSTRUCTIONS INSTALLATION INSTRUCTIONS Prepare Location NOTE: For vented installations, it is recommended that the vent system be installed before hood is installed. Determine Wiring Hole Location Before making cutouts, make sure there is proper clearance within the ceiling or wall for exhaust vent. 1. For vented installations, determine which venting method to use: roof or wall. 2. Select a flat surface for assembling the range hood. Place covering over that surface. Cut only one 1¹⁄₄" (3.2 cm) diameter wiring access hole. See Step 2 for wiring hole location instructions. 1. Determine and clearly mark a vertical centerline on the wall and cabinet in the area the vent opening will be made. WARNING Excessive Weight Hazard Use two or more people to move and install range hood. Failure to do so can result in back or other injury. 3. Using 2 or more people, lift the range hood and set it upside down onto covered surface. 4. If cabinet has recessed bottom, add wood filler strips on each side. Install screws to attach filler strips in locations shown. 3" (7.6 cm) Wood filler strips (recessed cabinet bottoms only) A A. Centerline 2. To wire through top: Mark a line distance "A" from the left of the centerline on the underside of the cabinet. Mark the point on this line that is 2" (5.0 cm) from back wall. Drill a 1¼" (3.0 cm) diameter hole through the cabinet at this point. Cabinet bottom 3" (7.6 cm) Wall 2" (5.1 cm) A from wall, not cabinet frame Centerline A. 12" (30.5 cm) for 30" (76.2 cm) models 12¼" (31.1 cm) for 36" (91.4 cm) models 7
-
 1
1 -
 2
2 -
 3
3 -
 4
4 -
 5
5 -
 6
6 -
 7
7 -
 8
8 -
 9
9 -
 10
10 -
 11
11 -
 12
12 -
13
-
14
-
15
-
16
-
17
-
18
-
19
-
20
-
21
-
22
-
23
-
24
-
25
-
26
-
27
-
28
 |
 |