Whirlpool W8FXNGMWD User Instructions - Page 6
Adjust the Doors - refrigerator parts
 |
UPC - 883049176598
View all Whirlpool W8FXNGMWD manuals
Add to My Manuals
Save this manual to your list of manuals |
Page 6 highlights
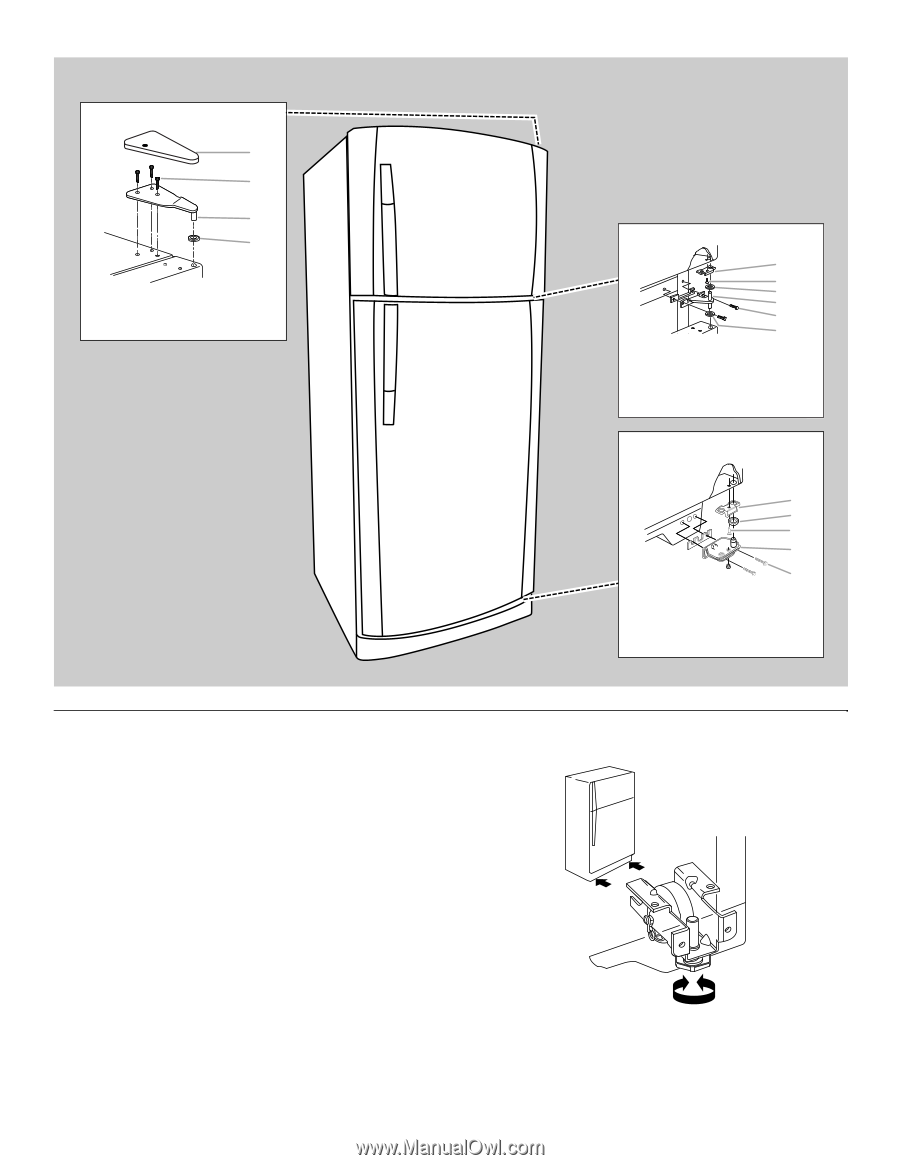
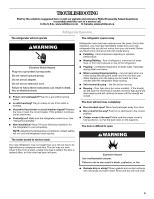
Top Hinge A B C D A. Top Hinge Cover B. 5/16" Hex-Head Hinge Screws C. Top Hinge D. Spacer Door Removal & Replacement Center Hinge A B C D E F A. Door Stop B. Door Stop Screw C. Spacer D. Center Hinge E. 5/16" Hex-Head Hinge Screws F. Spacer Bottom Hinge A B C D E A. Door Stop B. Spacer C. Door Stop Screw D. Bottom Hinge E. 5/16" Hex-Head Hinge Screws Adjust the Doors Your refrigerator has two front adjustable rollers - one on the right and one on the left. If your refrigerator seems unsteady or you want the doors to close easier, adjust the refrigerator's tilt using the instructions below. Style 1 Depending on your model, your refrigerator may have leveling legs (Style 1) or leveling screws (Style 2). They are part of the front roller assemblies which are found at the base of the refrigerator on either side. 1. Turn the leveling legs or leveling screws to the right to raise that side of the refrigerator or to the left to lower that side. It may take several turns to adjust the tilt of the refrigerator. NOTE: Having someone push against the top of the refrigerator takes some weight off the leveling screws and rollers. This makes it easier to adjust the screws. 2. Open both doors again and be sure that they close as easily as you like. If not, tilt the refrigerator slightly more to the rear by turning both leveling screws to the right. It may take several more turns, and you should turn both leveling screws the same amount. 6
-
 1
1 -
 2
2 -
 3
3 -
 4
4 -
 5
5 -
 6
6 -
 7
7 -
 8
8 -
 9
9 -
 10
10 -
 11
11 -
 12
12 -
13
-
14
-
15
-
16
-
17
-
18
-
19
-
20
-
21
-
22
-
23
-
24
-
25
-
26
-
27
-
28
-
29
-
30
-
31
-
32
-
33
-
34
-
35
-
36
 |
 |