Whirlpool WCG55US0HB Instruction Sheet - Page 5
Burner Models for Kit W10676662, To Convert Standard Burner, To Convert Dual Tier Ultra and Dual
 |
View all Whirlpool WCG55US0HB manuals
Add to My Manuals
Save this manual to your list of manuals |
Page 5 highlights
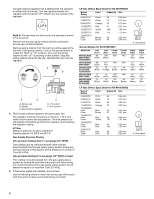
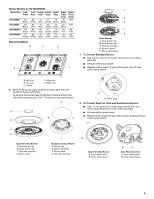
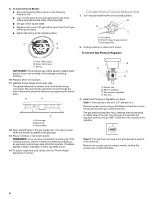
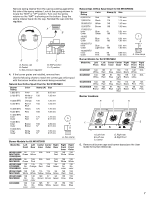
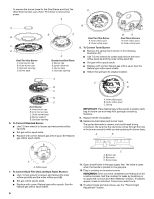
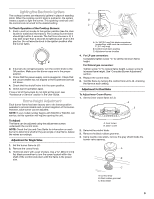
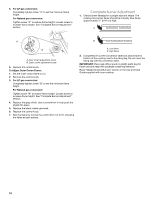
Burner Models for Kit W10676662 Model No. Left Left Center Center Right Front Rear Inner Outer Rear KCGS550E 89 66 Black White KCGS556E 89 66 Black white KCGS950ES 89 66 Black White KCGS956ES 97 66 Orange White 45 Blue 45 Blue 45 Blue 45 Blue 97 Brown 101 Yellow 97 Brown 105 Red 70 Green 70 Green 70 Green 70 Green Right Front Inner 89 Black 89 Black 40 Pink 40 Pink Right Front Outer N/A N/A 80 Pink 80 Pink Burner locations B C D A E A B C D E Torch Burner A. Inner burner cap B. Inner burner base C. Outer burner base D. Burner support E. Gas tube opening 7. To Convert Standard Burner: ■ Use 7.0 mm wrench to loosen and remove the orifice spud (A). ■ Set gas orifice spud aside. ■ Replace with correct LP gas orifice spud. See LP gas orifice spud charts. A. Left front B. Left rear C. Center D. Right rear E. Right front 6. Remove all burner caps and burner bases (see the User Guide for burner reference). To remove the burner base for the Dual Flame and Dual Tier Ultra Torch burners use a Torx® T10 driver to remove the screw. A A B D B A A. Orifice spud 8. To Convert Dual Tier Ultra and Dual Flame Burners: ■ Use 7.0 mm wrench to loosen and remove the inner orifice spud (A) and the outer orifice spud (B). ■ Set gas orifice spuds aside. ■ Replace with correct LP gas orifice spuds. See the LP gas orifice spud charts. A C D Dual Tier Ultra Burner A. Inner burner cap B. Outer burner cap C. Gas tube opening D. Burner base C Standard and Dual Flame A. Burner cap B. Igniter electrode C. Burner base D. Gas tube opening B Dual Tier Ultra Burner A. Inner orifice spud B. Outer orifice spud B A Dual Flame Burners A. Inner orifice spud B. Outer orifice spud 5
-
 1
1 -
 2
2 -
 3
3 -
 4
4 -
 5
5 -
 6
6 -
 7
7 -
 8
8 -
 9
9 -
 10
10 -
 11
11 -
12
-
13
-
14
-
15
-
16
-
17
-
18
-
19
-
20
 |
 |
