Whirlpool WDTA50SAHV Installation Guide - Page 10
Built-up floors, add shims as needed, Remove foam block, ELECTRICAL CONNECTION, If installing into
 |
View all Whirlpool WDTA50SAHV manuals
Add to My Manuals
Save this manual to your list of manuals |
Page 10 highlights
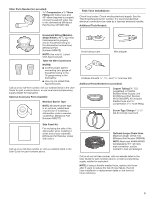
5. Built-up floors - add shims as needed If installing into a 331/2" (851 mm) opening Built-up floors: If the kitchen floor is higher than the cabinet opening's floor - for example, the kitchen floor tile does not extend into the cabinet opening - add shims, as needed, in the area shown to bring the dishwasher up to 34" (864 mm) below the countertop. NOTE: Shims must be securely attached to floor to avoid movement when the dishwasher is in use. 6. Remove foam block Cut insulation blanket along perforation for cabinet opening height of 331/2" (851 mm). For other cabinet opening heights, do not cut the insulation blanket. ELECTRICAL CONNECTION - For Direct Wire, begin with Step 7 - For Power Cord, wait until Step 22 7. Direct wire - route cable Foam block Remove and discard the foam blocks (if blocks are present; not all models have them) located above the front legs on each side of the dishwasher. The blocks cover the rope/link pulleys on the dishwasher. If installing with direct wire, route the cable as shown. Route cable from power supply through cabinet hole. (Cable must extend to the right front side of cabinet opening.) Tape cable to the floor in area shown. This will prohibit cable from moving when dishwasher is moved into cabinet opening. NOTE: If removing a previous dishwasher with a power cord, you will need to transfer the power cord to the new dishwasher. 10
-
 1
1 -
2
-
3
-
4
-
 5
5 -
 6
6 -
 7
7 -
 8
8 -
 9
9 -
 10
10 -
 11
11 -
 12
12 -
 13
13 -
 14
14 -
 15
15 -
16
-
17
-
18
-
19
-
20
-
21
-
22
-
23
-
24
-
25
-
26
-
27
-
28
-
29
-
30
-
31
-
32
-
33
-
34
-
35
-
36
-
37
-
38
-
39
-
40
-
41
-
42
-
43
-
44
-
45
-
46
-
47
-
48
-
49
-
50
-
51
-
52
-
53
-
54
-
55
-
56
-
57
-
58
-
59
-
60
-
61
-
62
-
63
-
64
-
65
-
66
-
67
-
68
-
69
-
70
-
71
-
72
-
73
-
74
-
75
-
76
 |
 |
