Whirlpool WEC310SAGS Installation Instructions - Page 14
Verify Anti-Tip Bracket Is Installed and, Engaged, Remove/Reinstall Toe Panel, Oven Door
 |
View all Whirlpool WEC310SAGS manuals
Add to My Manuals
Save this manual to your list of manuals |
Page 14 highlights
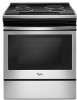
Verify Anti-Tip Bracket Is Installed and Engaged 1. Slide range into final location, making sure rear leveling leg slides into anti-tip bracket. 2. Remove the toe panel. 3. Use a flashlight to look underneath the bottom of the range. 4. Visually check that the rear range foot is inserted into the slot of the anti-tip bracket. 5. Replace the toe panel. IMPORTANT: If the range is moved to adjust the leveling legs, verify that the anti-tip bracket is engaged by repeating steps 1 to 5. Remove/Reinstall Toe Panel To Remove: Pull upward and out to disengage the studs. Oven Door For normal range use, it is not suggested to remove the oven door. However, if removal is necessary, make sure the oven is off and cool. Then, follow these instructions. The oven door is heavy. To Remove: 1. Open oven door all the way. 2. Pinch the hinge latch between two fingers and pull forward. Repeat on other side of oven door. A A. Hinge latch 3. Close the oven door as far as it will shut. 4. Lift the oven door while holding both sides. Continue to push the oven door closed and pull it away from the oven doorframe. 1 2 To Reinstall: Reinstall the access panel by aligning the studs with the keyhole slots on the range. Press the toe panel forward into the slots and push downward to enage the studs. To Replace: 1. Insert both hanger arms into the door. Be sure that the hinge notches are engaged in the oven doorframe. 1 A 2 A. Hinge notch 2. Open the oven door. The door should be able to open all the way. 3. Move the hinge levers back to the locked position. Check that the door is free to open and close and is level while closed. If it is not, repeat the removal and installation procedures. 14
-
 1
1 -
2
-
3
-
4
-
5
-
6
-
7
-
8
-
 9
9 -
 10
10 -
 11
11 -
 12
12 -
 13
13 -
 14
14 -
 15
15 -
 16
16
 |
 |
