Whirlpool WED8000DW Installation Guide - Page 20
Level Dryer, Connect Vent
 |
View all Whirlpool WED8000DW manuals
Add to My Manuals
Save this manual to your list of manuals |
Page 20 highlights
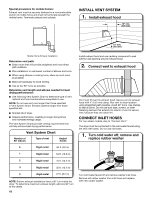
Connect vent 1. Connect vent to exhaust outlet Level dryer 1. Level Dryer Place level here Place level here Using a 4" (102 mm) clamp, connect vent to exhaust outlet in dryer. If connecting to existing vent, make sure vent is clean. Dryer vent must fit over dryer exhaust outlet and inside exhaust hood. Check that vent is secured to exhaust hood with a 4" (102 mm) clamp. 2. Move dryer to final location Check levelness of dryer from side to side. Repeat from front to back. NOTE: The dryer must be level for the moisture sensing system to operate correctly. Move dryer to final location. Avoid crushing or kinking vent. Not Level LEVEL 2. Adjust leveling legs Not Level If dryer is not level, prop up using a wood block. Use wrench to adjust legs up or down, and check again for levelness. 20
-
 1
1 -
2
-
3
-
4
-
5
-
6
-
7
-
8
-
9
-
10
-
11
-
12
-
13
-
14
-
 15
15 -
 16
16 -
 17
17 -
 18
18 -
 19
19 -
 20
20 -
 21
21 -
 22
22 -
 23
23 -
 24
24 -
 25
25 -
26
-
27
-
28
-
29
-
30
-
31
-
32
-
33
-
34
-
35
-
36
-
37
-
38
-
39
-
40
-
41
-
42
-
43
-
44
 |
 |
