Whirlpool WED9500T Use and Care Guide
Whirlpool WED9500T Manual
 |
View all Whirlpool WED9500T manuals
Add to My Manuals
Save this manual to your list of manuals |
Whirlpool WED9500T manual content summary:
- Whirlpool WED9500T | Use and Care Guide - Page 1
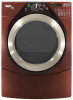
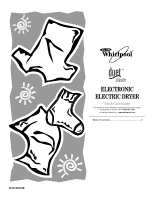
W10122319B ® ® ELECTRONIC ELECTRIC DRYER Use & Care Guide For questions about features, operation/performance, parts, accessories or service, call: 1-800-253-1301 or visit our website at... www.whirlpool.com Table of Contents 2 - Whirlpool WED9500T | Use and Care Guide - Page 2
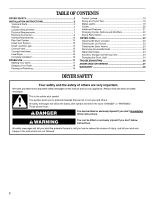
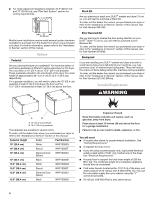
Care 24 Changing the Drum Light 24 TROUBLESHOOTING 25 ASSISTANCE OR SERVICE 27 WARRANTY 28 DRYER SAFETY Your safety and the safety if you don't immediately follow instructions. WARNING You can be killed or seriously injured if you don't follow instructions. All safety messages will tell - Whirlpool WED9500T | Use and Care Guide - Page 3
weather. ■ Do not tamper with controls. ■ Do not repair or replace any part of the dryer or attempt any servicing unless specifically recommended in this Use and Care Guide or in published user-repair instructions that you understand and have the skills to carry out. ■ Do not use fabric softeners - Whirlpool WED9500T | Use and Care Guide - Page 4
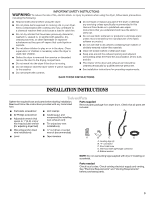
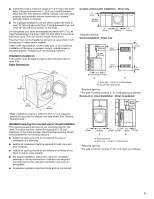
dryer or refer to the "Assistance or Service" section of this manual. Ask for Part Number 8579666. Backguard If you are installing your DUET® washer and dryer (61 cm) of either side of the dryer. See "Electrical Requirements." ■ A sturdy floor to support the total dryer weight of 200 lbs (90.7 kg). - Whirlpool WED9500T | Use and Care Guide - Page 5
Installation clearances The location must be large enough to allow the dryer door to open fully. Dryer Dimensions 51½" (130.81 cm) 38" (96.52 cm) servicing. ■ Additional clearances might be required for wall, door and floor moldings. ■ Additional spacing should be considered on all sides of the dryer - Whirlpool WED9500T | Use and Care Guide - Page 6
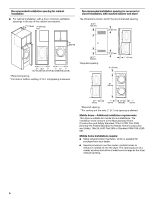
of the cabinet are required. 7"* (17.8 cm) 7"* (17.8 cm) Recommended installation spacing for recessed or closet installation, with stacked washer and dryer The dimensions shown are for the recommended spacing. 48 in.2 * (310 cm2) 3"* (7.6 cm) 9"* (22.9 cm) 5"** 31¹ ₂" 1"* 1" 27" 1" (12.7 cm - Whirlpool WED9500T | Use and Care Guide - Page 7
wires must be insulated. ■ 10-gauge solid copper wire (do not use aluminum). ■ At least 5 ft (1.52 m) long. GROUNDING INSTRUCTIONS ■ For a grounded, cord-connected dryer: This dryer electrician or service representative or personnel if you are in doubt as to whether the dryer is properly grounded - Whirlpool WED9500T | Use and Care Guide - Page 8
in death, fire, or electrical shock. 1. Disconnect power. 2. Remove the hold-down screw and terminal block cover. C D B A A. Neutral ground wire B. External ground conductor screw C. Center, silver-colored terminal block screw D. Terminal block cover and hold-down screw 3. Install strain relief - Whirlpool WED9500T | Use and Care Guide - Page 9
dryer power supply cord* 4-wire connection: Power supply cord 4-wire direct 5" (12.7 cm) A fused disconnect or circuit breaker box* 4-wire connection: Direct Wire 3-wire installation following instructions for your type of electrical connection: 4-wire (recommended) 3-wire (if 4-wire is not - Whirlpool WED9500T | Use and Care Guide - Page 10
terminal block screw. Tighten screw. A C B D E 4-wire connection: Direct wire IMPORTANT: A 4-wire connection is required for mobile homes and where local codes do not permit the use of 3-wire connections. Direct wire cable must have 5 ft (1.52 m) of extra length so dryer can be moved if needed - Whirlpool WED9500T | Use and Care Guide - Page 11
with up turned ends E 1.9 cm) UL listed strain relief F. Ring terminals G. Neutral (white or center wire) 4. Tighten strain relief screws. 5. Insert tab of terminal block cover into slot of dryer rear panel. Secure cover with hold-down screw. 6. You have completed your electrical connection. Now - Whirlpool WED9500T | Use and Care Guide - Page 12
relief F. Grounding path determined by a qualified electrician 3. Connect the other wires to outer terminal block screws. Tighten screws. 4. Tighten strain relief screw. 5. Insert tab of terminal block cover into slot of dryer rear panel. Secure cover with hold-down screw. 6. You have completed - Whirlpool WED9500T | Use and Care Guide - Page 13
instructions can result in death or fire. Good Better WARNING: To reduce the risk of fire, this dryer . ■ Review Vent system Whirlpool Parts and Accessories. For more information, see the "Assistance or Service" section of this manual and supported when the dryer is problems and health problems. 13 - Whirlpool WED9500T | Use and Care Guide - Page 14
are shown. Refer to the manufacturer's instructions. Optional exhaust installations This dryer can be converted to exhaust out the "Assistance or Service" section of this manual. ■ Over-the-Top Installation: Part Number 4396028 ■ Periscope Installation (For use with dryer vent to wall - Whirlpool WED9500T | Use and Care Guide - Page 15
hood. 2. Connect vent to exhaust hood. Vent must fit inside exhaust hood. Secure vent to exhaust hood with 4" (10.2 cm) clamp. 3. Run vent to dryer location. Use the straightest path possible. See "Determine vent path" in "Plan Vent System." Avoid 90º turns. Use clamps to seal all joints. Do not - Whirlpool WED9500T | Use and Care Guide - Page 16
connector. 6. Attach straight end of long hose to "Y" connector. 7. Attach washer cold inlet hose to other end of "Y" connector. Screw on coupling by Check that the dryer is level. See "Level Dryer." 8. For power supply cord installation, plug into an outlet. For direct wire installation, reconnect - Whirlpool WED9500T | Use and Care Guide - Page 17
, or injury to persons, read the IMPORTANT SAFETY INSTRUCTIONS before operating this appliance. This manual covers several different models. Your dryer may not have all of the cycles and features described. The following is a guide to starting your dryer. Please refer to specific sections of this - Whirlpool WED9500T | Use and Care Guide - Page 18
the WRINKLE SHIELD™ feature button if this option is desired. ■ Press the CYCLE SIGNAL button to set end of cycle signal volume to desired level. ■ Press and hold START button until dryer starts (about 1 second). NOTE: Dryness Level is not adjustable for Manual or Steam Cycles. Pressing the Dryness - Whirlpool WED9500T | Use and Care Guide - Page 19
instructions. ■ Remove the load from the dryer Manual Cycles. Status Lights You may follow the progress of your dryer with the drying Status indicator lights. WRINKLE SHIELD™ Feature The WRINKLE SHIELD™ feature light glows during the WRINKLE SHIELD™ feature (when selected). Steam Feature The Steam - Whirlpool WED9500T | Use and Care Guide - Page 20
such as jackets, comforters and pillows. Rearrange the load halfway through the dryer cycle. This will aid in the drying process. Normal Use this cycle Low heat to gently dry items such as lingerie. Manual Preset Cycle Settings Manual Cycles Load Type Temperature TIMED DRY Heavyweight items, - Whirlpool WED9500T | Use and Care Guide - Page 21
in a suitcase or wrinkled from being left in the dryer too long. Steam Preset Cycle Settings Timed Cycles Load Type Default Default Time for the Enhanced Touch Up cycle. Additional Features Drum Light Select Drum Light to turn on the light inside the dryer drum. During a cycle, if Drum Light - Whirlpool WED9500T | Use and Care Guide - Page 22
volume (Loud, Soft or Off) glows green. NOTE: When the WRINKLE SHIELD™ feature is selected and the End of Cycle Signal is on, an audible sound will , follow the instructions on the insert included in your dryer drum. To use the drying rack Do not remove the lint screen. 1. Open dryer door. Changing - Whirlpool WED9500T | Use and Care Guide - Page 23
that would obstruct the flow of combustion and ventilation air. WARNING Explosion Hazard Keep flammable materials and vapors, such as gasoline, away from dryer. Place dryer at least 18 inches (46 cm) above the floor for a garage installation. Failure to do so can result in death, explosion, or fire - Whirlpool WED9500T | Use and Care Guide - Page 24
the hose. Transport hose separately. 4. Make sure leveling legs are secure in dryer base. 5. Use masking tape to secure dryer door. For direct-wired dryers: WARNING Electrical Shock Hazard Disconnect power before servicing. Replace all parts and panels before operating. Failure to do so can result - Whirlpool WED9500T | Use and Care Guide - Page 25
TROUBLESHOOTING First try the solutions suggested here and possibly avoid the cost of a service call... Dryer Operation Dryer will not run ■ Has a household fuse blown, or has a circuit breaker tripped? There may be 2 household fuses or circuit breakers for the dryer. Check that both fuses are - Whirlpool WED9500T | Use and Care Guide - Page 26
, for most installations, the rear of the dryer requires 5" (12.7 cm). See the Installation Instructions. WARNING ■ Has the Air Only temperature setting been selected? Select the right temperature for the types of garments being dried. See "Additional Features." ■ Is the load too large and heavy - Whirlpool WED9500T | Use and Care Guide - Page 27
and service Call the Whirlpool Customer eXperience Center toll free: 1-800-253-1301. Our consultants provide assistance with: ■ Features and specifications on our full line of appliances ■ Installation information ■ Use and maintenance procedures ■ Accessory and repair parts sales ■ Specialized - Whirlpool WED9500T | Use and Care Guide - Page 28
of the Use & Care Guide. After checking "Troubleshooting," additional help can be found by checking the "Assistance or Service" section or by calling Whirlpool. In the U.S.A., call 1-800-253-1301. In Canada, call 1-800-807-6777. 12/05 Keep this book and your sales slip together for future
-
 1
1 -
 2
2 -
 3
3 -
 4
4 -
 5
5 -
 6
6 -
 7
7 -
8
-
9
-
10
-
11
-
12
-
13
-
14
-
15
-
16
-
17
-
18
-
19
-
20
-
21
-
22
-
23
-
24
-
25
-
26
-
27
-
28
 |
 |
ELECTRONIC
ELECTRIC DRYER
Use & Care Guide
For questions about features, operation/performance, parts,
accessories or service, call:
1-800-253-1301
or visit our website at...
www.whirlpool.com
Table of Contents
................................................
2
W10122319B
®
®