Whirlpool WED9620HC Door Reversal Guide - Page 2
Troubleshooting
 |
View all Whirlpool WED9620HC manuals
Add to My Manuals
Save this manual to your list of manuals |
Page 2 highlights
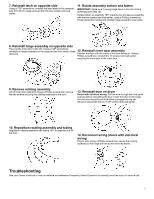
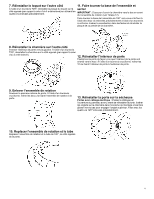
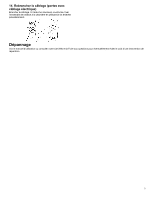
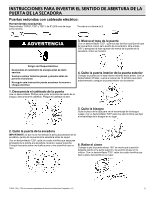
7. Reinstall latch on opposite side Using a T25® screwdriver, reinstall the latch plate on the opposite side from which it was removed with the four screws removed earlier. 11. Rotate assembly bottom and fasten IMPORTANT: Make sure to swing hinge down in front of rotating assembly (see Step 12). Rotate bottom of assembly 180° towards you and secure assembly with the two screws removed earlier, using a Phillips screwdriver. Press tubing into indents and reinstall hinge assembly cover plate. 8. Reinstall hinge assembly on opposite side Flip over the inner door to the left. Using a T20® screwdriver, reinstall the hinge assembly on the opposite side from which it was removed. 12. Reinstall inner door assembly Position the door with the inside of the door facing up. Using a Phillips screwdriver, reinstall the 10 screws removed earlier, securing the inner door to the outer door. 9. Remove rotating assembly Lift off inner door assembly. Using a Phillips screwdriver, remove the two screws securing the rotating assembly to the door. 13. Reinstall door on dryer Doors with electrical wiring: Pull the wire through the front panel opening before reinstalling the door. Insert the tabs on the hinge into the mounting slot and slide down to engage the top tab. Secure in place with the four T25® screws removed earlier. 10. Reposition rotating assembly and tubing Reposition rotating assembly and tubing 180° to opposite side of the door. 14. Reconnect wiring (doors with electrical wiring) Plug in wire. Using a Phillips screwdriver, secure the rotating assembly to the hinge with the screw removed earlier. Troubleshooting See your Owner's Manual or visit our website and reference Frequently Asked Questions to possibly avoid the cost of a service call. 2
-
 1
1 -
 2
2 -
 3
3 -
 4
4 -
 5
5 -
 6
6 -
 7
7 -
 8
8
 |
 |
