Whirlpool WEE760H0DS Installation Guide
Whirlpool WEE760H0DS Manual
 |
View all Whirlpool WEE760H0DS manuals
Add to My Manuals
Save this manual to your list of manuals |
Whirlpool WEE760H0DS manual content summary:
- Whirlpool WEE760H0DS | Installation Guide - Page 1
Location Requirements 3 Electrical Requirements - U.S.A. Only 6 Electrical Requirements - Canada Only 7 INSTALLATION INSTRUCTIONS 8 Unpack Range 8 Install Anti-Tip Bracket 8 Adjust Leveling Legs 9 Level Range 10 Electrical Connection - U.S.A. Only 10 Verify Anti-Tip Bracket is Installed and - Whirlpool WEE760H0DS | Installation Guide - Page 2
RANGE SAFETY Your safety and the safety of others are very important. We have provided many important safety messages in this manual anti-tip bracket if range is moved. Do not operate range without anti-tip bracket installed and engaged. Failure to follow these instructions can result in death - Whirlpool WEE760H0DS | Installation Guide - Page 3
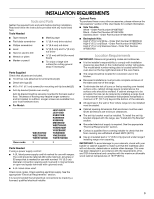
and follow the instructions provided with any tools Model: WEC530H0D WEE730H0D YWEE730H0D JES1450CD JES1450D KSEG700E KSEB900E KSIB900E MES8880D WEE760H0D section of the User Guide for contact information. ■ ¼" (0.64 cm) plywood under range if installing range over carpeting. IMPORTANT: To avoid - Whirlpool WEE760H0DS | Installation Guide - Page 4
⁷⁄₈" (73.3 cm) max. depth from handle to back of range IMPORTANT: Range must be level after installation. Follow the instructions in the "Level Range" section. Using the cooktop as a reference for leveling the range is not recommended. *Range can be raised approximately 1" (2.5 cm) by adjusting the - Whirlpool WEE760H0DS | Installation Guide - Page 5
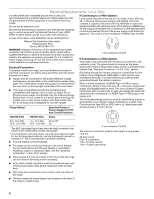
91.4 cm) countertop height. IMPORTANT: If installing a range hood or microwave hood combination above the range, follow the range hood or microwave hood combination installation instructions for dimensional clearances above the cooktop surface. Range may be installed next to combustible walls with - Whirlpool WEE760H0DS | Installation Guide - Page 6
risk of electric shock. Check with a qualified electrician or service technician if you are in doubt as to whether the appliance instructions provided for it here. ■ Range must be connected to the proper electrical voltage and frequency as specified on the model/serial number rating plate. The model - Whirlpool WEE760H0DS | Installation Guide - Page 7
40 or 50** 16.6 - 22.5 KW 12.6 - 18.5 KW 50 Electrically ground range. Failure to do so can result in death, fire, or electrical shock. If codes permit NEC calculated load is less than the total connected load listed on the model/serial number rating plate. **If connecting to a 50-amp circuit, use - Whirlpool WEE760H0DS | Installation Guide - Page 8
the floor behind the range to support the range when it is laid on its back. 4. Using 2 or more people, firmly grasp the range and gently lay it can tip the range and be killed. Install anti-tip bracket to floor or wall per installation instructions. Slide range back so rear range foot is engaged - Whirlpool WEE760H0DS | Installation Guide - Page 9
with the range on its back or with the range supported on 2 legs after the range has been placed back to a standing position. NOTE: To place range back can tip the range and be killed. Install anti-tip bracket to floor or wall per installation instructions. Slide range back so rear range foot is - Whirlpool WEE760H0DS | Installation Guide - Page 10
block. 2. If range is not level, use a wrench or pliers to adjust leveling legs up or down until the range is level. NOTE: Range must be level for Disconnect power before servicing. Use a new 40 amp power supply cord. Plug into a grounded outlet. Failure to follow these instructions can result in - Whirlpool WEE760H0DS | Installation Guide - Page 11
cord through the strain relief on the cord/conduit plate on bottom of range. Allow enough slack to easily attach the wiring to the terminal block. a Phillips screwdriver to remove the ground-link screw from the back of the range. Save the ground-link screw and the end of the ground link under the - Whirlpool WEE760H0DS | Installation Guide - Page 12
UL listed conduit connector in the opening. Electrical Shock Hazard Disconnect power before servicing. Use 8 gauge copper or 6 gauge aluminum wire. Electrically ground range. Failure to follow these instructions can result in death, fire, or electrical shock. Direct Wire Strain Relief 1. Disconnect - Whirlpool WEE760H0DS | Installation Guide - Page 13
easily attach the wiring terminal block. 3. Complete installation following instructions for your type of electrical connection: 4-wire (recommended) 3- Pull the wires through the conduit on cord/conduit plate on bottom of range. Allow enough slack to easily attach the wiring to the terminal block. - Whirlpool WEE760H0DS | Installation Guide - Page 14
lower access cover. A. Metal ground strap B. Discard C. Ground-link screw 2. Use a Phillips screwdriver to remove the ground-link screw from the back of the range. Save the ground-link screw and the end of the ground link under the screw. 3. Pull the wires through the strain relief on bottom of - Whirlpool WEE760H0DS | Installation Guide - Page 15
. Please reference the "Warranty" section of the User Guide to contact service. 8. Move the range into its final location. Check that the range is level by placing a level on the oven bottom. See the "Level Range" section. IMPORTANT: If the range is moved to adjust the leveling legs, verify that - Whirlpool WEE760H0DS | Installation Guide - Page 16
Drawer (on some models) Remove all items from inside the baking drawer, warming drawer or premium storage drawer, and allow the range to cool completely is necessary, make sure the oven is off and cool. Then, follow these instructions. The oven door is heavy. To Remove: 1. Open oven door all the way - Whirlpool WEE760H0DS | Installation Guide - Page 17
. Turn power on. 9. Turn on surface elements and oven. See the User Guide for specific instructions on range operation. If You Need Assistance or Service: Please reference the "Warranty" section of the User Guide to contact service. NOTE: Odors and smoke are normal when the oven is used the first - Whirlpool WEE760H0DS | Installation Guide - Page 18
Notes 18 - Whirlpool WEE760H0DS | Installation Guide - Page 19
est le danger potentiel et vous disent comment réduire le risque de blessure et ce qui peut se produire en cas de non-respect des instructions. Pied de la cuisinière AVERTISSEMENT Risque de basculement Un enfant ou une personne adulte peut faire basculer la cuisinière, ce qui peut causer - Whirlpool WEE760H0DS | Installation Guide - Page 20
l'installation. Lire et observer les instructions fournies avec chacun des outils de la d'autres, se reporter à la section "Accessoires" du guide d'utilisation pour les informations de contact. ■ Trousses de WEE730H0D YWEE730H0D 2 JES1450CD JES1450D KSEG700E KSEB900E KSIB900E MES8880D WEE760H0D - Whirlpool WEE760H0DS | Installation Guide - Page 21
de profondeur maximale entre la poignée et l'arrière de la cuisinière IMPORTANT : La cuisinière doit être d'aplomb après l'installation. Suivre les instructions de la section "Réglage de l'aplomb de la cuisinière". Il n'est pas recommandé d'utiliser la table de cuisson comme référence pour établir - Whirlpool WEE760H0DS | Installation Guide - Page 22
,4 cm) de hauteur. IMPORTANT : En cas d'installation d'une hotte ou d'un ensemble hotte/four à micro-ondes au-dessus de la cuisinière, suivre les instructions fournies avec ces appareils concernant les dégagements à respecter au-dessus de la surface de la table de cuisson. Une cuisinière peut être - Whirlpool WEE760H0DS | Installation Guide - Page 23
protection du circuit 120/240 volts 120/208 volts A Risque de choc électrique Relier la cuisinière à la terre. Le non-respect de cette instruction peut causer un décès, un incendie ou un choc électrique. Si l'on utilise un conducteur distinct de liaison à la terre lorsque les codes le permettent - Whirlpool WEE760H0DS | Installation Guide - Page 24
plancher dans le sens de la longueur derrière la cuisinière, à titre de support de la cuisinière lorsque celle-ci est placée sur sa partie postérieure. Fixer la bride antibasculement au plancher ou au mur, conformément aux instructions d'installation. Faire glisser de nouveau la cuisinière de façon - Whirlpool WEE760H0DS | Installation Guide - Page 25
Fixer la bride antibasculement au plancher ou au mur, conformément aux instructions d'installation. Faire glisser de nouveau la cuisinière de façon bride antibasculement n'est pas installée et engagée. Le non-respect de ces instructions peut causer un décès ou des brûlures graves aux enfants et aux - Whirlpool WEE760H0DS | Installation Guide - Page 26
faire fonctionner la cuisinière si la bride antibasculement n'est pas installée et engagée. Se reporter à la section "Garantie" du guide d'utilisation pour contacter le service de maintenance. 8. Déplacer la cuisinière à son emplacement définitif. Vérifier que la cuisinière est d'aplomb en plaçant - Whirlpool WEE760H0DS | Installation Guide - Page 27
la porte du four pour une utilisation normale. Toutefois, si la dépose est nécessaire, s'assurer que le four est éteint et froid. Ensuite, suivre les instructions ci-dessous. La porte du four est lourde. Démontage : 1. Ouvrir la porte du four complètement. 2. Pincer le loquet de charnière entre les - Whirlpool WEE760H0DS | Installation Guide - Page 28
qualifié. Pour obtenir de l'assistance ou une visite de service : Se reporter à la section "Garantie" du guide d'utilisation pour contacter le service de maintenance. 9. Mettre en marche les éléments de surface et le four. Pour des instructions spécifiques concernant l'utilisation de la cuisinière - Whirlpool WEE760H0DS | Installation Guide - Page 29
Notes 29 - Whirlpool WEE760H0DS | Installation Guide - Page 30
Notes 30 - Whirlpool WEE760H0DS | Installation Guide - Page 31
Notes 31 - Whirlpool WEE760H0DS | Installation Guide - Page 32
W10665255C © 2014. All rights reserved. Used under license in Canada Tous droits réservés. Utilisé sous licence au Canada. 9/14 Printed in U.S.A. Imprimé aux É.-U.
-
 1
1 -
 2
2 -
 3
3 -
 4
4 -
 5
5 -
 6
6 -
 7
7 -
8
-
9
-
10
-
11
-
12
-
13
-
14
-
15
-
16
-
17
-
18
-
19
-
20
-
21
-
22
-
23
-
24
-
25
-
26
-
27
-
28
-
29
-
30
-
31
-
32
 |
 |

INSTALLATION INSTRUCTIONS
30" (76.0 CM) SLIDE-IN ELECTRIC RANGES
INSTRUCTIONS D’INSTALLATION DES CUISINIÈRES
ÉLECTRIQUES ENCASTRABLES DE 30" (76,0 CM)
Table of Contents/Table des matières
RANGE SAFETY
.............................................................................
2
INSTALLATION REQUIREMENTS
................................................
3
Tools and Parts
............................................................................
3
Location Requirements
................................................................
3
Electrical Requirements - U.S.A. Only
.........................................
6
Electrical Requirements - Canada Only
.......................................
7
INSTALLATION INSTRUCTIONS
..................................................
8
Unpack Range
..............................................................................
8
Install Anti-Tip Bracket
.................................................................
8
Adjust Leveling Legs
....................................................................
9
Level Range
................................................................................
10
Electrical Connection - U.S.A. Only
...........................................
10
Verify Anti-Tip Bracket is Installed and Engaged
......................
15
Remove/Replace Drawer
...........................................................
16
Oven Door
..................................................................................
16
Complete Installation
.................................................................
17
SÉCURITÉ DE LA CUISINIÈRE
...................................................
19
EXIGENCES D’INSTALLATION
...................................................
20
Outillage et pièces
......................................................................
20
Exigences d’emplacement
.........................................................
20
Spécifications électriques – Canada seulement
........................
23
INSTRUCTIONS D’INSTALLATION
.............................................
24
Déballage de la cuisinière
..........................................................
24
Installation de la bride antibasculement
....................................
24
Réglage des pieds de nivellement
.............................................
25
Réglage de l’aplomb de la cuisinière
.........................................
26
Vérifier que la bride antibasculement
est bien installée et engagée
......................................................
26
Dépose et repose du tiroir
..........................................................
27
Porte du four
...............................................................................
27
Achever l’installation
..................................................................
28
IMPORTANT:
Save for local electrical inspector's use.
IMPORTANT :
À conserver pour consultation par l'inspecteur local des installations électriques.
W10665255C