Whirlpool WFG505M0BB Owners Manual
Whirlpool WFG505M0BB Manual
 |
View all Whirlpool WFG505M0BB manuals
Add to My Manuals
Save this manual to your list of manuals |
Whirlpool WFG505M0BB manual content summary:
- Whirlpool WFG505M0BB | Owners Manual - Page 1
STANDARD CLEANING GAS RANGE USER INSTRUCTIONS THANK YOU for purchasing this high-quality product. For future reference, please make a note of your 10 RANGE CARE 11 General Cleaning 11 Oven Light 12 Oven Door 12 Removing the Oven Bottom 12 TROUBLESHOOTING 13 ASSISTANCE OR SERVICE 15 W11256515A - Whirlpool WFG505M0BB | Owners Manual - Page 2
call your gas supplier from a neighbor's phone. Follow the gas supplier's instructions. • If you cannot reach your gas supplier, call the fire department. - Installation and service must be performed by a qualified installer, service agency or the gas supplier. WARNING: Gas leaks cannot always be - Whirlpool WFG505M0BB | Owners Manual - Page 3
Over Hazard A child or adult can tip the range and be killed. Verify the anti-tip bracket has been properly installed and engaged per installation instructions. Re-engage anti-tip bracket if range is moved. Do not operate range without anti-tip bracket installed and engaged. Failure to follow these - Whirlpool WFG505M0BB | Owners Manual - Page 4
IMPORTANT SAFETY INSTRUCTIONS WARNING: To reduce the risk of fire, electrical shock, injury worn while using the range. I User Servicing - Do not repair or replace any part of the range unless specifically recommended in the manual. All other servicing should be referred to a qualified technician. - Whirlpool WFG505M0BB | Owners Manual - Page 5
when not cooking. Failure to follow these instructions can result in death or fire. will stop. Use the following chart as a guide when setting heat levels. SETTING LITE High RECOMMENDED prolonged power failure, the surface burners can be lit manually. Hold a lit match near a burner and turn - Whirlpool WFG505M0BB | Owners Manual - Page 6
the surface grates. 7. Turn on the burner. If the burner does not light, check cap alignment. If the burner still does not light, do not service the sealed burner yourself. Contact a trained repair specialist. IMPORTANT: To avoid damage to griddle, the griddle is to be used on the side burners only - Whirlpool WFG505M0BB | Owners Manual - Page 7
Use the following chart as a guide for cookware material characteristics. COOKWARE CHARACTERISTICS Aluminum ■■ Heats frying ■■ Maintains heat for slow cooking. Ceramic or ceramic glass ■■ Follow manufacturer's instructions. ■■ Heats slowly, but unevenly. ■■ Ideal results on low-to-medium heat - Whirlpool WFG505M0BB | Owners Manual - Page 8
amount. The absence of a minus sign means the oven will be warmer by the displayed amount. Use the following chart as a guide. ADJUSTMENT °F (ADJUSTMENT °C) 10°F (6°C) COOKS FOOD ...a little more 20°F (11°C) 30°F (17°C) ...moderately more ...much more -10°F (-6°C) -20°F (-11°C) -30°F (-17 - Whirlpool WFG505M0BB | Owners Manual - Page 9
(5 cm) of space around bakeware and oven walls. Use the following chart as a guide. NUMBER OF PAN(S) 1 2 3 or 4 POSITION ON RACK Center of rack. time. ■■ May need to increase baking time. ■■ Follow manufacturer's instructions. ■■ May need to reduce baking temperatures slightly Oven Vent A A. - Whirlpool WFG505M0BB | Owners Manual - Page 10
Baking and Roasting IMPORTANT: To avoid damage to the interior finish, do not place food or cookware on the oven door or oven bottom. Before baking and roasting, position racks according to the "Positioning Racks and Bakeware" section. To Bake or Roast: 1. Press BAKE. Press TEMP/TIME or TEMP/HOUR " - Whirlpool WFG505M0BB | Owners Manual - Page 11
RANGE CARE General Cleaning IMPORTANT: Before cleaning, make sure all controls are off and the oven and cooktop are cool. Always follow label instructions on cleaning products. Do not wipe down any of the inside surfaces until the oven has completely cooled down. To avoid breaking the glass, do - Whirlpool WFG505M0BB | Owners Manual - Page 12
, it is not suggested to remove the oven door. However, if removal is necessary, make sure the oven is off and cool. Then, follow these instructions. The oven door is heavy. To Remove: 1. Open the oven door. Insert the hinge locks into both hinge hangers. See following illustration. Do not unlock - Whirlpool WFG505M0BB | Owners Manual - Page 13
problem continues, call an electrician. ■■ Is the main or regulator gas shutoff valve in the off position? See the Installation Instructions gas shutoff in the off position? Contact a designated service technician or see the Installation Instructions. Oven makes muffled ticking noise when in use ■■ - Whirlpool WFG505M0BB | Owners Manual - Page 14
service technician to check the air/gas mixture or see the Installation Instructions. level? Level the range. See the Installation Instructions. ■■ Does the oven temperature calibration need Is the ignition system broken? Contact a designated service technician to replace it. ■■ Has a household - Whirlpool WFG505M0BB | Owners Manual - Page 15
Before calling for assistance or service, please check "Troubleshooting." It may save you the cost of a service call. If you still need help, check the contact information on the Certificate of Warranty that accompanies the product. When calling, please know the purchase - Whirlpool WFG505M0BB | Owners Manual - Page 16
INSTRUCTIONS D'UTILISATION DE LA CUISINIÈRE À GAZ À NETTOYAGE STANDARD Nous vous REMERCIONS d'avoir acheté ce produit de haute qualité. Pour référence ultérieure, consignez ral 28 Lampe du four 29 Porte du four 29 Enlèvement du panneau au fond du four 30 DÉPANNAGE 30 ASSISTANCE OU SERVICE 32 - Whirlpool WFG505M0BB | Owners Manual - Page 17
le fournisseur de gaz à partir du téléphone d'un voisin. Suivre ses instructions. • À défaut de joindre votre fournisseur de gaz, appeler les pompiers entretien doivent être effectués par un installateur qualifié, une agence de service ou le fournisseur de gaz. AVERTISSEMENT : L'odorat ne permet pas - Whirlpool WFG505M0BB | Owners Manual - Page 18
La bride antibasculement Dans des conditions de service normales, la cuisinière ne bascule pas cuisinière si la bride antibasculement n'est pas installée et engagée. Le non-respect de ces instructions peut causer un décès ou des brûlures graves aux enfants et aux adultes. Bride antibasculement Pied - Whirlpool WFG505M0BB | Owners Manual - Page 19
IMPORTANTES INSTRUCTIONS DE SÉCURITÉ AVERTISSEMENT : Pour réduire le risque d'incendie, de choc ne doivent pas être laissés seuls ou sans surveillance dans la pièce où la cuisinière est en service. Ne jamais laisser les enfants s'asseoir ou se tenir sur une partie quelconque de la cuisinière. I - Whirlpool WFG505M0BB | Owners Manual - Page 20
IMPORTANTES INSTRUCTIONS DE SÉCURITÉ I Nettoyer la table de cuisson avec prudence - Si une éponge ou un chiffon mouillé est utilisé pour essuyer les renversements du four et les surfaces près de ces ouvertures, les portes du four, et les hublots des portes du four. CONSERVEZ CES INSTRUCTIONS 20 - Whirlpool WFG505M0BB | Owners Manual - Page 21
. Fermer tous les réglages lorsque la cuisson est terminée. Le non-respect de ces instructions peut causer un décès ou un incendie. RÉGLAGE UTILISATION RECOMMANDÉE LITE (allumage) ■■ Les déclics cesseront. Utiliser le tableau suivant comme guide lors du réglage des niveaux de chaleur. 21 - Whirlpool WFG505M0BB | Owners Manual - Page 22
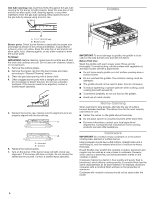
Brûleurs de surface A 4. Nettoyer les orifices de brûleur obstrués avec une épingle droite tel qu'indiqué. Ne pas agrandir ni déformer l'orifice. Ne pas utiliser un cure-dents en bois. Si le brûleur a besoin d'être ajusté, contacter un technicien de réparation qualifié. B A. Chapeau de brûleur B. - Whirlpool WFG505M0BB | Owners Manual - Page 23
Pour plus de renseignements, communiquez avec votre service local d'agriculture. Les compagnies qui fabriquent des gril. Utiliser le tableau suivant comme guide pour les caractéristiques du matériau pour une cuisson lente. ■■ Suivre les instructions du fabricant. ■■ Chauffe lentement mais iné - Whirlpool WFG505M0BB | Owners Manual - Page 24
affiché. L'absence de signe moins signifie que le four sera plus chaud du nombre de degrés affiché. Utiliser le tableau suivant comme guide. ADJUSTEMENT EN °F CUIT LES ALIMENTS (ADJUSTEMENT EN °C) 10 °F (6 °C) ...un peu plus 20 °F (11 °C) ...modérément plus 30 °F (17 °C) ...beaucoup plus -10 - Whirlpool WFG505M0BB | Owners Manual - Page 25
pour le cuire uniformément. Laisser 2" (5 cm) entre les ustensiles de cuisson et les parois du four. Se servir du tableau suivant comme guide. NOMBRE POSITION SUR LA GRILLE D'USTENSILES Positionnement des grilles et des 1 ustensiles de cuisson 2 Centre de la grille. Côte à côte ou légèrement - Whirlpool WFG505M0BB | Owners Manual - Page 26
recommandé dans la recette. Se servir du tableau suivant comme guide. USTENSILES DE CUISSON AU FOUR/ RÉSULTATS Aluminium légèrement coloré cuisson. ■■ Peut nécessiter d'augmenter le temps de cuisson. ■■ Suivre les instructions du fabricant. ■■ Peut nécessiter de réduire légèrement la température de - Whirlpool WFG505M0BB | Owners Manual - Page 27
Cuisson au gril GRIL Le gril est situé en dessous de la porte du four. Utiliser une grille de four pour cuire au gril. Pour retirer une grille, la tirer jusqu'à la position de butée, soulever l'avant, puis extraire. Suivre les étapes dans l'ordre inverse pour réinstaller la grille. Toujours fermer - Whirlpool WFG505M0BB | Owners Manual - Page 28
nettoyage, s'assurer que toutes les commandes sont désactivées et que le four et la table de cuisson sont refroidis. Toujours suivre les instructions sur les étiquettes des produits nettoyants. Ne nettoyer aucune surface intérieure jusqu'au complet refroidissement du four. Pour éviter de briser la - Whirlpool WFG505M0BB | Owners Manual - Page 29
nettoyage : ■■ Tampon en laine d'acier ■■ Nettoyant à four : Suivre les instructions du fabricant GRILLES DU FOUR ET DE RÔTISSAGE Méthode de nettoyage : ■■ du four. Insérer les verrous de charnière dans les deux supports de charnière (voir l'illustration suivante). Ne pas déverrouiller les charni - Whirlpool WFG505M0BB | Owners Manual - Page 30
la section "Brûleurs de surface". ■■ Le mélange air/gaz est-il correct? Contacter un technicien de service désigné pour vérifier le mélange air/gaz ou voir les instructions d'installation. ■■ Utilise-t-on du gaz propane? La cuisinière a peut-être été convertie incorrectement. Contacter un technicien - Whirlpool WFG505M0BB | Owners Manual - Page 31
des commandes". ■■ Le robinet principal d'arrêt ou de réglage du gaz est-il à la position fermée? Contacter un technicien de service désigné ou voir les instructions d'installation. Le four émet un tic-tac sourd durant l'utilisation ■■ Ce bruit est normal et se produit lorsque le brûleur du - Whirlpool WFG505M0BB | Owners Manual - Page 32
durées de cuisson plus longues. Le brûleur du gril ne s'allume pas ■■ Le système d'allumage est-il brisé? Contacter un technicien de service désigné pour le remplacer. ■■ Un fusible est-il grillé ou le disjoncteur s'est-il déclenché? Remplacer le fusible ou réenclencher le disjoncteur. Si le probl - Whirlpool WFG505M0BB | Owners Manual - Page 33
INSTRUCCIONES DE LIMPIEZA ESTÁNDAR PARA EL USUARIO DE LA ESTUFA A GAS LE AGRADECEMOS la compra de este producto de alta calidad. Para referencia futura, tome nota de los números de modelo y de serie de su producto. Puede encontrarlos en la etiqueta de la esquina superior izquierda del marco frontal. - Whirlpool WFG505M0BB | Owners Manual - Page 34
SEGURIDAD DE LA ESTUFA Su seguridad y la seguridad de los demás es muy importante. Hemos incluido muchos mensajes importantes de seguridad en este manual y en su electrodoméstico. Lea y obedezca siempre todos los mensajes de seguridad. Este es el símbolo de alerta de seguridad. Este símbolo le - Whirlpool WFG505M0BB | Owners Manual - Page 35
Soporte antivuelco La estufa no se volcará durante el uso normal. Sin embargo, la estufa se puede voltear si aplica mucha fuerza o peso sobre la puerta abierta sin tener el soporte antivuelco sujeto al piso adecuadamente. ADVERTENCIA Peligro de Vuelco Un niño o un adulto puede volcar accidentalmente - Whirlpool WFG505M0BB | Owners Manual - Page 36
unidades exteriores o el fondo del horno, excepto como lo sugiera el manual. La instalación inapropiada de estos forros puede dar lugar a riesgos de alguna de la estufa a menos que se recomiende específicamente en el manual. Cualquier otro servicio se debe dejar en las manos de un técnico competente - Whirlpool WFG505M0BB | Owners Manual - Page 37
protectores para el forro del horno de ningún tipo en o alrededor de cualquier parte del horno. I Limpie únicamente las piezas enumeradas en el manual. I Antes de realizar la autolimpieza del horno - quite la charola para asar a la parrilla y otros utensilios. Para unidades con campana de ventilaci - Whirlpool WFG505M0BB | Owners Manual - Page 38
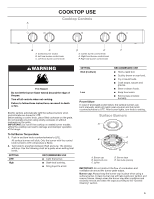
USO DE LA SUPERFICIE DE COCCIÓN Controles de la superficie de cocción A B C D E F A. Localizador de quemadores de superficie B. Perilla de control del quemador trasero izquierdo C. Perilla de control del quemador delantero izquierdo D. Perilla de control del quemador central E. Perilla de - Whirlpool WFG505M0BB | Owners Manual - Page 39
Abertura del tubo de gas: Debe haber flujo libre de gas a través de la abertura del tubo de gas para que el quemador se encienda como es debido. Mantenga esa zona libre de suciedad y no permita que ingresen derrames, alimentos, agentes de limpieza ni otros materiales a la abertura del tubo de gas. - Whirlpool WFG505M0BB | Owners Manual - Page 40
Use la siguiente tabla como guía para ver las características de los materiales de los utensilios de cocina. UTENSILIOS DE COCINA CARACTERÍSTICAS Aluminio ■■ Se calienta de manera rápida y uniforme. ■■ Sirve para todos los tipos de cocción ■■ Los espesores medianos o pesados son óptimos para - Whirlpool WFG505M0BB | Owners Manual - Page 41
Fahrenheit y Celsius La temperatura está prefijada en Fahrenheit, pero puede cambiarse a Celsius. Para cambiar: Presione y sostenga BROIL (Asar a la parrilla) por 5 segundos. Se escuchará un tono y aparecerá "C" en la pantalla. Repita el procedimiento para volver a Fahrenheit. Para salir del modo, - Whirlpool WFG505M0BB | Owners Manual - Page 42
Posición de las parrillas y los utensilios para hornear IMPORTANTE: Para evitar daños permanentes en el acabado de porcelana, no coloque alimentos ni utensilios para hornear directamente sobre la puerta o el piso del horno. Parrillas ■■ Coloque las parrillas antes de encender el horno. ■■ No coloque - Whirlpool WFG505M0BB | Owners Manual - Page 43
Cómo hornear y asar IMPORTANTE: Para evitar daños permanentes en el acabado del interior, no coloque alimentos ni utensilios de cocción sobre la puerta o la base del horno. Antes de hornear o asar, coloque las parrillas según la sección "Posición de las parrillas y los utensilios para hornear". Para - Whirlpool WFG505M0BB | Owners Manual - Page 44
TABLA PARA ASAR A LA PARRILLA Pechugas de Para obtener mejores resultados, coloque los alimentos a 3" pollo, sin hueso, No 2 (7,0 cm) o más del elemento para asar. Los tiempos son solamente con hueso No 2 una guía y pueden necesitar ajustarse para los alimentos y gustos individuales. El - Whirlpool WFG505M0BB | Owners Manual - Page 45
Método de limpieza: ■■ Estropajo plástico no abrasivo y limpiador abrasivo suave: Limpie apenas la superficie de cocción, las rejillas y las tapas se hayan enfriado. ■■ Lavavajillas (solo las rejillas, no las tapas): Use el ciclo más potente. Los restos de alimentos cocidos deben ponerse en remojo o - Whirlpool WFG505M0BB | Owners Manual - Page 46
2. Sostenga la puerta del horno de modo que el borde superior de cada ranura de la puerta esté en posición horizontal. Introduzca la bisagra de la puerta en las ranuras de la bisagra. 3. Incline la parte superior de la puerta hacia la estufa. Inserte la bisagra inferior de la puerta, con la muesca - Whirlpool WFG505M0BB | Owners Manual - Page 47
■■ ¿La mezcla de aire y gas es correcta? Contacte a un técnico de servicio designado para que verifique la mezcla de aire y gas, o consulte las Instrucciones de instalación. ■■ ¿Se está usando gas propano? Es probable que el electrodoméstico haya sido convertido incorrectamente. Póngase en contacto - Whirlpool WFG505M0BB | Owners Manual - Page 48
, tenga a mano la fecha de compra y los números completos de modelo y de serie del aparato. Esta información nos ayudará a atender mejor su solicitud. W11256515A ®/™ ©2018 Whirlpool. All rights reserved. Tous droits réservés. Todos los derechos reservados. 07/18
-
 1
1 -
 2
2 -
 3
3 -
 4
4 -
 5
5 -
 6
6 -
 7
7 -
8
-
9
-
10
-
11
-
12
-
13
-
14
-
15
-
16
-
17
-
18
-
19
-
20
-
21
-
22
-
23
-
24
-
25
-
26
-
27
-
28
-
29
-
30
-
31
-
32
-
33
-
34
-
35
-
36
-
37
-
38
-
39
-
40
-
41
-
42
-
43
-
44
-
45
-
46
-
47
-
48
 |
 |

THANK YOU for purchasing this high-quality product.
For future reference, please make a note of your product model and serial numbers. These can be found on the label located
on the upper right corner of the front frame.
Model Number __________________________________________
Serial Number ___________________________________________
Table of Contents
STANDARD CLEANING
GAS RANGE
USER INSTRUCTIONS
W11256515A
RANGE SAFETY
.............................................................................
2
The Anti-Tip Bracket
....................................................................
3
COOKTOP USE
..............................................................................
5
Cooktop Controls
.........................................................................
5
Griddle
..........................................................................................
6
Home Canning
.............................................................................
6
Cookware
.....................................................................................
6
Display
..........................................................................................
7
Oven Indicator Lights
...................................................................
7
Start
..............................................................................................
7
Clock
............................................................................................
7
Tones
............................................................................................
7
Fahrenheit and Celsius
.................................................................
8
Timer
.............................................................................................
8
Control Lock
.................................................................................
8
Oven Temperature Control
...........................................................
8
Aluminum Foil
...............................................................................
8
Positioning Racks and Bakeware
................................................
9
Bakeware
......................................................................................
9
Oven Vent
.....................................................................................
9
Baking and Roasting
..................................................................
10
Broiling
........................................................................................
10
RANGE CARE
...............................................................................
11
General Cleaning
........................................................................
11
Oven Light
..................................................................................
12
Oven Door
..................................................................................
12
Removing the Oven Bottom
......................................................
12
TROUBLESHOOTING
..................................................................
13
ASSISTANCE OR SERVICE
.........................................................
15