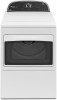
Whirlpool WGD5800BW Use & Care Guide
Whirlpool WGD5800BW Manual
 |
View all Whirlpool WGD5800BW manuals
Add to My Manuals
Save this manual to your list of manuals |
Whirlpool WGD5800BW manual content summary:
- Whirlpool WGD5800BW | Use & Care Guide - Page 1
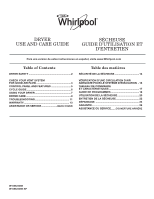
www.Whirlpool.com Table of Contents Table des matières DRYER SAFETY 2 SÉCURITÉ DE LA SÉCHEUSE 14 CHECK YOUR VENT SYSTEM FOR GOOD AIR FLOW 4 CONTROL PANEL AND FEATURES 5 CYCLE GUIDE 6 USING YOUR DRYER 7 DRYER CARE 9 TROUBLESHOOTING 11 WARRANTY 13 ASSISTANCE OR SERVICE BACK COVER - Whirlpool WGD5800BW | Use & Care Guide - Page 2
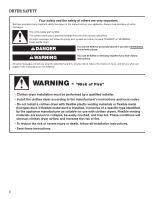
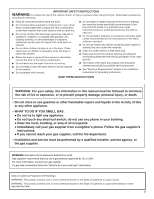
DRYER SAFETY 2 - Whirlpool WGD5800BW | Use & Care Guide - Page 3
3 - Whirlpool WGD5800BW | Use & Care Guide - Page 4
dry laundry. Proper venting will reduce your drying times and improve your energy savings. See "Installation Instructions." The venting system attached to the dryer plays a big role in good air flow. Service calls caused by improper venting are not covered by the warranty and will be paid by the - Whirlpool WGD5800BW | Use & Care Guide - Page 5
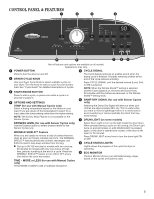
cycles on your dryer. Turn the knob to select a cycle for your laundry load. See "Cycle Guide" for detailed descriptions of cycles. 3 START/PAUSE BUTTON Press to start a cycle, or press once while a cycle is in process to pause it. 4 OPTIONS AND SETTINGS TEMP (for use with Manual Cycles only) Select - Whirlpool WGD5800BW | Use & Care Guide - Page 6
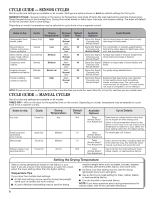
similar load. CYCLE GUIDE - MANUAL CYCLES Not all cycles and settings are available on all models. TIMED DRY - Will run the dryer for the specified dresses, underwear, permanent press fabrics, and some knits. ■■ An Extra-Low heat setting may be used for drying lightweight items such as lingerie. - Whirlpool WGD5800BW | Use & Care Guide - Page 7
wash screen to remove lint. Push the lint screen firmly back into place. For additional cleaning information, see "Dryer Care." Place laundry in the dryer. Close the door. Do not tightly pack the dryer; clothes should be able to tumble freely. 3. Press POWER Press the POWER button to turn on the - Whirlpool WGD5800BW | Use & Care Guide - Page 8
for your load. See the "Cycle Guide" or the display for more information about Manual Cycles only. NOTE: Not all options and settings are available with all cycles. Temp (for use with Manual or Less automatically adjusts the dryness level at which the dryer will shut off. Once a dryness level is set, - Whirlpool WGD5800BW | Use & Care Guide - Page 9
the Dryer Cabinet Lint should be removed every 2 years, or more often, depending on dryer usage. Cleaning should be done by a qualified servicer. . 2. Wet both sides of lint screen with hot water. 3. Wet a nylon brush with hot water and liquid detergent. Scrub lint screen with the brush to remove - Whirlpool WGD5800BW | Use & Care Guide - Page 10
3. Turn bulb counterclockwise. Replace the bulb with a 10-watt appliance bulb only. Replace the cover and secure with the screw. 4. Plug in dryer or reconnect power. Electrical Shock Hazard Disconnect power before servicing. Replace all parts and panels before operating. Failure to do so can result - Whirlpool WGD5800BW | Use & Care Guide - Page 11
TROUBLESHOOTING First try the solutions suggested here or visit our website at www.whirlpool.com/product_help In Canada www.whirlpool.ca for assistance and to possibly avoid a service call. If you experience Possible Causes Solution Clothes are not drying satisfactorily, drying times are too - Whirlpool WGD5800BW | Use & Care Guide - Page 12
TROUBLESHOOTING CONT. First try the solutions suggested here or visit our website at www.whirlpool.com/product_help In Canada www.whirlpool.ca for assistance and to possibly avoid a service call. If you experience Possible Causes Solution Dryer displaying code message Cycle time too short "PF" - Whirlpool WGD5800BW | Use & Care Guide - Page 13
installation of your major appliance, to instruct you on how to use your major appliance, to replace or repair house fuses, or to correct house wiring or plumbing. 3. Service calls to repair or replace appliance light bulbs, air filters, or water filters. Consumable parts are excluded from warranty - Whirlpool WGD5800BW | Use & Care Guide - Page 14
SÉCURITÉ DE LA SÉCHEUSE 14 - Whirlpool WGD5800BW | Use & Care Guide - Page 15
15 - Whirlpool WGD5800BW | Use & Care Guide - Page 16
pour sécher efficacement le linge. Une ventilation adéquate réduit les durées de séchage et accroît les économies d'énergie. Voir les "Instructions d'installation." Le système d'évacuation fixé à la sécheuse joue un rôle important dans la circulation de l'air. Les interventions de dépannage caus - Whirlpool WGD5800BW | Use & Care Guide - Page 17
sélectionner les programmes disponibles sur la sécheuse. Tourner le bouton de programme pour sélectionner un programme correspondant à la charge de linge. Voir "Guide de programmes" pour des descriptions de programmes détaillées. 3 BOUTON START/PAUSE (mise en marche/pause) Appuyer sur ce bouton pour - Whirlpool WGD5800BW | Use & Care Guide - Page 18
ée selon les programmes et options utilisés. GUIDE DE PROGRAMMES - PROGRAMMES DE DÉTECTION Certains : Articles lourds, serviettes, jeans Heavy Duty (service intense) High (élevée) Articles non repassables, aller) Eco Normal (normal éco) Normal Low (basse) Medium (moyenne) Medium (moyenne) - Whirlpool WGD5800BW | Use & Care Guide - Page 19
GUIDE DE PROGRAMMES - PROGRAMMES MANUELS Certains programmes ne sont pas disponibles sur certains modèles. TIMED DRY (séchage doublés ou multicouches. REMARQUE : Pour toute question concernant les températures de séchage pour diverses charges, consulter les instructions sur l'étiquette de soin. 19 - Whirlpool WGD5800BW | Use & Care Guide - Page 20
emballer étroitement la sécheuse; les vêtements doivent pouvoir culbuter librement. 20 Sélectionner le programme souhaité pour la charge. Voir le "Guide de programmes" ou l'affichage pour plus d'informations sur chaque programme. REMARQUE : Tous les réglages et options ne sont pas disponibles avec - Whirlpool WGD5800BW | Use & Care Guide - Page 21
du réglage du degré de séchage. REMARQUE : Le séchage avancé élimine davantage d'humidité de la charge. Le séchage normal est utilisé comme point de départ dans le séchage de détection. Le séchage limité élimine moins d'humidité et est utilisé pour les charges que l'on souhaite placer sur un cintre - Whirlpool WGD5800BW | Use & Care Guide - Page 22
ENTRETIEN DE LA SÉCHEUSE Nettoyer l'emplacement de la sécheuse Éviter de laisser autour de la sécheuse des éléments qui pourraient obstruer la circulation de l'air et empêcher le bon fonctionnement de la sécheuse. Ceci implique de dégager également les éventuelles piles de linge placées devant la sé - Whirlpool WGD5800BW | Use & Care Guide - Page 23
fixés à la base de la sécheuse. 4. Utiliser du ruban adhésif pour fixer la porte de la sécheuse. Réinstallation de la sécheuse Suivre les "Instructions d'installation" pour choisir l'emplacement, régler l'aplomb de la sécheuse et la raccorder. Changement de la lampe du tambour (sur certain modèles - Whirlpool WGD5800BW | Use & Care Guide - Page 24
érées ici ou consulter le site Web www.whirlpool.com/product_help In Canada www.whirlpool.ca pour obtenir de l'aide et pour é de 5" (127 mm) est nécessaire à l'arrière de la sécheuse. Voir les "Instructions d'installation." S'assurer que la porte de la sécheuse est complètement fermée. Appuyer sans - Whirlpool WGD5800BW | Use & Care Guide - Page 25
le site Web www.whirlpool.com/product_help In Canada www.whirlpool.ca pour obtenir de la DEL du bouton de mise en marche clignote Codes de service variables "F# E#" (F1 E1, F3 E1, etc.). Un programme synthétiques. REMARQUE : Se reporter aux instructions figurant sur l'étiquette de soin des vê - Whirlpool WGD5800BW | Use & Care Guide - Page 26
aux instructions jointes à ou fournies avec le produit, Whirlpool Corporation ou Whirlpool Canada LP (ci-après désignées "Whirlpool") Whirlpool autorisé pour déterminer si une autre garantie s'applique. Si vous avez besoin d'un service de réparation, voir d'abord la section "Dépannage" du Guide - Whirlpool WGD5800BW | Use & Care Guide - Page 27
NOTES - Whirlpool WGD5800BW | Use & Care Guide - Page 28
for assistance or service, please check "Troubleshooting" or visit www.whirlpool.com/help. It may save you the cost of a service call. If you still need help, follow the instructions below. When calling, please know the purchase date and the complete model and serial number of your appliance. This
-
 1
1 -
 2
2 -
 3
3 -
 4
4 -
 5
5 -
 6
6 -
 7
7 -
8
-
9
-
10
-
11
-
12
-
13
-
14
-
15
-
16
-
17
-
18
-
19
-
20
-
21
-
22
-
23
-
24
-
25
-
26
-
27
-
28
 |
 |
W10562348B
W10562349B-SP
DRYER
USE AND CARE GUIDE
Table of Contents
Table des matières
DRYER SAFETY
............................................................
2
CHECK YOUR VENT SYSTEM
FOR GOOD AIR FLOW
.................................................
4
CONTROL PANEL AND FEATURES
............................
5
CYCLE GUIDE
...............................................................
6
USING YOUR DRYER
...................................................
7
DRYER CARE
.......................................................................
9
TROUBLESHOOTING
......................................................
11
WARRANTY
........................................................................
13
ASSISTANCE OR SERVICE
.........................
BACK COVER
SÉCURITÉ DE LA SÉCHEUSE
...................................
14
VÉRIFICATION D’UNE CIRCULATION D’AIR
ADÉQUATE POUR LE SYSTÈME D’ÉVACUATION ..16
TABLEAU DE COMMANDE
ET CARACTÉRISTIQUES
...........................................
17
GUIDE DE PROGRAMMES
........................................
18
UTILISATION DE LA SÉCHEUSE
...............................
20
ENTRETIEN DE LA SÉCHEUSE
....................................
22
DÉPANNAGE.
....................................................................
24
GARANTIE.
.........................................................................
26
ASSISTANCE OU SERVICE.
......
COUVERTURE ARRIÈRE
SÉCHEUSE
GUIDE D’UTILISATION ET
D’ENTRETIEN
Para una version de estas instrucciones en español, visite www.Whirlpool.com