Whirlpool WGD6620H Owners Manual 1 - Page 6
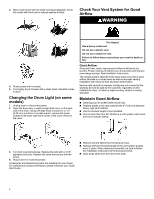
Changing the Drum Light (on some models), Check Your Vent System for Good Airflow, Maintain Good
 |
View all Whirlpool WGD6620H manuals
Add to My Manuals
Save this manual to your list of manuals |
Page 6 highlights
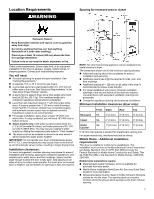
3. Wet a nylon brush with hot water and liquid detergent. Scrub lint screen with the brush to remove residue buildup. Check Your Vent System for Good Airflow WARNING 4. Rinse screen with hot water. 5. Thoroughly dry lint screen with a clean towel. Reinstall screen in dryer. Changing the Drum Light (on some models) 1. Unplug dryer or disconnect power. 2. Open the dryer door. Locate the light bulb cover on the back wall of the dryer. Using a Phillips-head screwdriver or 1/4" (6.35 mm) nut driver or socket wrench, remove the screw located in the lower right-hand corner of the cover. Remove the cover. Fire Hazard Use a heavy metal vent. Do not use a plastic vent. Do not use a metal foil vent. Failure to follow these instructions can result in death or fire. Good Airflow Along with heat, dryers require good airflow to efficiently dry laundry. Proper venting will reduce your drying times and improve your energy savings. See Installation Instructions. The venting system attached to the dryer plays a big role in good airflow. Blocked or crushed vents as well as improper venting installation will reduce air flow and dryer performance. Service calls caused by improper venting are not covered by the warranty and will be paid by the customer, regardless of who installed the dryer. To clean or repair venting, contact a venting specialist. Maintain Good Airflow � Cleaning your lint screen before each load. � Replace plastic or foil vent material with 4" (102 mm) diameter heavy, rigid vent material. � Use the shortest length of vent possible. � Use no more than four 90° elbows in a vent system; each bend and curve reduces airflow. 3. Turn bulb counterclockwise. Replace the bulb with a 10 W appliance bulb only. Replace the cover and secure with the screw. 4. Plug in dryer or reconnect power. Accessories and replacement parts are available for your model. For ordering and contact information, please reference your Quick Start Guide. � Remove lint and debris from the exhaust hood. � Remove lint from the entire length of the vent system at least every 2 years. When cleaning is complete, be sure to follow the Installation Instructions for final product check. � Clear away items from the front of the dryer. 6
-
 1
1 -
 2
2 -
 3
3 -
 4
4 -
 5
5 -
 6
6 -
 7
7 -
 8
8 -
 9
9 -
 10
10 -
 11
11 -
 12
12 -
13
-
14
-
15
-
16
-
17
-
18
-
19
-
20
-
21
-
22
-
23
-
24
-
25
-
26
-
27
-
28
-
29
-
30
-
31
-
32
-
33
-
34
-
35
 |
 |
