Whirlpool WGD7300XW Installation Instructions - Page 13
Connect Vent
 |
UPC - 883049202334
View all Whirlpool WGD7300XW manuals
Add to My Manuals
Save this manual to your list of manuals |
Page 13 highlights
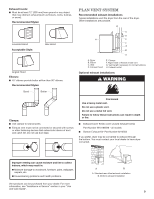
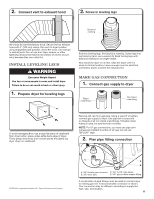
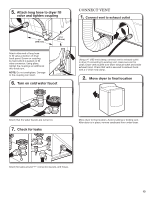
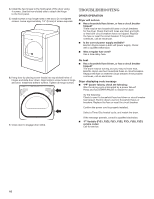
5. Attach long hose to dryer fill valve and tighten coupling Connect vent 1. Connect vent to exhaust outlet 11" (279 mm) 3 3/4" (95 mm) Attach other end of long hose to fill valve at bottom of dryer back panel. Screw on coupling by hand until it is seated on fill valve connector. Using pliers, tighten the couplings an additional two-thirds turn. NOTE: Do not overtighten. Damage to the coupling can result. 6. Turn on cold water faucet Using a 4" (102 mm) clamp, connect vent to exhaust outlet in dryer. If connecting to existing vent, make sure vent is clean. Dryer vent must fit over dryer exhaust outlet and inside exhaust hood. Check that vent is secured to exhaust hood with a 4" (102 mm) clamp. 2. Move dryer to final location Check that the water faucets are turned on. 7. Check for leaks Move dryer to final location. Avoid crushing or kinking vent. After dryer is in place, remove cardboard from under dryer. Check for leaks around "Y" connector, faucets, and hoses. 13
-
 1
1 -
2
-
3
-
4
-
5
-
6
-
7
-
 8
8 -
 9
9 -
 10
10 -
 11
11 -
 12
12 -
 13
13 -
 14
14 -
 15
15 -
 16
16 -
 17
17 -
 18
18 -
19
-
20
-
21
-
22
-
23
-
24
-
25
-
26
-
27
-
28
-
29
-
30
-
31
-
32
-
33
-
34
-
35
-
36
 |
 |
