Whirlpool WOC95EC0A Instruction Sheet - Page 1
Whirlpool WOC95EC0A Manual
 |
View all Whirlpool WOC95EC0A manuals
Add to My Manuals
Save this manual to your list of manuals |
Page 1 highlights
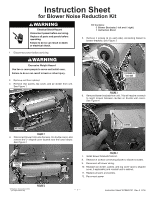
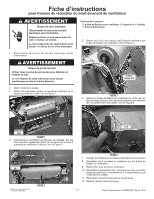
Instruction Sheet for Blower Noise Reduction Kit WARNING electrical Shock hazard Kit Contains: 2 Blower Brackets (1 left and 1 right) 1 Instruction Sheet disconnect power before servicing. INSTALLATION INSTRUCTIONS Replace all parts and panels before operating. Failure to do so can result in death 5. Remove 4 screws (2 on each side) connecting blower to blower brackets. See Figure 3. or electrical shock. Prepare Built-In Oven Remove Oven Door(s) 11.. DcuDetcitsiincdogenionnnteocththepooufiwsneaelrwlboirecinfaogtrioednuserfoirnvrgitchiinnesgot.avlelant.ioAnv.oid drilling or IMPORTANT: Use both hands to remove oven doors. 1. Open the oven door. WARNING Excessive Weight Hazard 2. Locate the oven door latches in both corners of the oven door, and rotate the latches forward to the unlocked position. Use two or more people to move and install oven. Failure to do so can result in back or other injury. 22.. TtooRieanmvsotoaidvlleafltouioonnirt.dfDraoommnaocgtaeub, sisneeetht.tahnedoleveonr onto cardboard prior any portion of the front 3. frRameme ofovrelirfetianrg.panels, top cover, and air divider from unit. 3. RSemeeoFveigtuhree s1h. ipping materials and tape from the oven. 4. Remove the hardware package from inside the bag containing literature. 5. Remove and set aside racks and other parts from inside the oven. 6. If installing a single oven below a cooktop, remove the adhesive backing from the foam strip and press it to the back of the control panel. NOTE: When the cooktop is installed in the cabinet, the top edge of the foam strip should be approximately ³⁄8" (10 mm) from the top edge of the control panel. Make sure the foam strip is positioned against the cabinet face. A (2) screws on B each side figure 3 6. Remove blower brackets from unit. This will require a wrench A. Oven tdooorrelaactchh sinclroecwkesdbetweeBn. cOavveintiedsooor nlatdchouinbulenlowcakleldovens. positioSnee Figure 4. position 3. Grasp the edges of the oven door with both hands and close the oven door until it will no longer close. Lift and pull oven door toward you and remove. Set the oven door(s) aside on a covered work surface. A air divider (3) screws figure 1 4. Disconnect blower from wire harness. On double ovens, also remove the U- shaped cover located near the lower blower. See Figure 2. A. Foam strip 7. Move oven and cardboard close to the oven's final location. u-shaped cover figure 4 7. Install blower brackets from kit. 8. Reattach 4 screws connecting blower to blower brackets. 9. Reconnect all blower wiring. 10. Reattach air divider, panels, and top cover (and U-shaped cover, if applicable) and reinstall unit in cabinet. 11. Replace all parts and panels. 12. Reconnect power. 3. Disconnect blower from wire harness. figure 2 4. Rem©o Wvehi4rlpscoroelwCso(2rpoonraetaiocnh s2i0d1e)6connecting blower to blower brackets. (All Rights Reserved) - 1 - Instruction Sheet W10883107 Rev A 4/16
-
 1
1 -
 2
2
 |
 |
