Whirlpool WOS51EC7H Installation Instructions - Page 2
Built-in Oven Safety, Installation Requirements
 |
View all Whirlpool WOS51EC7H manuals
Add to My Manuals
Save this manual to your list of manuals |
Page 2 highlights
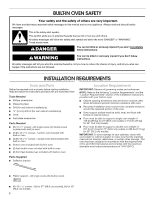
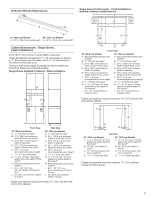
BUILT-IN OVEN SAFETY Your safety and the safety of others are very important. We have provided many important safety messages in this manual and on your appliance. Always read and obey all safety messages. This is the safety alert symbol. This symbol alerts you to potential hazards that can kill or hurt you and others. All safety messages will follow the safety alert symbol and either the word "DANGER" or "WARNING." These words mean: DANGER You can be killed or seriously injured if you don't immediately follow instructions. WARNING You can be killed or seriously injured if you don't follow instructions. All safety messages will tell you what the potential hazard is, tell you how to reduce the chance of injury, and tell you what can happen if the instructions are not followed. INSTALLATION REQUIREMENTS Tools and Parts Gather the required tools and parts before starting installation. Read and follow the instructions provided with any tools listed here. Tools Needed ■■ Phillips screwdriver ■■ Measuring tape ■■ Drill (for wall cabinet installations) ■■ 1/8" (3 mm) drill bit (for wall cabinet installations) ■■ Level ■■ Flat-blade screwdriver Parts Needed ■■ #8-14 x 1" screws - (2) single ovens, (4) double ovens included with built-in oven ■■ (2) #8-18 x 3/8" screws - bottom vent included with built-in oven ■■ (4) #8-18 x 3/8" screws - double oven feet included with built-in oven ■■ Bottom vent included with built-in oven ■■ (2) feet double oven included with built-in oven ■■ (2) front feet double oven included with built-in oven Parts Supplied ■■ Deflector bracket Location Requirements IMPORTANT: Observe all governing codes and ordinances. NOTE: Refer to the following "Location Requirements" and the "Location Requirements" section of the Installation Instructions provided with your built-in oven. ■■ Cabinet opening dimensions that are shown must be used. Given dimensions provide minimum clearance with oven. ■■ Recessed installation area must provide complete enclosure around the recessed portion of the oven. ■■ Oven support surface must be solid, level, and flush with bottom of cabinet cutout. ■■ Floor must be able to support a single oven weight of 129 lbs (59 kg) for 27" (68.6 cm) models or 154 lbs (70 kg) for 30" 76.2 cm) models. ■■ Floor must be able to support a double oven weight of 251 lbs (114 kg) for 27" (68.6 cm) models or 288 lbs (131 kg) for 30" (76.2 cm) models. IMPORTANT: To avoid damage to your cabinets, check with your builder or cabinet supplier to make sure that the materials used will not discolor, delaminate, or sustain other damage. This oven has been designed in accordance with the requirements of UL and CSA International and complies with the maximum allowable wood cabinet temperatures of 194°F (90°C). ■■ Plastic spacers - (2) single ovens, (4) double ovens ■■ #8-18 x 1/8" screws - (2) for 27" (68.6 cm) models), (4) for 30" (76.2 cm) models 2
-
 1
1 -
 2
2 -
 3
3 -
 4
4 -
 5
5 -
 6
6 -
 7
7 -
 8
8 -
9
-
10
-
11
-
12
-
13
-
14
-
15
-
16
-
17
-
18
-
19
-
20
 |
 |
