Whirlpool WRF991BOOM Use & Care Guide - Page 17
Adjust Temperature Set Points, Save/Confirm Temperature Settings, Fast Ice, Filter Status
 |
View all Whirlpool WRF991BOOM manuals
Add to My Manuals
Save this manual to your list of manuals |
Page 17 highlights
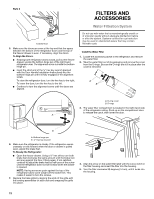
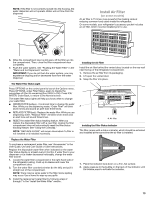
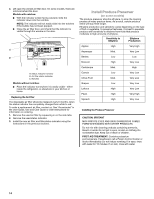
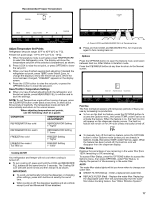
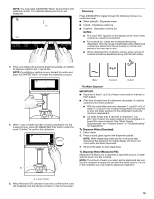
Recommended Freezer Temperature Adjust Temperature Set Points Refrigerator set point range: 33°F to 45°F (0°C to 7°C). Freezer set point range: -5°F to 5°F (-21°C to -15°C). 1. When Temperature mode is activated, press TEMPERATURE to select the Refrigerator zone. The display will show the temperature set point of the selected compartment, as shown. 2. Press LOCK to raise the set point, or press OPTIONS to lower the set point. 3. When you have finished viewing (and adjusting if desired) the refrigerator set point, press TEMP, under Select Zone, to change the display to show the freezer set point. When the zone has been changed, "FREEZER" appears on the display screen. 4. Press the LOCK button to raise the set point, or press the OPTIONS button to lower the set point. Save/Confirm Temperature Settings ■ When you have finished adjusting both the refrigerator and freezer set points, press MEASURED FILL to confirm and to save the settings. NOTE: To exit Temperature mode without saving changes, press the ICE/WATER button under Back at any time, or allow about 60 seconds of inactivity. The temperature mode will turn off automatically and return to the normal screen. When adjusting temperature set points, use the following chart as a guide: CONDITION: TEMPERATURE ADJUSTMENT: REFRIGERATOR too cold REFRIGERATOR Setting 1° higher REFRIGERATOR too warm REFRIGERATOR Setting 1° lower FREEZER too cold FREEZER Setting 1° higher FREEZER too warm / Too little ice FREEZER Setting 1° lower Cooling On/Off Your refrigerator and freezer will not cool when cooling is turned off. ■ To turn cooling off, press and hold the LOCK and MEASURED FILL buttons at the same time for 3 seconds. The Cooling Off icon will blink seven times and then remain lit as shown. IMPORTANT: ■ To avoid unintentionally locking the dispenser or changing other settings, press both buttons at exactly the same time. ■ When cooling is off, the dispenser paddles and all controls except Lock and Measured Fill are disabled. A. Press LOCK and MEASURED FILL at the same time. ■ Press and hold LOCK and MEASURED FILL for 3 seconds again to turn cooling back on. Options Press the OPTIONS button to open the Options menu and select between Fast Ice, Filter Status or Vacation mode. Press the ICE/WATER button at any time to return to the Normal screen. Fast Ice The Fast Ice feature assists with temporary periods of heavy ice use by increasing ice production. ■ To turn on the Fast Ice feature, press the OPTIONS button to access the Options menu, then press TEMP, under Fast Ice to activate the feature. When the feature is on, the Fast Ice icon will appear on the dispenser display screen. The Fast Ice feature will remain on for 24 hours unless manually turned off. ■ To manually turn off the Fast Ice feature, press the OPTIONS button to enter Options mode (unless you are already in Options mode), then press TEMP, under Fast Ice, again. When the feature has been turned off, the Fast Ice icon will disappear from the dispenser display. Filter Status Displays the percentage of use remaining in the water filter (from 100% remaining to 0% remaining). To access Filter Status, press the OPTIONS button to access the Options menu, then press OPTIONS, under Filter Status, to display the percent of life remaining in the water filter. ALSO The water filter status lights will let you know when to change your water filter. ■ ORDER FILTER (Yellow) - Order a replacement water filter. ■ REPLACE FILTER (Red) - Replace the water filter. Replacing the disposable water filter will automatically reset the water filter status tracking feature. See "Water Filtration System." 17
-
 1
1 -
2
-
3
-
4
-
5
-
6
-
7
-
8
-
9
-
10
-
11
-
 12
12 -
 13
13 -
 14
14 -
 15
15 -
 16
16 -
 17
17 -
 18
18 -
 19
19 -
 20
20 -
 21
21 -
 22
22 -
23
-
24
-
25
-
26
-
27
-
28
-
29
-
30
-
31
-
32
-
33
-
34
-
35
-
36
-
37
-
38
-
39
-
40
-
41
-
42
-
43
-
44
-
45
-
46
-
47
-
48
-
49
-
50
-
51
-
52
-
53
-
54
-
55
-
56
-
57
-
58
-
59
-
60
-
61
-
62
-
63
-
64
-
65
-
66
-
67
-
68
-
69
-
70
-
71
-
72
-
73
-
74
-
75
-
76
-
77
-
78
-
79
-
80
-
81
-
82
-
83
-
84
-
85
-
86
-
87
-
88
-
89
-
90
-
91
-
92
-
93
-
94
-
95
-
96
-
97
-
98
-
99
-
100
-
101
-
102
-
103
-
104
-
105
-
106
-
107
-
108
 |
 |
